The Gnosis ML System Build Guide
Table of Contents
(NOTE: to traverse this article click the section title (e.g. Preface) to return here from that section)
Preface
Nothing in the world is worth having or worth doing unless it means effort, pain, difficulty… I have never in my life envied a human being who led an easy life. I have envied a great many people who led difficult lives and led them well.
– Theodore Roosevelt
The gnosis project began innocently: I wanted to build my own machine learning (ML) platform (i.e. server), that I could push code to, train models, and deploy them. I decided I would name the system I was building gnosis, the Greek word for knowledge, as it was indeed “knowledge” that was the driving force behind my ML interest. Little did I realize how much “knowledge” I would need to simply build the ML platform that I vehemently desired.
As I began researching how to build my ML system, I became frustrated at how little there was on actually building ML systems. Most of the articles were about “using” the ML cloud (i.e. google cloud, AWS, floydhub). And while I certainly found articles on the hardware,1,2 there was nothing that truly guided you from hardware selection and assembly, to OS installation, to actually setting up an ML development environment. I spent countless hours reading reviews of hardware, compiling lists of potential motherboards, RAM, GPUs, etc, comparing and contrasting each, and scouring the internet for any and every piece of information on building your own ML system. And finally, after all that work, what resulted, I believe, was truly worth the cost: the ML system I wanted, and a guide to empower others to build their own.
It has been a long journey building this system, and writing this “build guide.” Now having gone through it, I sincerely hope that sharing my journey will help others get the necessary information, insight, and guidance on how to build your own ML platform, without the same frustration and difficulty I faced. Besides, the whole point of building this system was to use it to do actual machine learning, not to be an expert in building computers ;)
Introduction
The gnosis project has one goal: developing a complete ML platform that just works. Notice we use the word “platform” here and not server. Running your ML algorithms on bare-metal is, in the opinion of the author, not sufficient. Hence in the third part of the guide we will discuss using the most “minimalist PaaS”, Dokku, as the interface for your machine learning server. Still this portion of the guide will be optional, and you are more than free to run your programs directly on the server (i.e. outside of a container).
Building the System
=============> All parts to replicate the gnosis system build are here <==============
The above link has some info about the system build, and the components chosen,
but we will be using most of this section to discuss the various components,
argue the case for their selection, and also offer some alternatives that favor
lower cost builds, or just a different “style.” After a detailed look at the
hardware, we will discuss the actual assembly of the system.
Hardware
The following section will introduce a component (motherboard, CPU, etc),
discuss why it was selected, and offer some alternatives. (Note: while
a mouse, keyboard, and monitor/television are not required for accessing the
system remotely they are required for configuring the BIOS and
installing the OS. Make sure you have access to these resources as you
will need them later. See “Setup Tools” section below for more info.)
- Motherboard: MSI X99A GAMING PRO CARBON ATX Motherboard
- Overview: Of all the components to discuss, my experience building this system led me
to appreciate how integral the motherboard was to EVERY other hardware
choice to be made. The motherboard affects the chassis you will use, the
CPU, and the GPU. There are four main features to consider in a
motherboard:
Of all the features, the debug LED meter is the most crucial. DO NOT BUY A MOTHERBOARD WITHOUT A DEBUG LED METER. This little digital meter could potentially save you from countless hours of troubleshooting. If you boot up the system and something is “mounted” incorrectly or some other more nefarious problem occurs, this little meter will give you a code that you can use to trouble shoot what is the problem. Without this meter, you are flying blind.
The other three features work together: they determine the number of GPUs that you can effectively use. The form factor is the actual size of the motherboard, and mostly limits the amount of PCIE slots, which are the slots where the GPUs will be mounted. But all PCIE slots are not equal, and for ML applications you want the full x16 slot. But still, the socket will limit how many of those PCIE slots can be used simultaneously, because the socket limits the CPU that can be used, and each CPU has a different amount of PCIE lanes that allow it to communicate in parallel with PCIE devices. So basically, you want a CPU with as many PCIE lanes and a motherboard that has the socket for that CPU and as many x16 PCIE slots as possible.
-
Selection: The MSI X99A Gaming Pro Carbon was selected because it did an excellent job of fulfilling the aforementioned requirements: it supports an LGA-2011 socket (which supports CPUs with up to 40 lanes), it possesses the desired debug LED meter, and it has four x16 PCIE slots. Also it is well reviewed3 by what seems to be the most trusted hardware review site: Tom’s Hardware.
- Alternatives: Again, if you want to chose an alternative board, you
just need to be clear about how many GPUs you want, and then what CPU and
CPU socket you will need to handle them. Then look for a motherboard with
those specifications. And make sure it has a debug LED meter!!!
- Overview: Of all the components to discuss, my experience building this system led me
to appreciate how integral the motherboard was to EVERY other hardware
choice to be made. The motherboard affects the chassis you will use, the
CPU, and the GPU. There are four main features to consider in a
motherboard:
- GPU: NVIDIA - GeForce GTX 1080 8GB Founders Edition
- Overview: In a system like this, which is designed for doing ML and
Deep Learning (DL) work, the GPU is really the key component: it is
the piece of hardware that is going to be doing the real work in your
ML or DL algorithms. To be clear, NVIDIA is the dominant choice for
GPUs, because all the ML frameworks
(e.g. Theano,
Tensorflow,
Caffe)
are built to work with NVIDIA drivers and libraries (i.e.
CUDA). Once you
have accepted the fact that you will be buying NVIDIA GPUs then you just
need to be clear about what you want. There are two main features to a GPU
that you will be paying for:
- CUDA Cores: More powerful GPUs have more CUDA cores
- RAM: More powerful GPUs have more RAM
-
Selection: The NVIDIA GTX 1080 was chosen because it is the “flagship” GPU: it is more than enough for anything you might want to do. The logic behind this choice is simple: if you have the money, just invest in this GPU and move on. If you do not want to spend this money, then let us look at some alternatives.
- Alternatives: There are two issues to consider when discussing the
possible alternatives: new vs. used. You could buy a used GPU, but I
would advise against this unless you really know what you are doing. Should
you decide to go this route at some point,
eBay
will be a good place to hunt for inexpensive GPUs. You would be
better off looking at less expensive but new GPUs:
NVIDIA GTX 1060 and 1070. These less expensive GPUs are still quite
powerful and will be sufficient for most applications. Again, only you
really know what’s right for you, but if you are just starting out, only
buy new, and consider saving up to buy a 1080 and just move on from there.
- Overview: In a system like this, which is designed for doing ML and
Deep Learning (DL) work, the GPU is really the key component: it is
the piece of hardware that is going to be doing the real work in your
ML or DL algorithms. To be clear, NVIDIA is the dominant choice for
GPUs, because all the ML frameworks
(e.g. Theano,
Tensorflow,
Caffe)
are built to work with NVIDIA drivers and libraries (i.e.
CUDA). Once you
have accepted the fact that you will be buying NVIDIA GPUs then you just
need to be clear about what you want. There are two main features to a GPU
that you will be paying for:
- CPU: Intel Xeon Processor E5-1620 v4
-
Overview: As previously mentioned in the motherboard section, the CPU is mostly significant in terms of how many PCIE lanes can it support, and how many cores. The last attribute is less of a problem, because most CPUs have at least 4 cores and typically more. To a lesser extent you want to consider the processor frequency which is the measure of how powerful/fast the CPU can process (i.e. execute instructions). Since it is very unlikely that the processor frequency will ever be the bottle neck, this is not a major concern.
-
Selection: The Intel Xeon E5 1620 v4 was chosen because it was the least expensive CPU that met the requirements: it has the max number of PCIE lanes (i.e. 40 lanes), it has 4 cores, and as a bonus a nice processor frequency (3.50 GHz).
-
Alternatives: If you REALLY do not care about having 40 PCIE lanes then there are plenty of less expensive CPUs that you can select. Just be aware that this will impact performance when training/deploying your ML algorithms. Also there are CPUs with less than 4 cores, but this is probably not worth the cost savings. At some point, it is more “expensive” to buy lower performing parts than to invest in more powerful parts. And remember if you do select a different CPU, you must select a motherboard that supports that CPU’s socket!!!
-
- CPU-Fan: Noctua L-Type Premium Quiet CPU Cooler NH-L9x65
-
Overview: While this portion of the build may seem “trivial”, take the time to really think about what this fan is doing: it is regulating the temperature of the neurological center of your computer. When stated this way, it is not so trivial, and it is worth investing the time, energy, and money into acquiring a fan that is worthy of protecting the system you have put much time and energy into building.
-
Selection: Noctua seems to be of a higher quality than most of the CPU-fan manufacturers. This can be seen in the reviews for their products, and can also “literally” be seen in the product: it looks good and not cheap. Originally a different fan was used in this build, and it the quality was underwhelming (to say the least). Considering this component will be directly responsible for cooling the BRAIN of your computer, you would like it to have some quality.
-
Alternatives: Anything Noctua should be ok, but there may be other manufacturers that you might find are of sound quality. Also, you may want to consider a water cooled system, of which there are several options. This is an aspect that was not heavily researched for the guide, so if you are interested in a water cooled system, proceed with caution and do your research. Remember, the good thing about the fan is … it won’t leak on your electronics!!!
-
- Thermal Paste: ARCTIC MX-4 Thermal Compound
-
Overview: Similar to the discussion about the CPU-fan, the thermal paste might be easy to disregard as “trivial”, but again take a moment to really think about what it is doing: it is the medium that helps to dissipate and spread heat, the mortal enemy of all electronics, from the CPU, into the CPU-fan’s heat sink, and then out of the system. Again, if for some reason it fails or does not work, then your CPU could greatly reduce in performance, and may even become damaged.
-
Selection: Of all the thermal pastes this one had the best reviews. It is that simple. Read the reviews on it by clicking the link above.
-
Alternatives: Probably not necessary.
-
- PSU: EVGA 1600 P2
- Overview: If the CPU is the brain, then the Power Supply Unit
(PSU)is the heart. The PSU can also be the most expensive part of
your build, but considering it is the “heart” of the system, this should
not be a surprise. The PSU has a very simple but key function (just like
the heart): to supply energy to all the other components of the system. This
includes the GPU, Storage Drives, Motherboard, and Chassis. It indirectly
(through the motherboard) powers the CPU, and CPU-fan. So, it is literally
“carrying the load” of your system. The main factors in choosing a PSU
are simple:
- Capacitor quality
- Power Output (Watts)
- Overview: If the CPU is the brain, then the Power Supply Unit
(PSU)is the heart. The PSU can also be the most expensive part of
your build, but considering it is the “heart” of the system, this should
not be a surprise. The PSU has a very simple but key function (just like
the heart): to supply energy to all the other components of the system. This
includes the GPU, Storage Drives, Motherboard, and Chassis. It indirectly
(through the motherboard) powers the CPU, and CPU-fan. So, it is literally
“carrying the load” of your system. The main factors in choosing a PSU
are simple:
- RAM: HyperX FURY Black 16GB Kit (2x8GB) 2133MHz DDR4 (HX421C14FBK2/16)
-
Overview: The RAM is probably the most disposable part of this build. It is certainly possible to buy better quality or worse quality RAM, but whether the cost of higher quality RAM is justified by the performance gains is debatable. To state it another way, is it really worth buying expensive RAM over moderately priced RAM? This is a question that is relevant to each system, and the needs of the builder.
-
Selection: The HyperX FURY DDR4 2133MHz was chosen because it was actually tested with the motherboard.4 One of the many issues with PC building is the various mixing and matching that is possible, and that may have unintended incompatibilities. When choosing RAM, this is why it is good to look at the motherboard’s website and see what components it has been tested with.
-
Alternatives: There are many possible alternatives here and there are probably much better choices for RAM. If you swap this out, make sure you check the website of the motherboard you are using to see what it has been tested with.
-
- Storage: Samsung 850 EVO 250GB 2.5-Inch SATA III Internal SSD
-
Overview: Storage refers to the wide range of possible “disk drives” that exist, but in our current times this typically refers to a solid-state drive (more commonly know as SSD). While more expensive than the older hard disk drive (HDD), the SSD is really a necessity. The SSD is what will hold your operating system and hence your file system. Every time your system boots up, you read/write a file, this all is affected by the storage (i.e. HDD, SSD) you are using. Hence why there is no reason to not have the fastest most advanced drive (i.e SSD) unless you just enjoy suffering from a painfully slow computer :)
-
Selection: Among the various Amazon reviews and backchannel hardware forums, you will find the Samsung 850 EVO SSD is a well known and well loved favorite. It seems to be sort of a “standard” drive that enthusiasts and professionals unilaterally approve. It was this positivity that secured this SSD as the selection for the gnosis build.
-
Alternatives: Plenty of reasons to pursue alternative drives. The drive selected is only 250GB, you may want more. There are also drives that use the Non-Volatile Memory Express or NVMe which are more expensive and higher performing than a standard SATA mounted drive. Depending on your needs, you may want to research the NVMe drives.
-
- Chassis: NZXT H440 Razer Edition Mid Tower ComputerCase (CA-H442W-RA)
- Overview: The chassis or case is another component that you might
too easily discount its importance. But keep in mind, the case ultimately
determines how air moves through your system, and can potentially affect
the performance of your system. Choosing a case is really about three
factors:
- Air Flow: How easy is it for air to flow through the system
- Storage Space: How many storage drives could be mounted in the case
- Aesthetics: Does the case look good
-
Selection: The NZXT H440 is a well reviewed case. There may be some comments about the air flow being reduced, but overall it strikes a good balance of all the previous factors: the air flow is good, it has much storage space, and the aesthetics are quite nice. For this build the Razer edition was chosen because it adds “extra aesthetics”.
- Alternatives: The obvious alternative would be to get the “normal”
NZXT H440 and not the “Razer
edition.” The NZXT H440 is a much loved product, and would certainly
be a good choice. That being said, there are many other choices you could
select, just make sure you are clear about the motherboard size (i.e.
the form factor) that the case will support. For example, if you get a
smaller case, then naturally it will not be able to fit a motherboard form
factor that is larger than average. The PSU should not be an issue as
most cases seem to accept all PSU sizes.
- Overview: The chassis or case is another component that you might
too easily discount its importance. But keep in mind, the case ultimately
determines how air moves through your system, and can potentially affect
the performance of your system. Choosing a case is really about three
factors:
- UPS: CyberPower CP1500PFCLCD PFC Sinewave UPS System, 1500VA/900W
- Overview: The
Uninterruptible Power Supply
(UPS) is an optional component for this build, but it is strongly
suggested for actual operation of the system. Not only does a UPS provide
a backup battery for any potential power outages that occur, which will give
you some time to “gracefully” save your data and shutdown your system, it
also protects the system from any
power surges that could
damage your system. There are couple of factors to consider when choosing
a UPS:
- Capacity: Basically how much power (Watts) can it put out
- Waveform: The quality of the electricty being put out
- CLI: Whether there is a way to monitor the UPS from the command line
-
Selection: The CyberPower CP1500PFCLCD UPS was chosen because it met the necessary requirements: it can handle up to 900W of power, it has a good sinewave output, and there is a command line interface (CLI) tool available.
- Alternatives: Depending on how much you are modifying the gnosis
build, you may want to go with a lower power UPS. For example, if you are
not interested in ever having multiple GPUs EVER, than you could save some
money and buy a far less expensive (and hence less powerful) UPS. Also, if
you are not that concerned with the quality of the electricity being output
(though at this level of investment you should be), you could also select
a UPS with lower quality sinewave.
- Overview: The
Uninterruptible Power Supply
(UPS) is an optional component for this build, but it is strongly
suggested for actual operation of the system. Not only does a UPS provide
a backup battery for any potential power outages that occur, which will give
you some time to “gracefully” save your data and shutdown your system, it
also protects the system from any
power surges that could
damage your system. There are couple of factors to consider when choosing
a UPS:
- Cable Management: VELCRO Brand One Wrap Thin Ties
-
Overview: This may or may not be something you are interested in, but cable management can absolutely make your life better.
-
Selection: The VELCRO brand chosen is simply the most highly reviewed of all the “velcro” products available. If purchased, you should have enough ties for your system, and possibly several future systems.
-
Alternatives: There are many different possibilities here: cable/zip ties, twist tie, and other velcro tie brands. While certainly this guide recommends the velcro, it is a completely personal choice.
-
- Setup Tools:
- Overview: As mentioned in the section introduction, there are some tools that are
only needed in the assmbly and setup/configuration of the system, but are
never needed again (unless you want to reinstall your OS or reconfigure
the BIOS). These are tools you will need:
- Mouse + Keyboard: These will be necessary to interface with the BIOS
- Television/Monitor: This will be necessary to actually see the BIOS GUI interface
- Screw Driver: You must have the necessary screw driver to actually assemble the system
- Magnetic Tray: This is not a necessity, but considering the amount of small metal parts you will be working with, it is worth noting
- Anti-Static Mat/Wrist Band: Often controversial, some believe you
need it, others do not.
-
Selection: The mouse and keyboard are rather straightforward: grab any USB mouse/keyboard you can find. Amazon produces some well reviewed basic mouse and keyboard products that will work well. For the television or monitor, again make sure you have an HDMI or Displayport cable. For the remaining parts, the ModRight Extreme Anti-Static Mat, Klein no.2 Phillips 7in Round Shank, and the Capri Tools 10012 Magnetic Tools Tray were all used in the gnosis build.
- Alternatives: As long as you have a USB keyboard/mouse, a television/monitor with HDMI or DisplayPort ports, and a phillips head screw driver that is small enough, you really have everything you need. The anti-static mat/wrist band is not strictly necessary but certainly recommended (at least do the research yourself to know).
- Overview: As mentioned in the section introduction, there are some tools that are
only needed in the assmbly and setup/configuration of the system, but are
never needed again (unless you want to reinstall your OS or reconfigure
the BIOS). These are tools you will need:
Assembling the System
While there is no “one best way” to assemble your system, this is the way that
the gnosis system was assembled and you may find it to your liking. What follows
is a quick overview:
-
Mount PSU in Chassis: Basically connect all the PSU cables to the PSU, bundle the cables with a rubber band, attach the PSU backplate (comes with chassis) to the PSU and pass cables and PSU into chassis, screw PSU backplate in place with screwdriver
-
Assemble CPU, CPU-Fan, RAM, and Motherboard: Plug CPU into socket, add thermal paste (pea size amount) to CPU heat shield (top of CPU), mount CPU-fan, mount RAM, and you are done!
-
Mount Motherboard in Chassis: This is when your 10” screwdriver is going to come in handy: take the assembled motherboard (with CPU, CPU-fan, and RAM mounted), lay it on top of the mounting points in the chassis, and used the provided mounting screws (comes with chassis) to secure the motherboard in place.
-
Mount GPU in Motherboard: Now with the GPU, it is rather heavy. It needs to be secured to the back of the chassis where the motherboard I/O shield is located. Without that secured step, it will put a lot of strain on the PCIE slot, when the motherboard is mounted and vertical in the chassis. Hence, mounting it last alleviates this (though you could also mount it when you mount the CPU, CPU-fan, and RAM, but this still seems a bit “flimsy”). Basically, slide the graphics card I/O shield into the back of the case, while also guiding the PCIE connector into the PCIE slot (this should all be done with the case lying on its side). Then lock the PCIE slot (using the tab on the motherboard), and screw the graphics card I/O shield into place.
-
Mount SSD in Chassis: This is the last of the mounting steps. The NZXT H440 has several places to mount both HDD and SSD drives. In the gnosis build, the middle drive bay in the front of the case (next to the front fans) was chosen with the hope that this would help cool the drive.
-
Connect Power Cables from PSU: Now it is simply about connecting the right cables to the right components.
-
Next Step: Now that everything is setup, you are ready to go. Move on to the next section for how to install the OS.
Installing Linux
Regardless of how you may feel about Ubuntu, it is the most prevalent “flavor” of Linux and this bias is inherited in ML: most ML frameworks are developed and deployed in Ubuntu Linux. Hence, while the other Linux distributions certainly have their requisite pros and cons, we will have to leave that research to those who are interested. The remainder of this section will discuss installing Ubuntu Linux on your newly assembled ML system.
Ubuntu
The steps to installing Ubuntu are rather straight forward: 1. create a “bootable USB flash drive” of the Ubuntu installer, and 2. “configure your BIOS” to boot from the storage device containing the Ubuntu install.5 Each one of these steps will be discussed below.
- Bootable USB Flash Drive:
To create a “bootable” USB flash drive, you will need three things:- 1: A USB flash drive that you don’t mind completely erasing and using only for installing Ubuntu
- 2: The Ubuntu installer
- 3: Software to write installer to the drive
The first step, i.e. obtaining a USB Flash Drive, should be rather straightforward. If you don’t have one or would like a recommendation, try this USB Flash drive from SanDisk. I have had several of these drives for various purposes, and have used them to install both Linux and macOS operating systems. But, again any USB flash drive will do, as long as it has at least 2 GB of space.6 Also be aware of the “USB version”: 1.0, 2.0, and 3.0. At the time of writing, USB 2.0 is the standard, but USB 3.0 is becoming more common. The USB version will affect the speed of the install, so keep this in mind before you choose a USB flash drive.7
With an adequate USB flash drive chosen, we are ready for step two: downloading the Ubuntu installer. First, to make clear, at the time of writing Ubuntu 16.04 is the most common version in use, and the assumption is that you will be downloading Ubuntu 16.04 LTS (the “LTS” stands for Long Term Support). Within the Ubuntu 16.04 version there are two “types” of installers:
-
Ubuntu Desktop: Download Here
-
Ubuntu Server: Download Here
Now which of these two you choose to install, is entirely up to you. If you ever want to use your ML system as a desktop computer, with a monitor and keyboard attached, then download Ubuntu Desktop. Otherwise, if you are like me and never want to use your ML system as a desktop computer, then download Ubuntu Server. This may seem trivial, but really take the time to think about it. You may want to use your system as a desktop computer for some future unknown reason. The only real advantage to installing Ubuntu Server is the minimalism: there’s no extra GUI processes using up your GPU or CPU. So, in the end, it’s better to be safe, and install the desktop version (which you can always turn off the GUI-related processes), unless you are 100% sure you will never need it.
Finally, having chosen the USB flash drive in step 1, and picked the appropriate Ubuntu type (i.e. Desktop vs. Server) in step 2, you are ready to write the downloaded ISO file to the USB flash drive. While there are multiple tools available for writing ISO files to USB drives, I have the most experience with Etcher. I have no idea if it is the best, but having used it several times it certainly seems to be very reliable and straightforward. Granted, I am using a MacBook Pro Late 2013 and I have no idea how Etcher performs on Windows or Linux. But if my experience on macOS is any indication of how Etcher will perform on any OS, then I am confident you will find it very pleasant to use.
Navigate to the Etcher site and download Etcher for the OS that you downloaded the ISO file to. Once you have downloaded and installed Etcher, open Etcher and you should see a GUI similar to this:
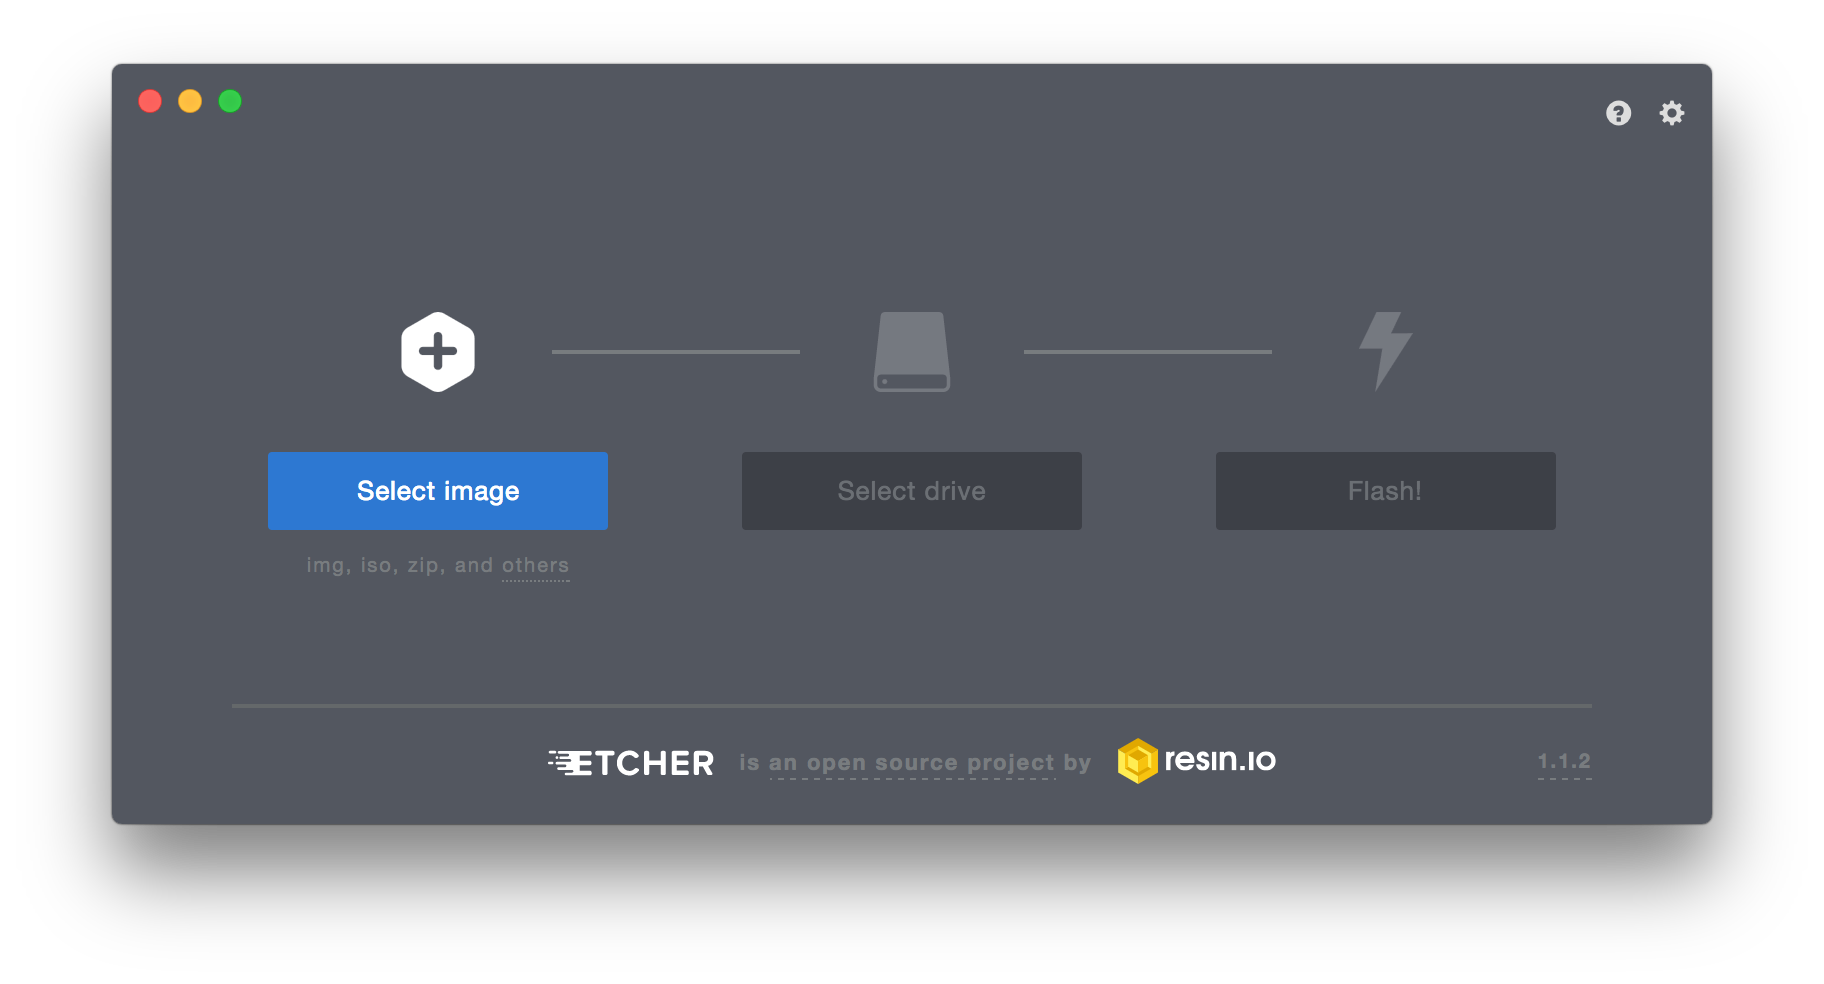
Looking at the above image, you will notice on the far left, you must click the Select Image button, and select the ISO file you downloaded for Ubuntu. Then, you must click the middle Select drive button to select the USB flash drive that you want to write the ISO file to (just plug the drive into a USB port and Etcher will automatically find it). Finally, after selecting both the image (i.e. ISO file) and the USB flash drive, click the flash button, and Etcher will write the file. When it is done, eject the USB flash drive, and proceed to the next section.
- Configure the BIOS:
Basically, all you need to “configure” the BIOS, is to set the boot media priority. This literally means, setting the order in which storage devices that are connected to the motherboard (by USB or SATA), will be scanned for a boot partition.8 As discussed in the Setup Tools section in the “Building the System” section above, you are going to need two things:
- Mouse + Keyboard: These will be necessary to interface with the BIOS
- Television/Monitor: This will be necessary to actually see the BIOS
GUI interface
Assuming you have completed the system build and all parts are connected, proceed by connecting the mouse and keyboard to the system, using whatever USB port you wish, and plug in your monitor or television to either the HDMI or Displayport on the graphics card shield on the back of the chassis. Now take your USB Ubuntu installer flash drive that you just created with Etcher previously, and plug it in to one of the USB ports on the system (if you chose a USB 3.0 flash drive you may want to use the USB 3.0 ports on the motherboard or case since this will have even faster transfer rates). Power on the system by plugging in the power cord from the PSU to a power outlet (or even better the CyberPower UPS that was listed in the hardware section), toggling the power switch on the back of the PSU, and pressing the big power button on top of the case.
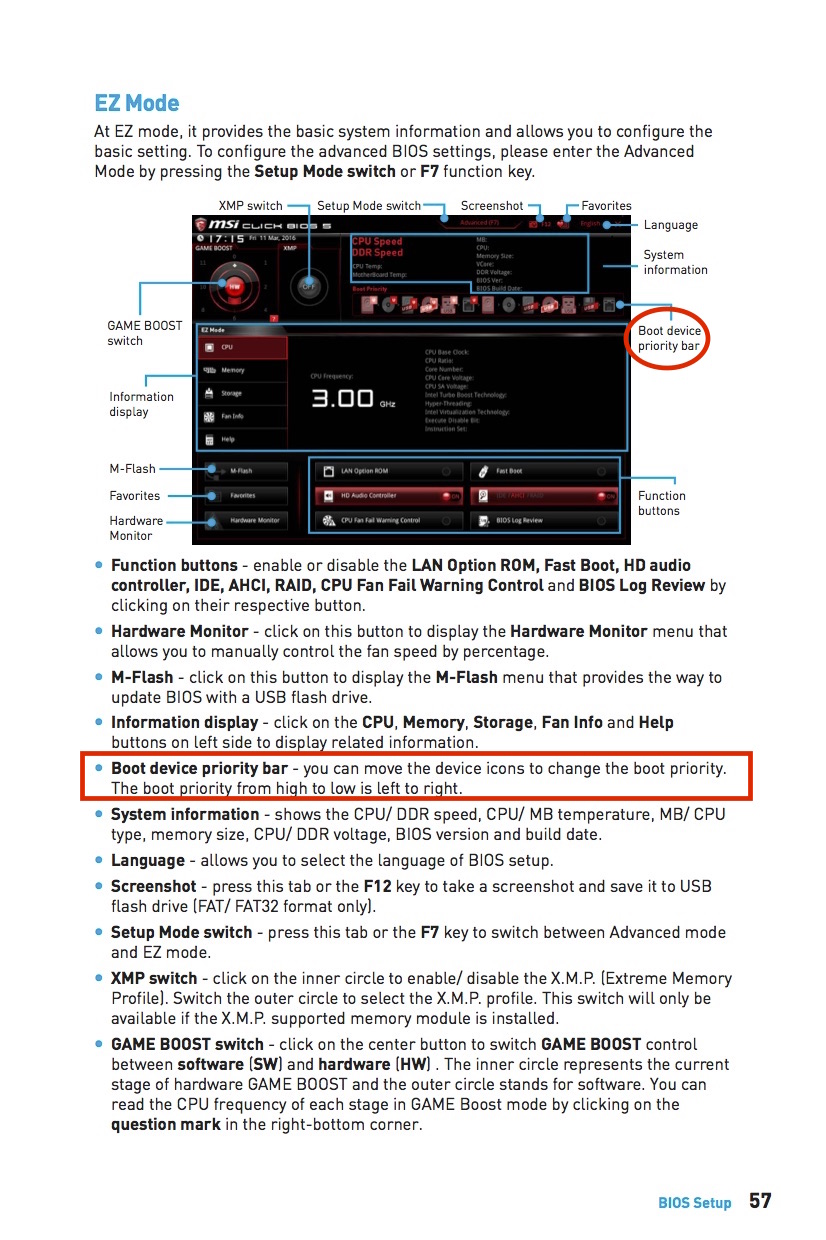
The default boot priority should place a bootable USB drive (i.e. the bootable USB flash drive with Ubuntu Installer you made earlier) ahead of any SSD/HD drive, so the system should boot straight into the Ubuntu installer after the BIOS has finished loading. If not, then you may need to change the boot priority:
To get to the above configuration screen of the BIOS, hold the delete key on the keyboard while the system is booting up. Then, if you read the above page from the MSI X99A Gaming Pro Carbon manual,8 you will see that you can drag and drop to change the devices in the boot priority. Once you are satisfied with the boot priority, simply restart the system (either through the BIOS GUI, or through the reset button on the chassis) and after the system reboots, and the BIOS loads, you should be taken straight to the Ubuntu Installer (if not, please make sure that your USB flash drive is plugged in properly, and that the USB flash drive has the Ubuntu Installer correctly installed). The actual installation process that the Ubuntu Installer takes you through is mostly straightforward, and can be reviewed in detail at the following links:
Once you have finished one of the two installation tutorials, you should now have a fresh install of Ubuntu! Now where to go next ….
- Mouse + Keyboard: These will be necessary to interface with the BIOS
Installing a PaaS
While you could jump into running ML algorithms immediately on your freshly installed Ubuntu system, you might not realize that there are some alternatives to running code on bare-metal servers. In this final section we will be discussing installing a Platform as a Service, commonly abbreviated PaaS. To clarify: this is an optional step. You are not required to do this, it is simply a suggestion, and something to consider. If you are not familiar with a PaaS, then you might find this section worthwhile. Ever heard of Heroku? It is a great example of a PaaS. Essentially, you can think of a PaaS as an interface: a way of sending commands and receiving output, that obfuscates and automates much of the detailed and tedious tasks. This becomes incredibly useful when you want to deploy applications to a remote server: how do you get all the code/data on to the server, how do you create an environment to run the code in, and how do you monitor/manage the application once running?
Can you see why a PaaS might be good? You may find that you grow quickly tired of remotely logging in with SSH, copying your code, configuring a language-dependent environment (e.g. Python, Ruby, Go) and doing this several times as you change your code again and again during the development process. Sound like fun? That’s why the PaaS starts to become so important: it streamlines and clarifies your workflow. So, while it may not seem necessary at first, at some point the tedious and repetitive nature of your workflow will likely change your mind. And then your journey to the PaaS darkside shall be complete :)

Dokku: The Minimalist PaaS
Dokku is, in its own words, “The smallest PaaS implementation you’ve ever seen.”9 If you look at its source code you will see that it is ~75% shell script.10 Then if you look at the documentation,11 you will realize that it is designed to “wrap” docker. So minimalism really is the name of the game with Dokku: they took existing tools and assembled them into a PaaS. This minimalistic and low maintenance approach is exactly why it was chosen for gnosis. Now we need to understand how to run ML code (i.e. GPU-accelerated code) on a Dokku server. This is covered in the next section.
Machine Learning with Dokku
Now, admittedly, this section is a bit “experimental.” This portion of
the gnosis build can definitely be classified as a minimal viable product.
In other words: “it works, it’s not pretty, there are definitely
improvements that can be made, but it works.” You see, the issue with using
a PaaS like Dokku, is that it is built around Docker. The whole philosophy of
Docker is
containerization:
running code in isolated user spaces
that act like “thin” virtual machines.
While this allows you to easily create and reproduce an entire
development environment (e.g. for Python or Go), this also isolates the
processes running in those environments from the GPU devices, drivers, and
libraries located on the host operating system (unless you manually mount the
files using the -v flag with the docker run command).12 Hence,
out of the frying pan and into the fire.
To get around this issue, NVIDIA created its own “nvidia-docker plugin” that can automatically detect what GPU devices, drivers, and libraries are on the system and mount them for you when you run your Docker containers (during the research for gnosis this was the most direct solution that was found). This plugin combined with Dokku’s own “container options” allowed for a simple way to mount the necessary GPU files into the container.
This whole process is completely explained at this repository:
The gist of the repository is how to setup your Dokku server for ML apps and then how to setup each app to automatically mount the necessary device and drivers/libraries. For the purposes of this build guide, we will only focus on setting up the server (for more details about setting up ML apps visit the dokku-ml repository linked above).
To get started, login to your newly built ML system, open a terminal,
and download the following install script:
$ curl -fsSL -o /tmp/dokku-ml_setup https://raw.githubusercontent.com/RagingTiger/dokku-ml/master/dokku-ml_setup.shBefore executing this script, let’s go over in detail what is in it:
#!/bin/bash

# functions
dokku_install(){
  # the contents of this function are from dokku's own install instructions
  # (ref: http://dokku.viewdocs.io/dokku/getting-started/installation/#1-install-dokku)
  wget https://raw.githubusercontent.com/dokku/dokku/v0.10.5/bootstrap.sh;
  sudo DOKKU_TAG=v0.10.5 bash bootstrap.sh
}

cuda_install(){
  # From nvidia-docker docs: https://github.com/NVIDIA/nvidia-docker/wiki/Deploy-on-Amazon-EC2
  # Install official NVIDIA driver package
  sudo apt-key adv --fetch-keys http://developer.download.nvidia.com/compute/cuda/repos/ubuntu1604/x86_64/7fa2af80.pub
  sudo sh -c 'echo "deb http://developer.download.nvidia.com/compute/cuda/repos/ubuntu1604/x86_64 /" > /etc/apt/sources.list.d/cuda.list'
  sudo apt-get update && sudo apt-get install -y --no-install-recommends linux-headers-generic dkms cuda-drivers
}

nvidiadocker_install(){
  # From nvidiai-docker docs: https://github.com/NVIDIA/nvidia-docker
  # Install nvidia-docker and nvidia-docker-plugin
  wget -P /tmp https://github.com/NVIDIA/nvidia-docker/releases/download/v1.0.1/nvidia-docker_1.0.1-1_amd64.deb
  sudo dpkg -i /tmp/nvidia-docker*.deb && rm /tmp/nvidia-docker*.deb

  # Test nvidia-smi
  sudo nvidia-docker run --rm nvidia/cuda nvidia-smi
}

setup_tfhello(){
  # setup app 'tf-hello' with the gpu devices arguments returned from then
  # nvidia-docker plugin REST API
  # (ref: https://github.com/NVIDIA/nvidia-docker/wiki/nvidia-docker-plugin)
  dokku apps:create tf-hello
  dokku docker-options:add tf-hello deploy,run "$(curl localhost:3476/docker/cli)"
}

main(){
  # install dokku
  dokku_install

  # setup CUDA
  cuda_install

  # setup nvidia-docker
  nvidiadocker_install

  # create tfhello test app with correct gpu devices mounted
  setup_tfhello
}

# run main after everything has downloaded
main
If we look at the very bottom of the script, we can see that the final
line is a call to the main function. If we look at the body of this function,
we can see that it starts by calling dokku_install. This function simply wraps
the same Dokku install commands listed in the Dokku install documentation.11
After installing Dokku, the main function moves on to calling cuda_install
which simply installs CUDA. In essence
CUDA is all the drivers/libraries necessary to perform computations on a
NVIDIA “CUDA-enabled” GPU. After this finishes, the nvidiadocker_install
executes, and not surprisingly, installs
nvidia-docker which also installs
the nvidia-docker plugin
that was mentioned earlier. At this point during the installation, the install
script will test the setup by running the following command:
# Test nvidia-smi
sudo nvidia-docker run --rm nvidia/cuda nvidia-smi
This will download the nvidia/cuda
docker image and run the nvidia-smi command inside a docker container built
from that image. This simply ensures that CUDA and nvidia-docker have been
installed correctly. If all was installed correctly, you should see the
following:
+-----------------------------------------------------------------------------+
| NVIDIA-SMI 384.90                 Driver Version: 384.90                    |
|-------------------------------+----------------------+----------------------+
| GPU  Name        Persistence-M| Bus-Id        Disp.A | Volatile Uncorr. ECC |
| Fan  Temp  Perf  Pwr:Usage/Cap|         Memory-Usage | GPU-Util  Compute M. |
|===============================+======================+======================|
|   0  GeForce GTX 1080    Off  | 00000000:02:00.0 Off |                  N/A |
| 27%   25C    P8    10W / 180W |     10MiB /  8112MiB |      0%      Default |
+-------------------------------+----------------------+----------------------+

+-----------------------------------------------------------------------------+
| Processes:                                                       GPU Memory |
|  GPU       PID   Type   Process name                             Usage      |
|=============================================================================|
|  No running processes found                                                 |
+-----------------------------------------------------------------------------+
Keep in mind that your output might be slightly different if you chose a
different GPU, but regardless if you are seeing this output message then all
is working. Finally, the install script runs the setup_tfhello function that
will “configure” a Dokku app named tf-hello to use the GPU devices, and
drivers that nvidia-docker finds on the system. This app is meant to be
both a test of the system and instructional. If you would like to run this app
and begin learning how to configure your own Dokku ML apps, then visit the
dokku-ml repository mentioned above. It will give a much more
detailed explanation of how to run the tf-hello app, and how to setup your own
apps.
If you are now satisfied with the details of the install script, then simply
pass the script to bash and sit back and watch the magic:
$ bash /tmp/dokku-ml_setup
Conclusion
While there is still much to be improved in the gnosis system outlined here,
as well as the accuracy and clarity of the build guide, still this guide
should offer you more than enough insight and knowledge to “confidently”
build your own machine learning system. If you have not already, consider
joining the gnosis Slack channel. There you will be able
to ask questions, trouble shoot problems, and hopefully acquire any additional
wisdom/insight into building your system.
In closing, hopefully this guide has helped you with whatever knowledge or guidance you may have needed. Also, keep an eye out for future developments on this project, (e.g. a more developed PaaS for machine learning). These will be announced in the Slack channel.