Ubiquiti EdgeRouter Setup Guide
Table of Contents
Introduction
While researching enterprise routers to build my own enterprise LAN, I became acquainted with the Ubiquiti EdgeRouter series.1, 2, 3 I became very impressed with the whole Ubiquiti lineup, and I invested in the EdgeRouter ER-X4, and the UniFi AC LR AP5 (NOTE: setting up this access point will be discussed in a completely separate post6). What follows is a brief description of how I setup my EdgeRouter ER-x. (NOTE: since macOS is the OS that I used to setup my router, that is the OS that will be covered in this guide.)
Setup
Before you get started with setting up your router, make sure you have a few items:
- A competent modem for use with your router: Here is an example
- 3-5 foot cat6 ethernet cable for connecting router to modem: Here is an example
- 10 foot cat6 ethernet cable for connecting router to personal computer: Here is an example
- Ethernet-Thunderbolt adapter (depends on your computer): Here is an example
Once you have all these things, you can actually proceed with setting up your router and connecting it to the internet.
Initial Login
To start with, you will need to grab an ethernet cable (e.g. RJ45 cable), and a thunderbolt to ethernet adapter (if you don’t have an ethernet port). Go ahead and connect the adapter to the ethernet cable, and plug it into your mac. Plug the other end of the cable into the left most ethernet port labeled eth0 on the front of the router. Now power up the router by plugging in the 12V power supply.
With the router powered up, the ethernet cable plugged into the port eth0 on the front of the router, and the other end of the ethernet cable plugged into the thunderbolt adapter (which is plugged into your mac), open the Network Preferences under System Preferences.
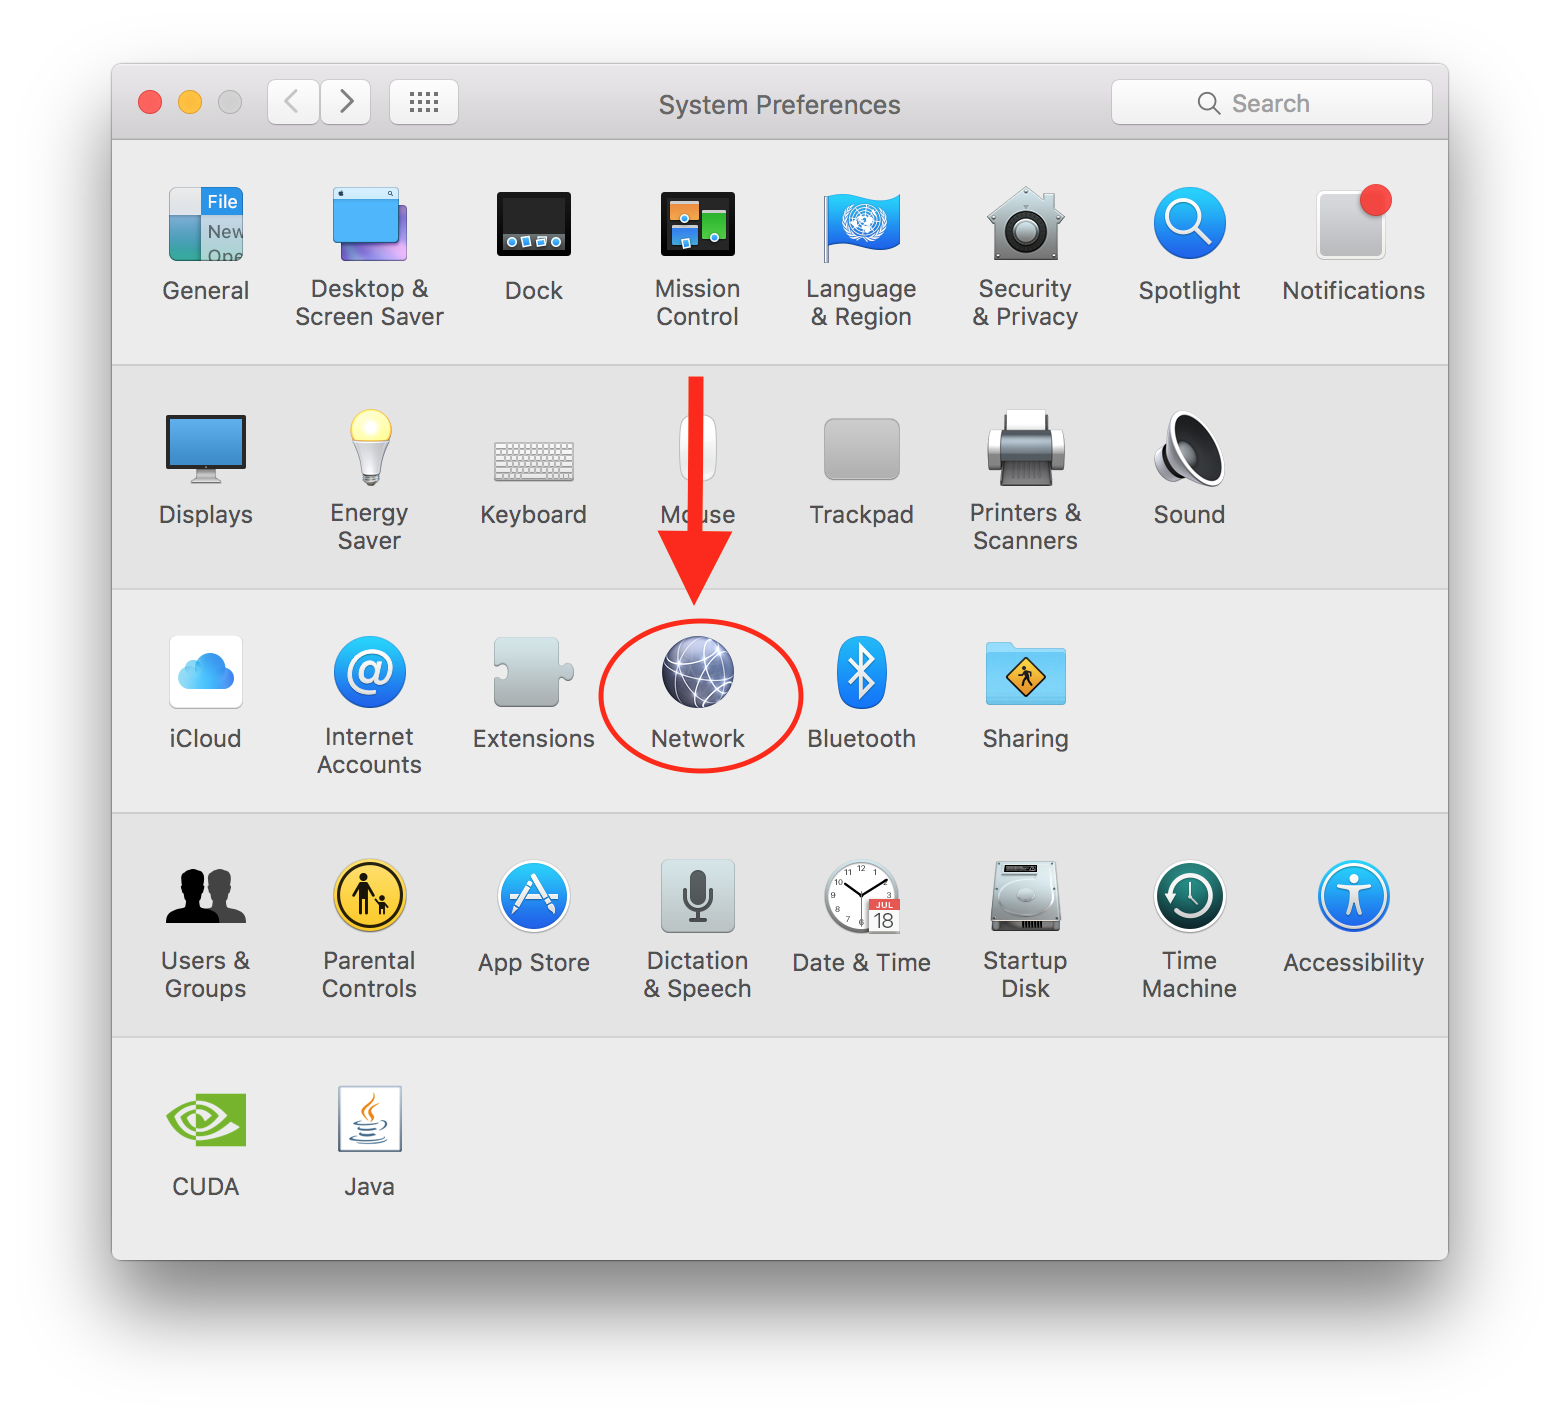
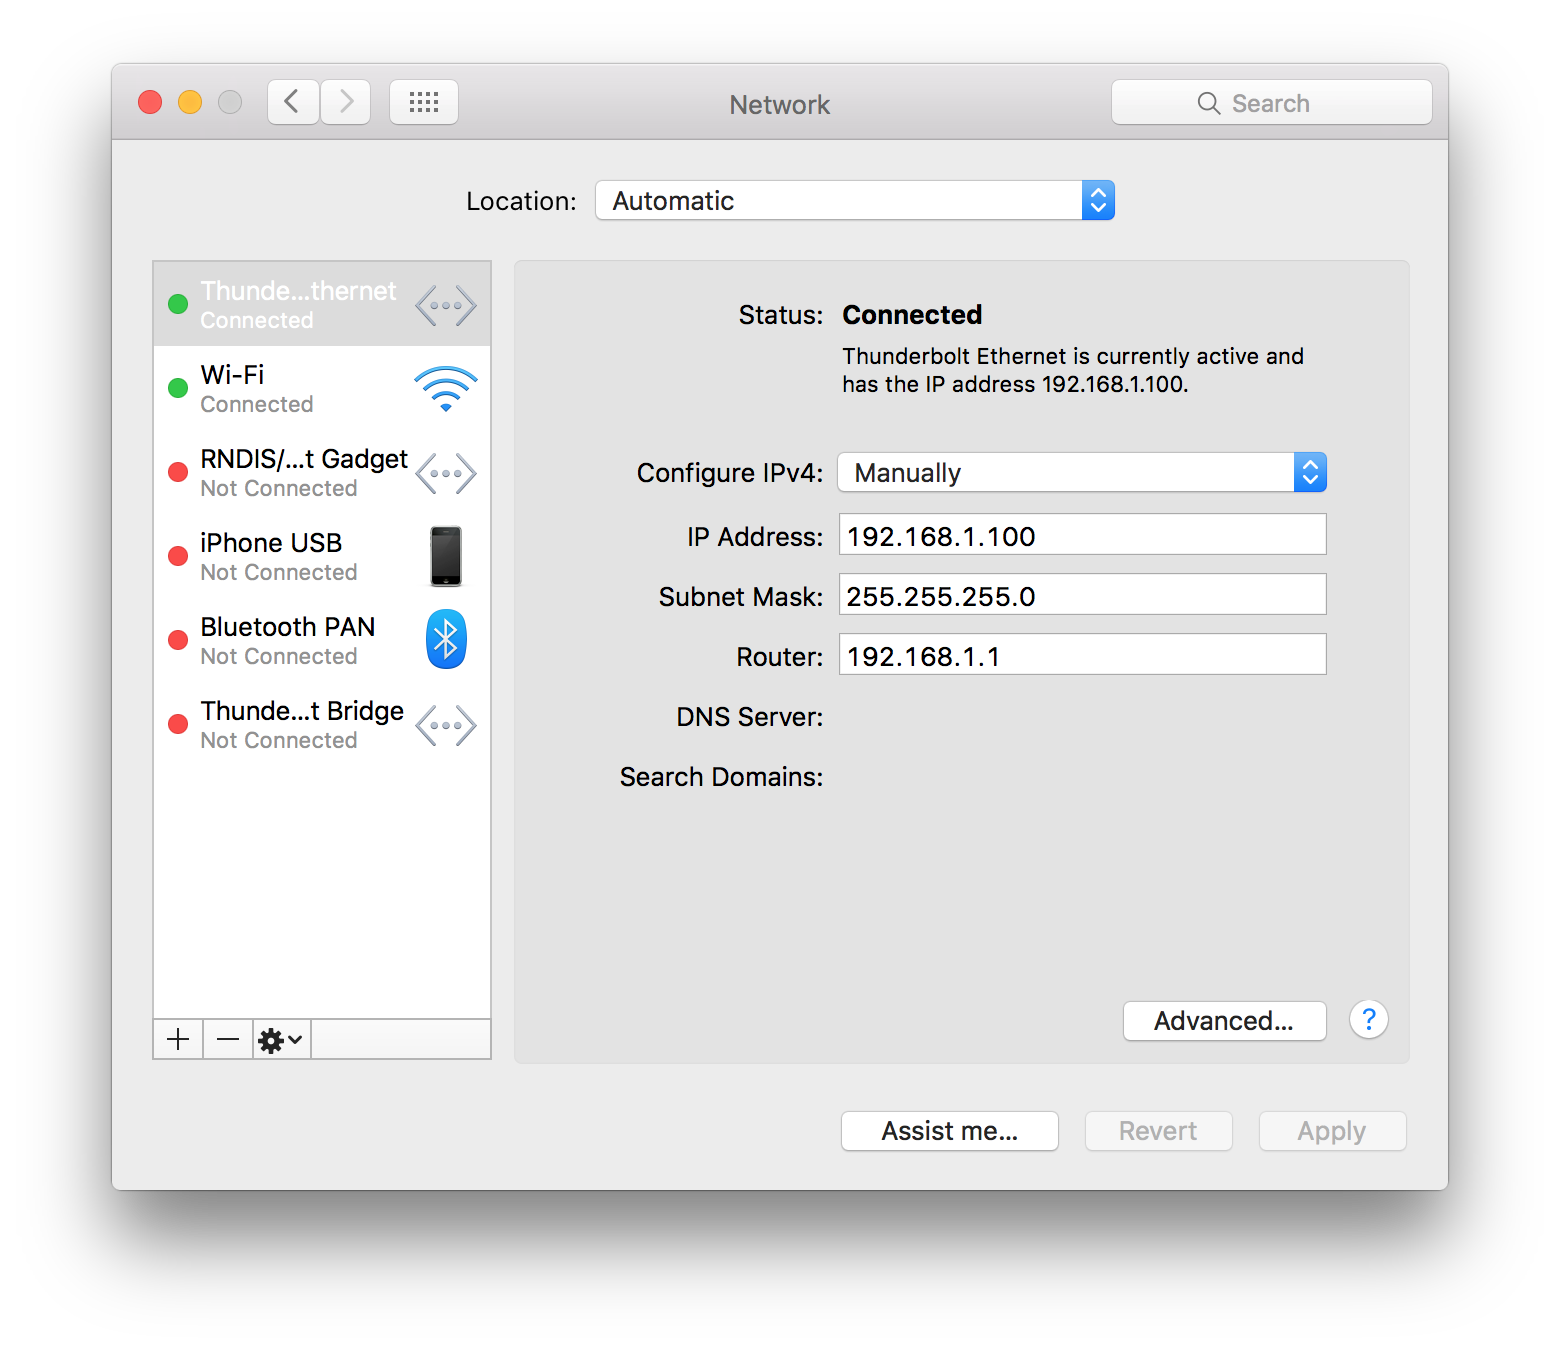
Then, after clicking on Network (as shown above), click on Thunderbolt Ethernet on the far left list, and select Manually under Configure IPv4 and fill out the configuration as follows:
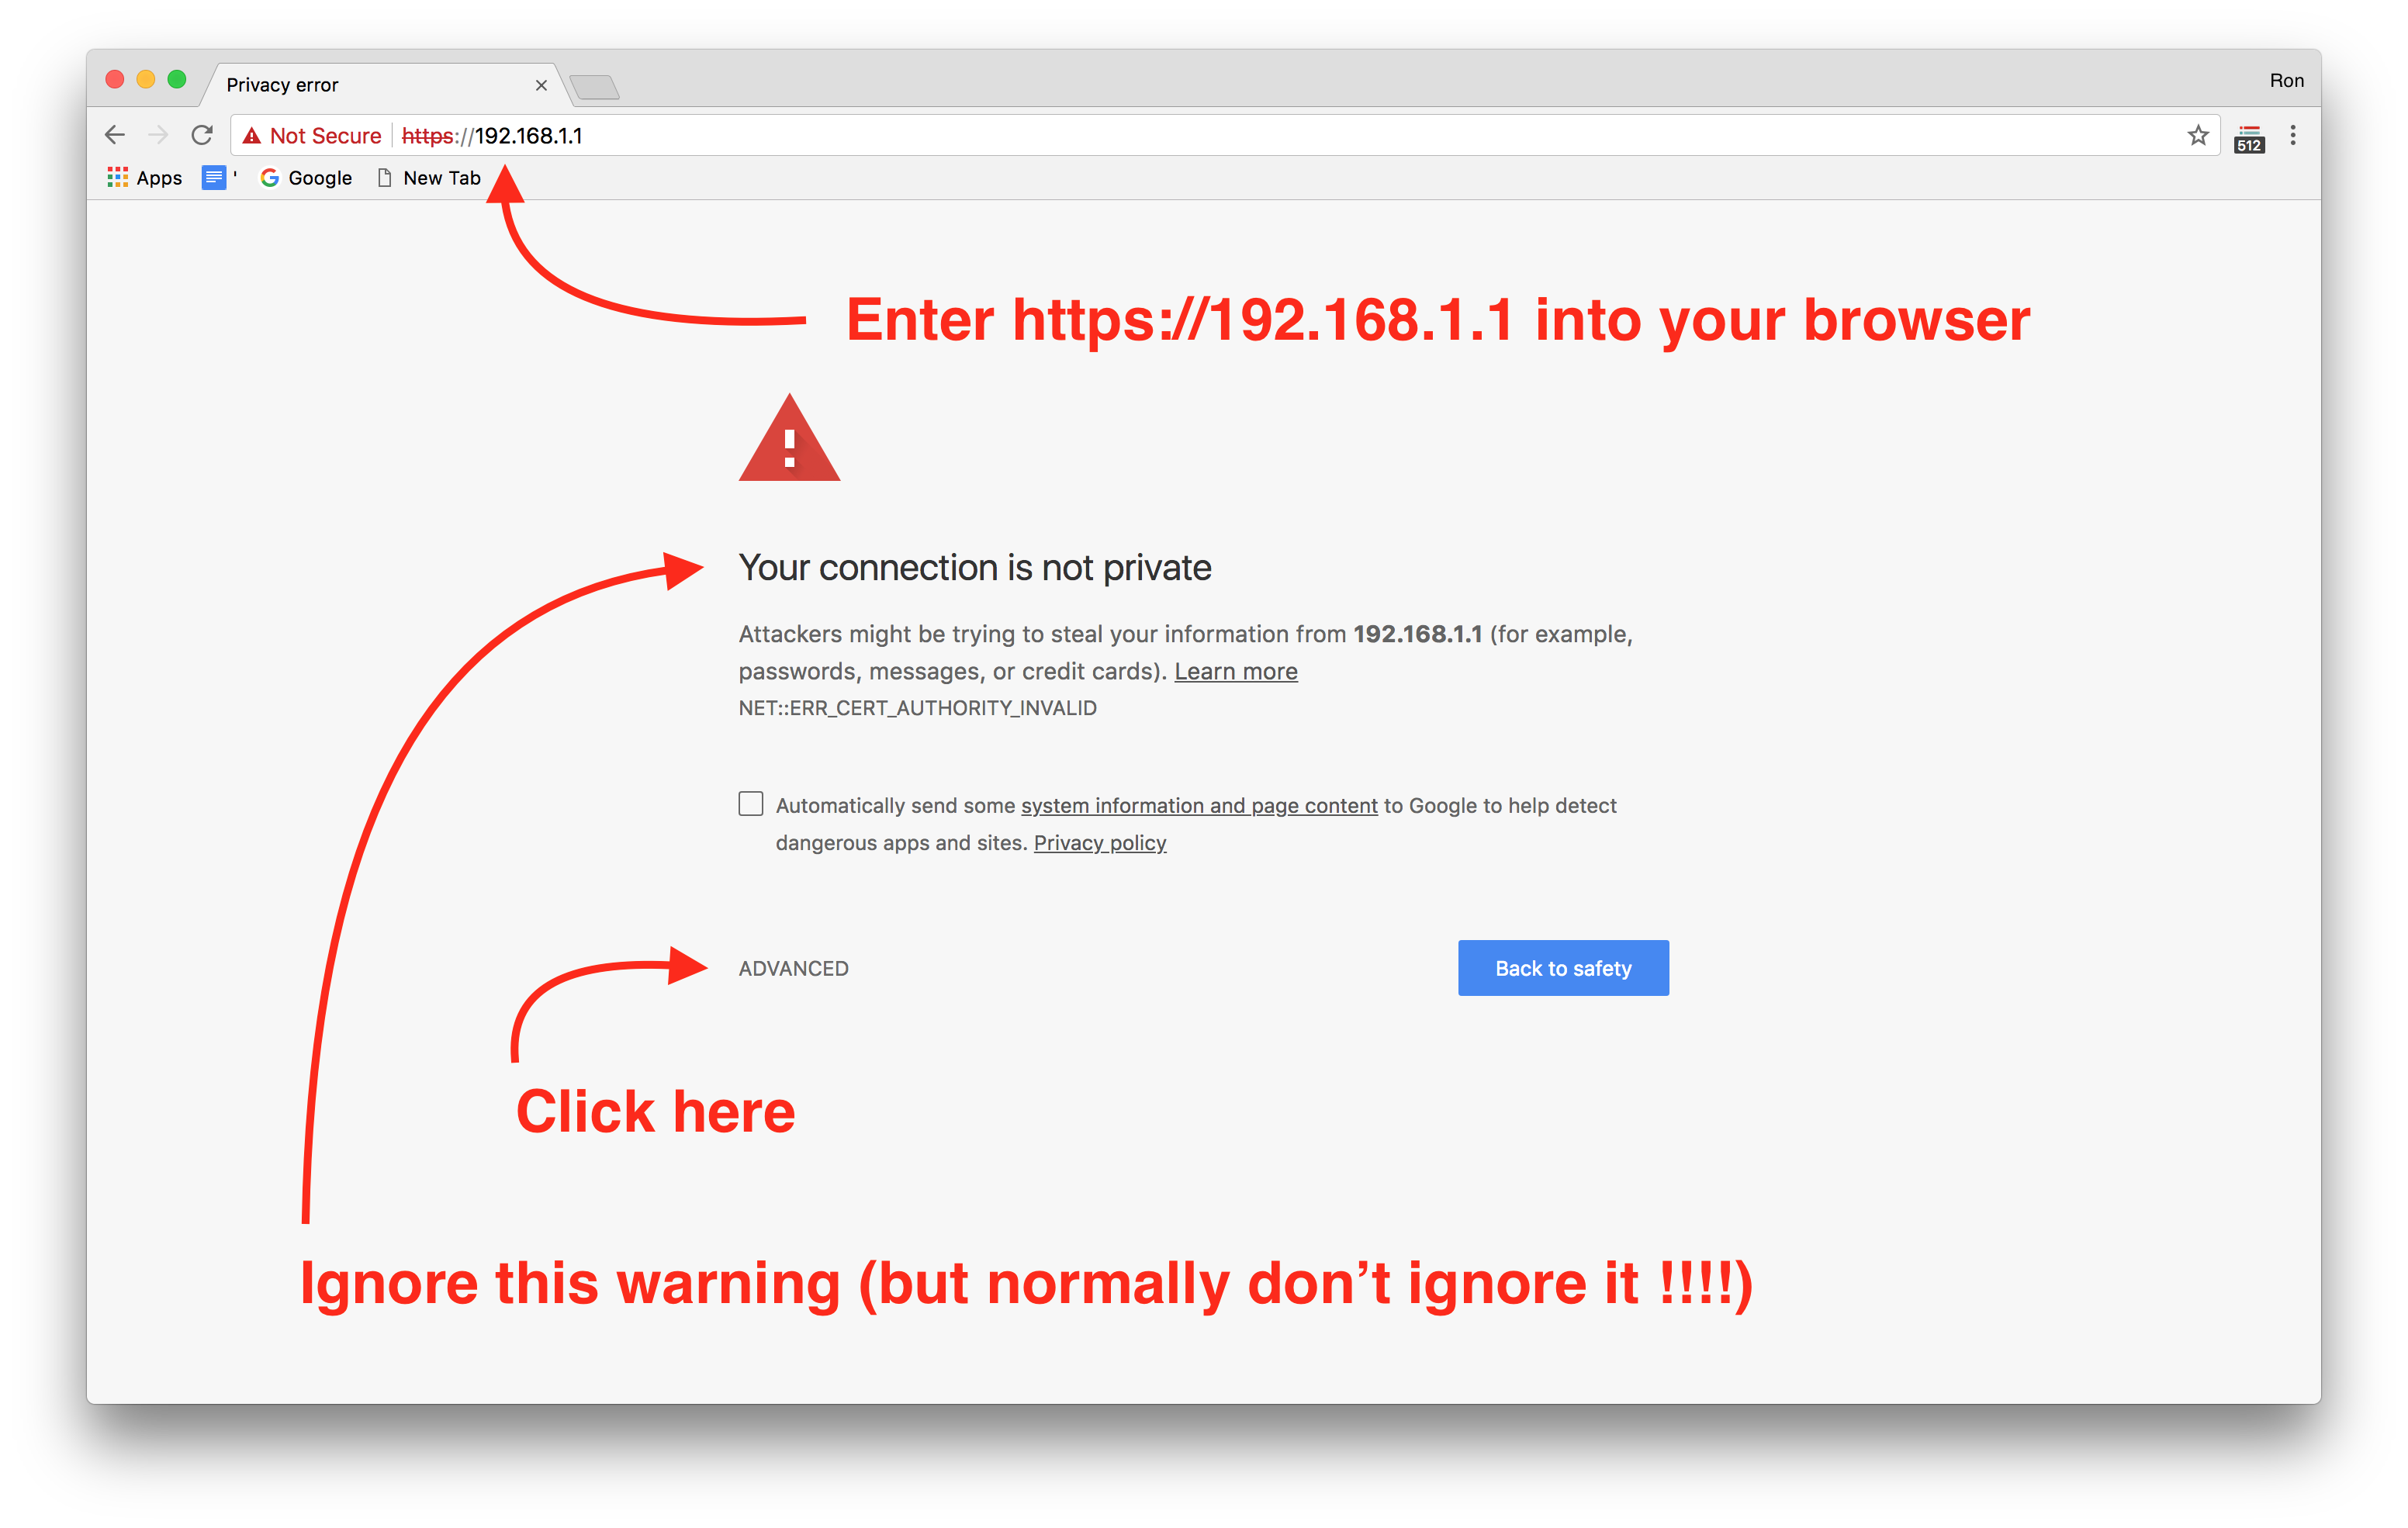
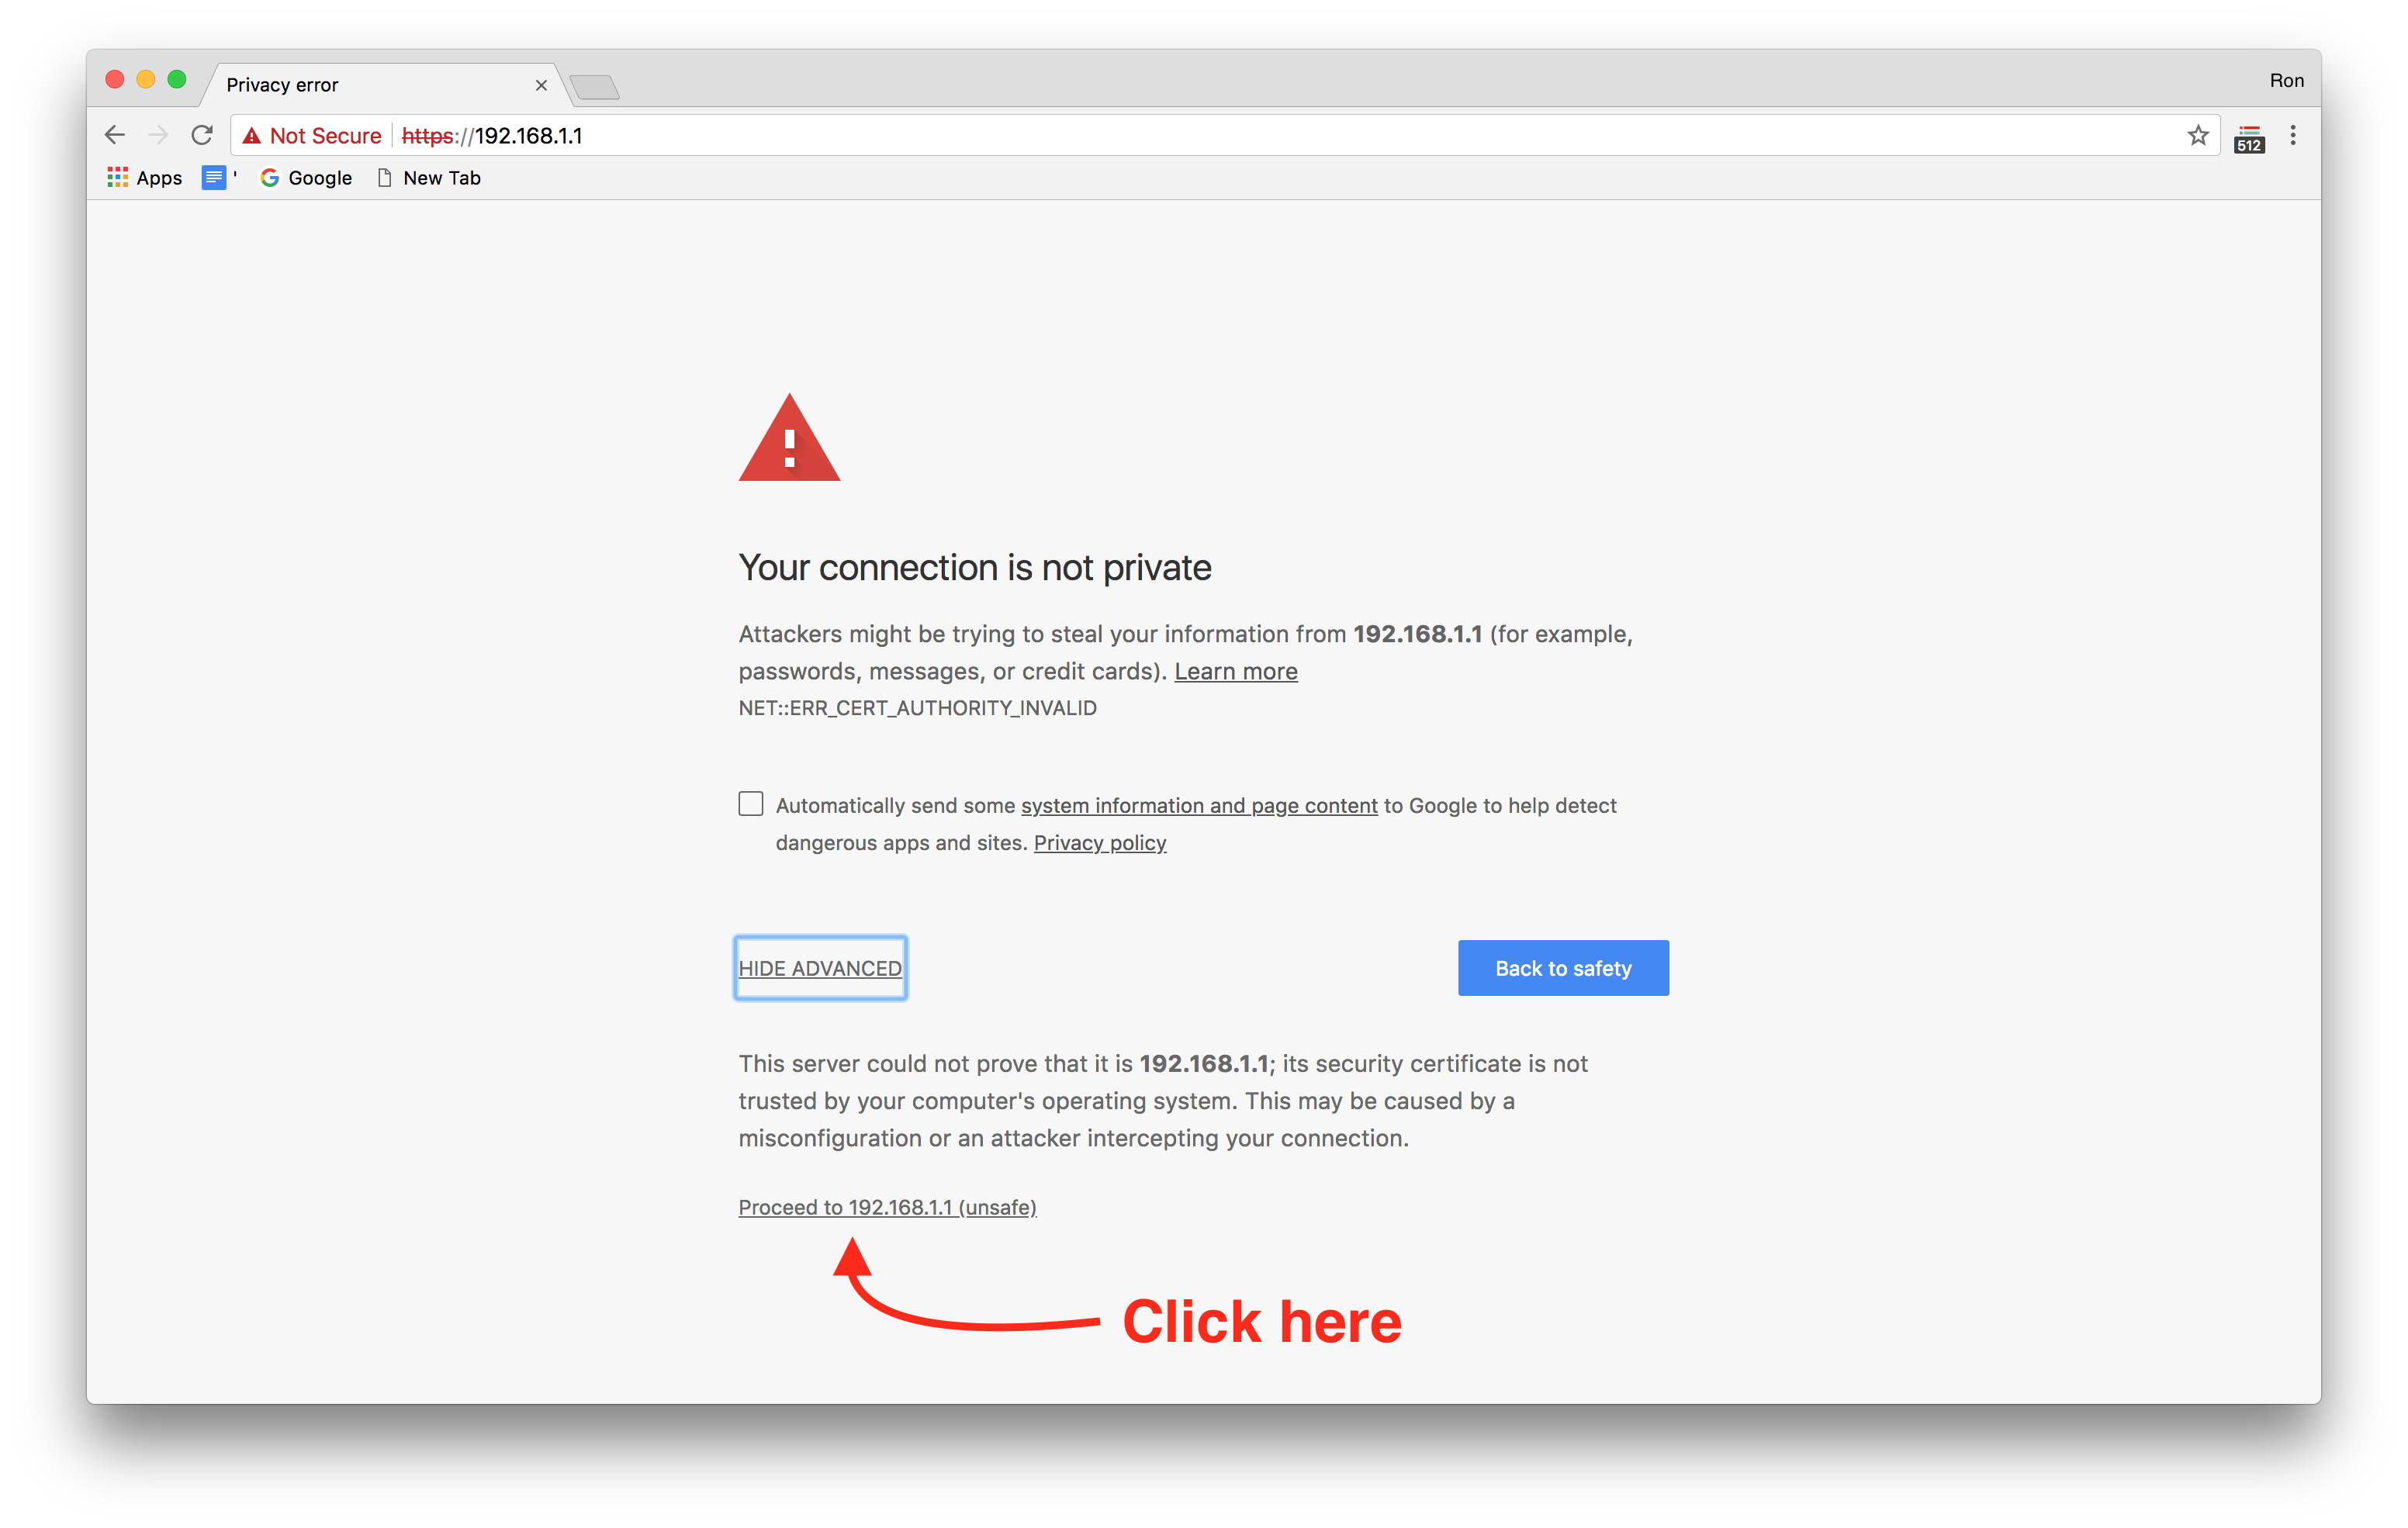
Now turn off the wifi and navigate in a browser to https://192.168.1.1. You may have some issues with this connection is not secure, ignore them and proceed to the website (see below for an example on chrome):
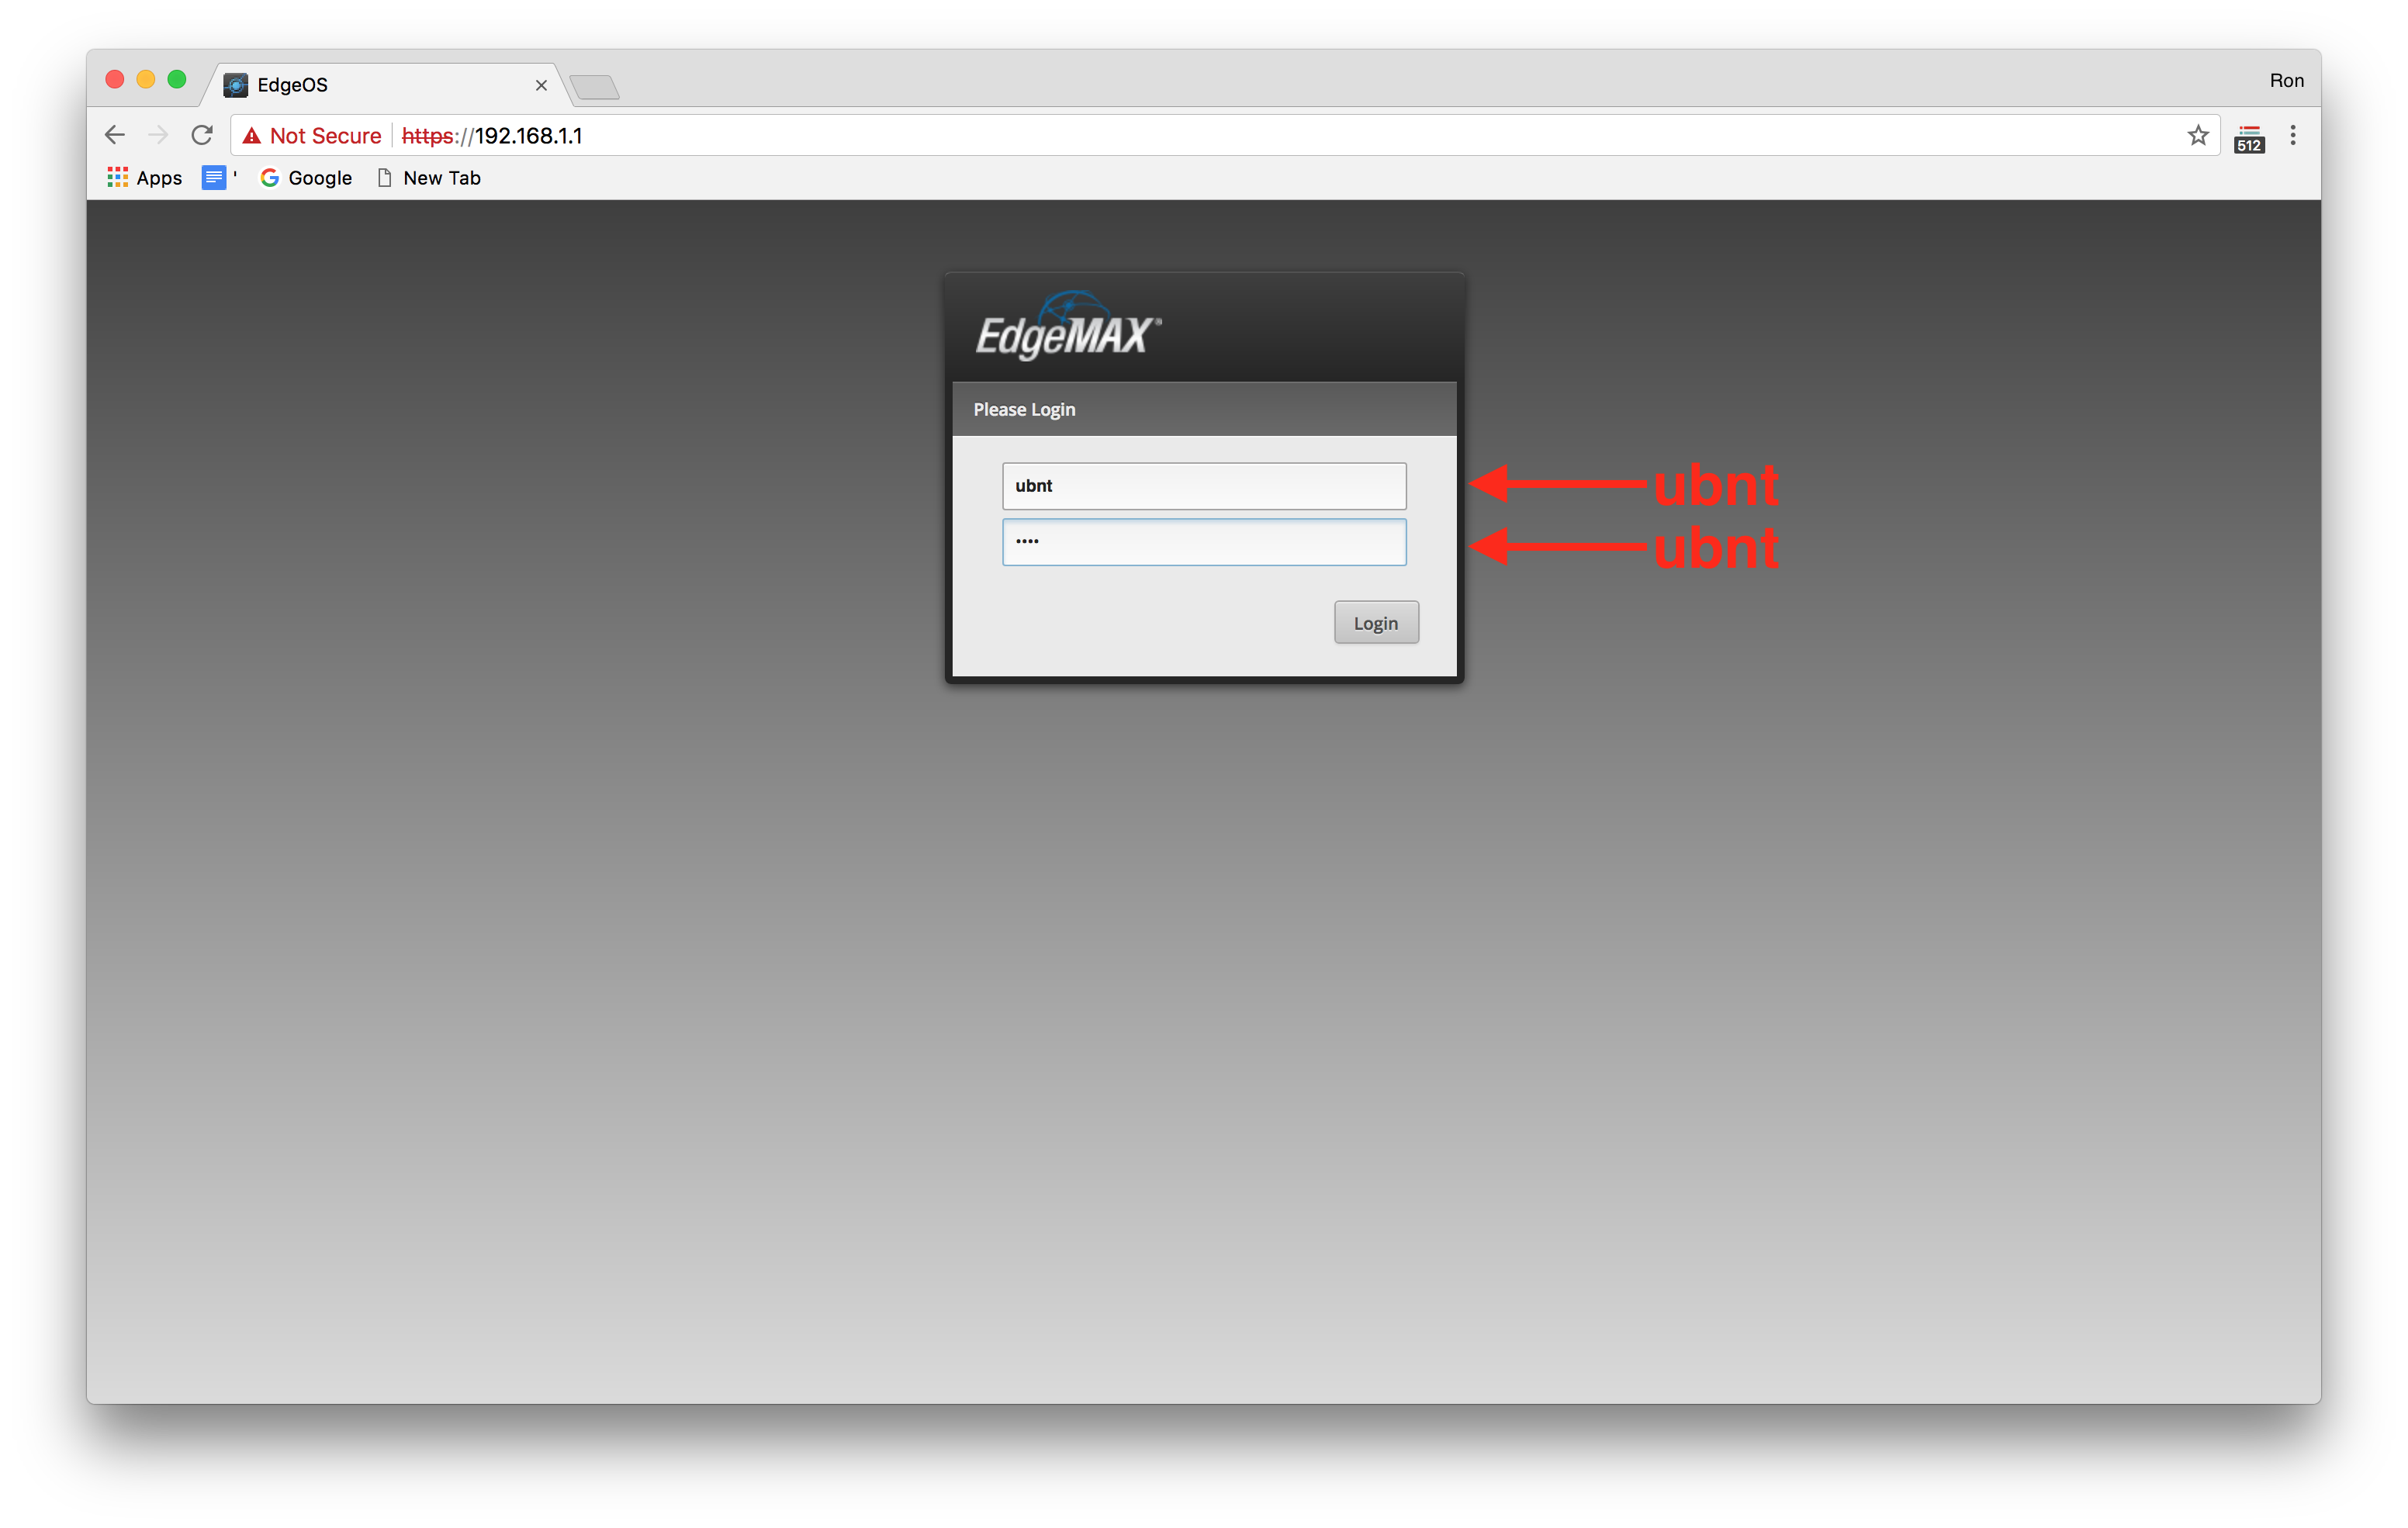
Once you have correctly navigated to the website, you should see a login page like the following:

Enter the login credentials as follows:
Username: ubnt
Password: ubnt
These are the default credentials and you will want to change them (this will be covered later). If successful, you should see a dashboard for the EdgeOS:
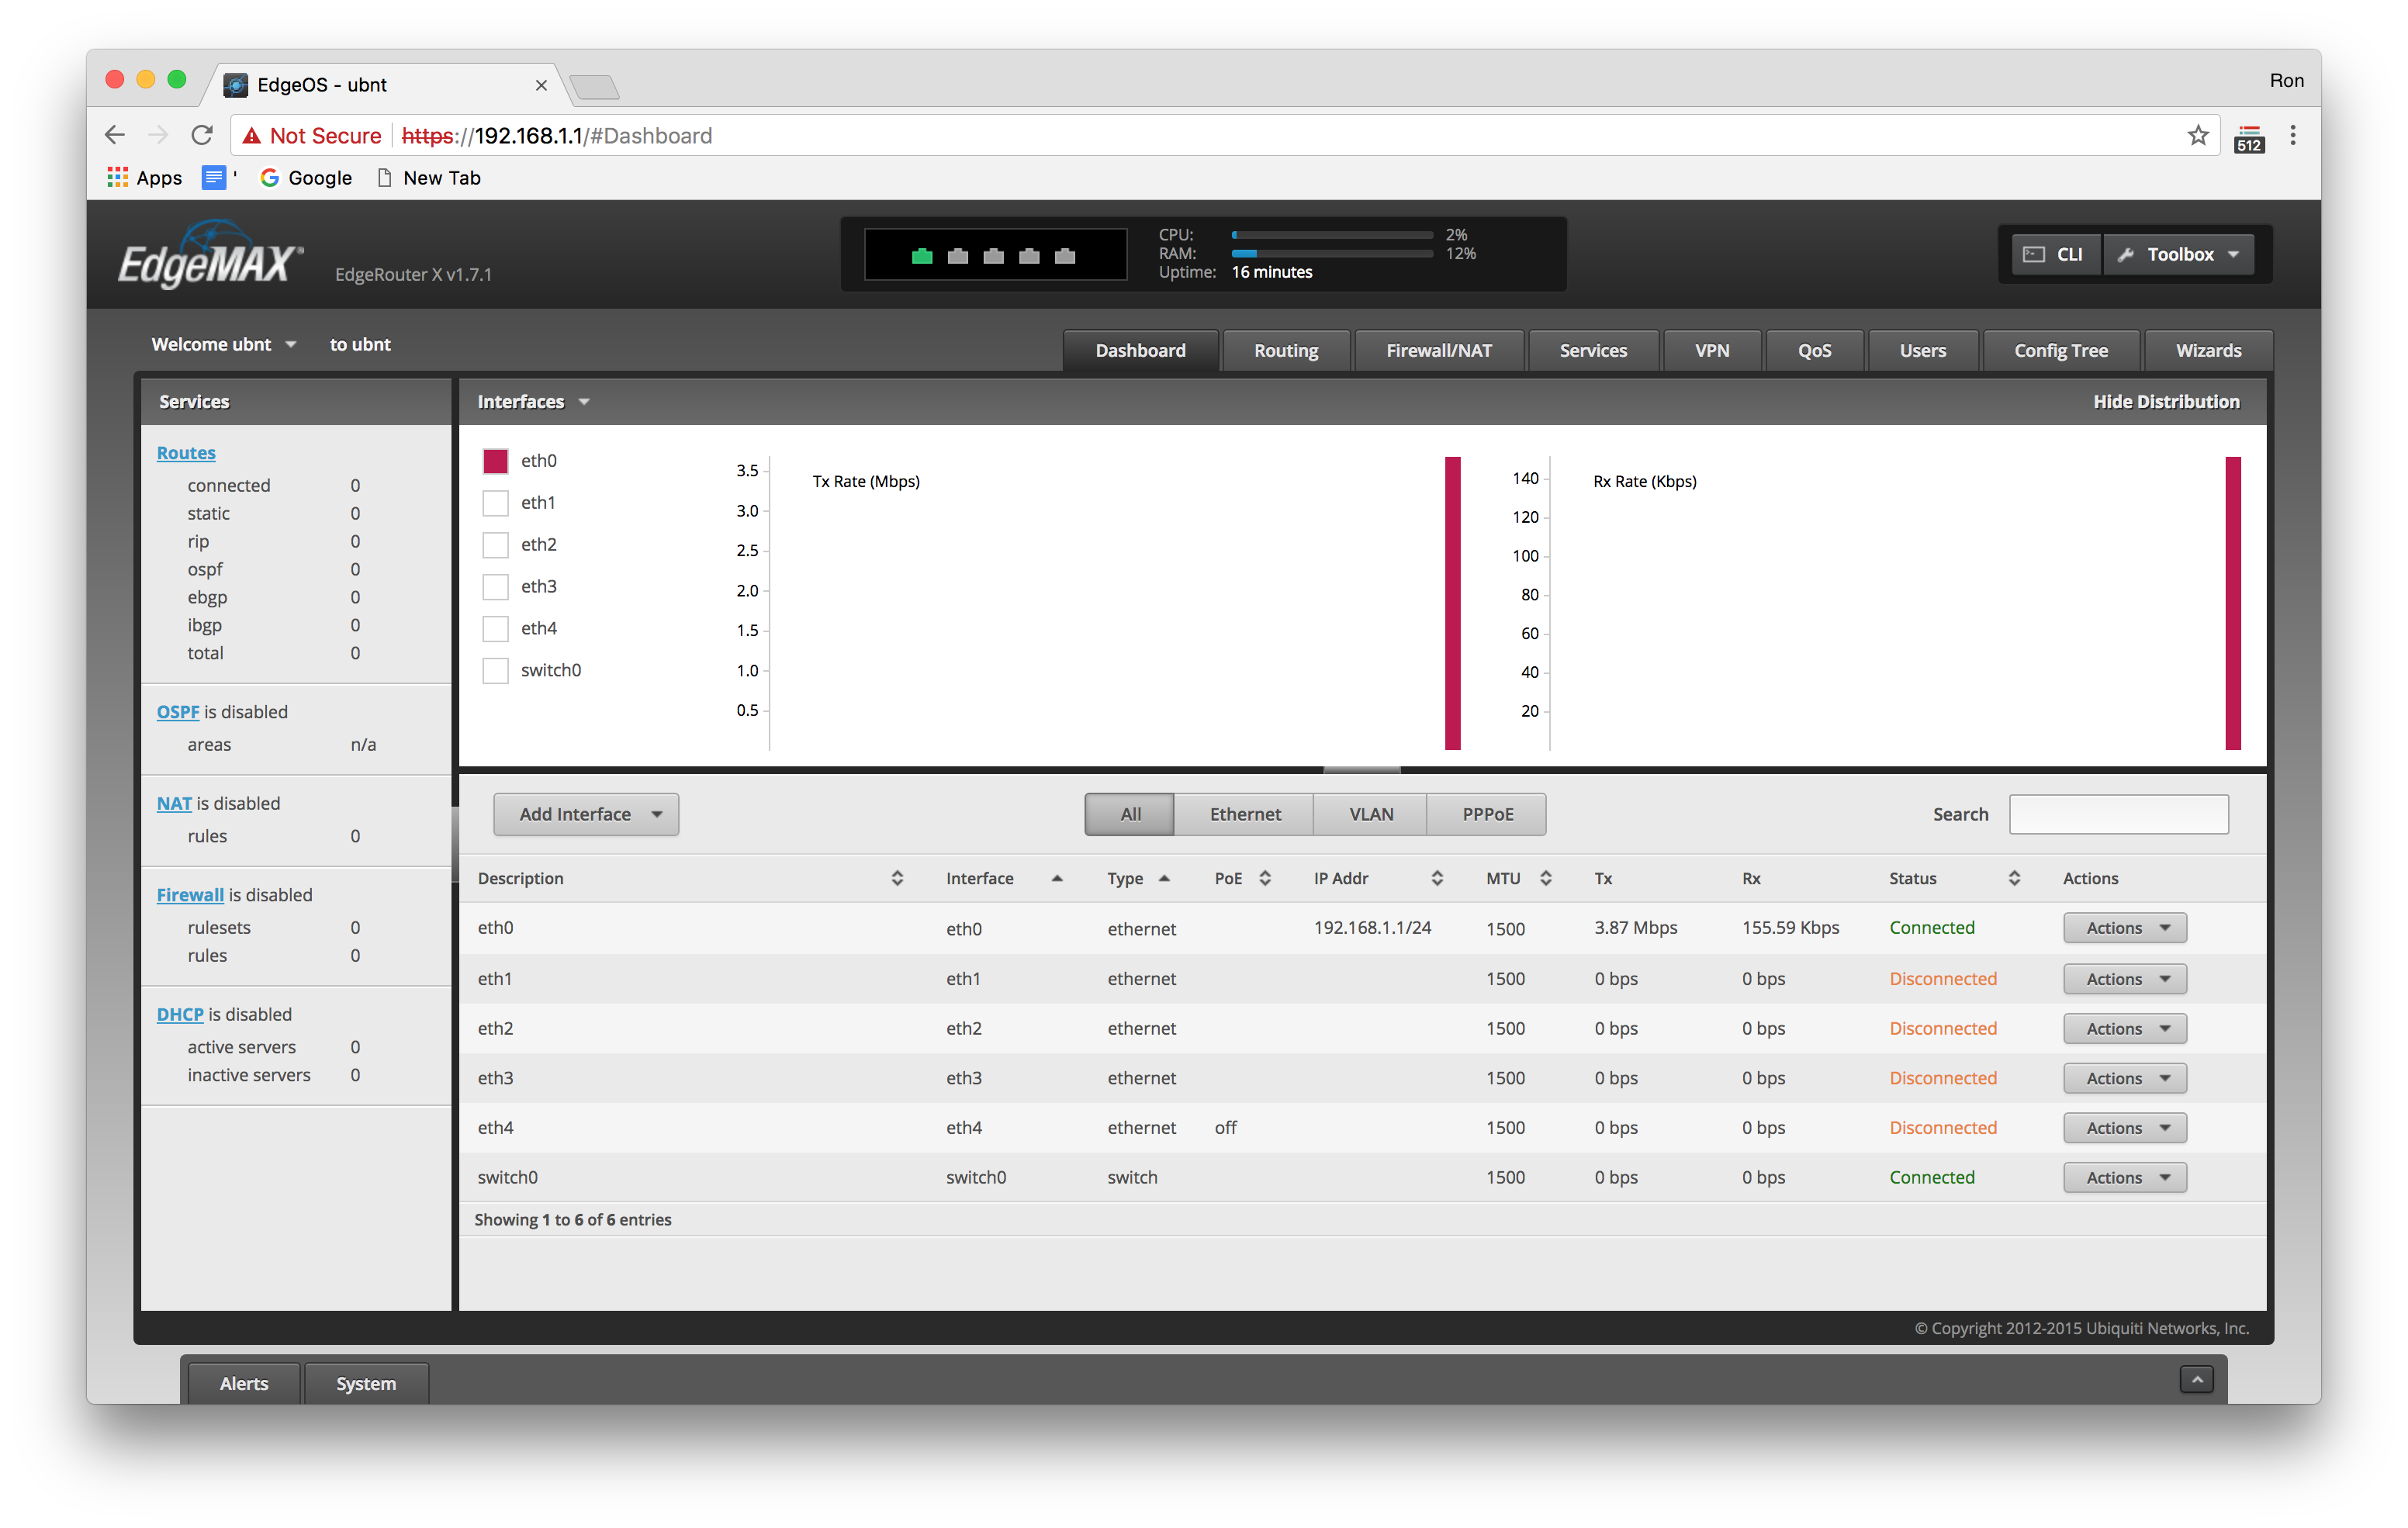
You have completed the initial login to the router! Now in the next section we will look at how to update the firmware.
Update Firmware
Before we move any further, it would be wise to take this oppurtunity to update the firmware. At the time of writing, my EdgeRouter X shipped with the default firmware version v1.7.1. After updating to the most recent version (at the time of writing v1.10.1), many more features became available (e.g. hardware offloading).
To get started, navigate to the Ubiquiti Edge Router firmware page and download version v1.10.1 for model no: ER-X to your local machine (we will upload from your main laptop/desktop computer to the Edge Router). This is assuming that you are downloading the firmware v1.10.1 for the Edge Router X (model no: ER-X). If not, then look for the firmware for your specific model.
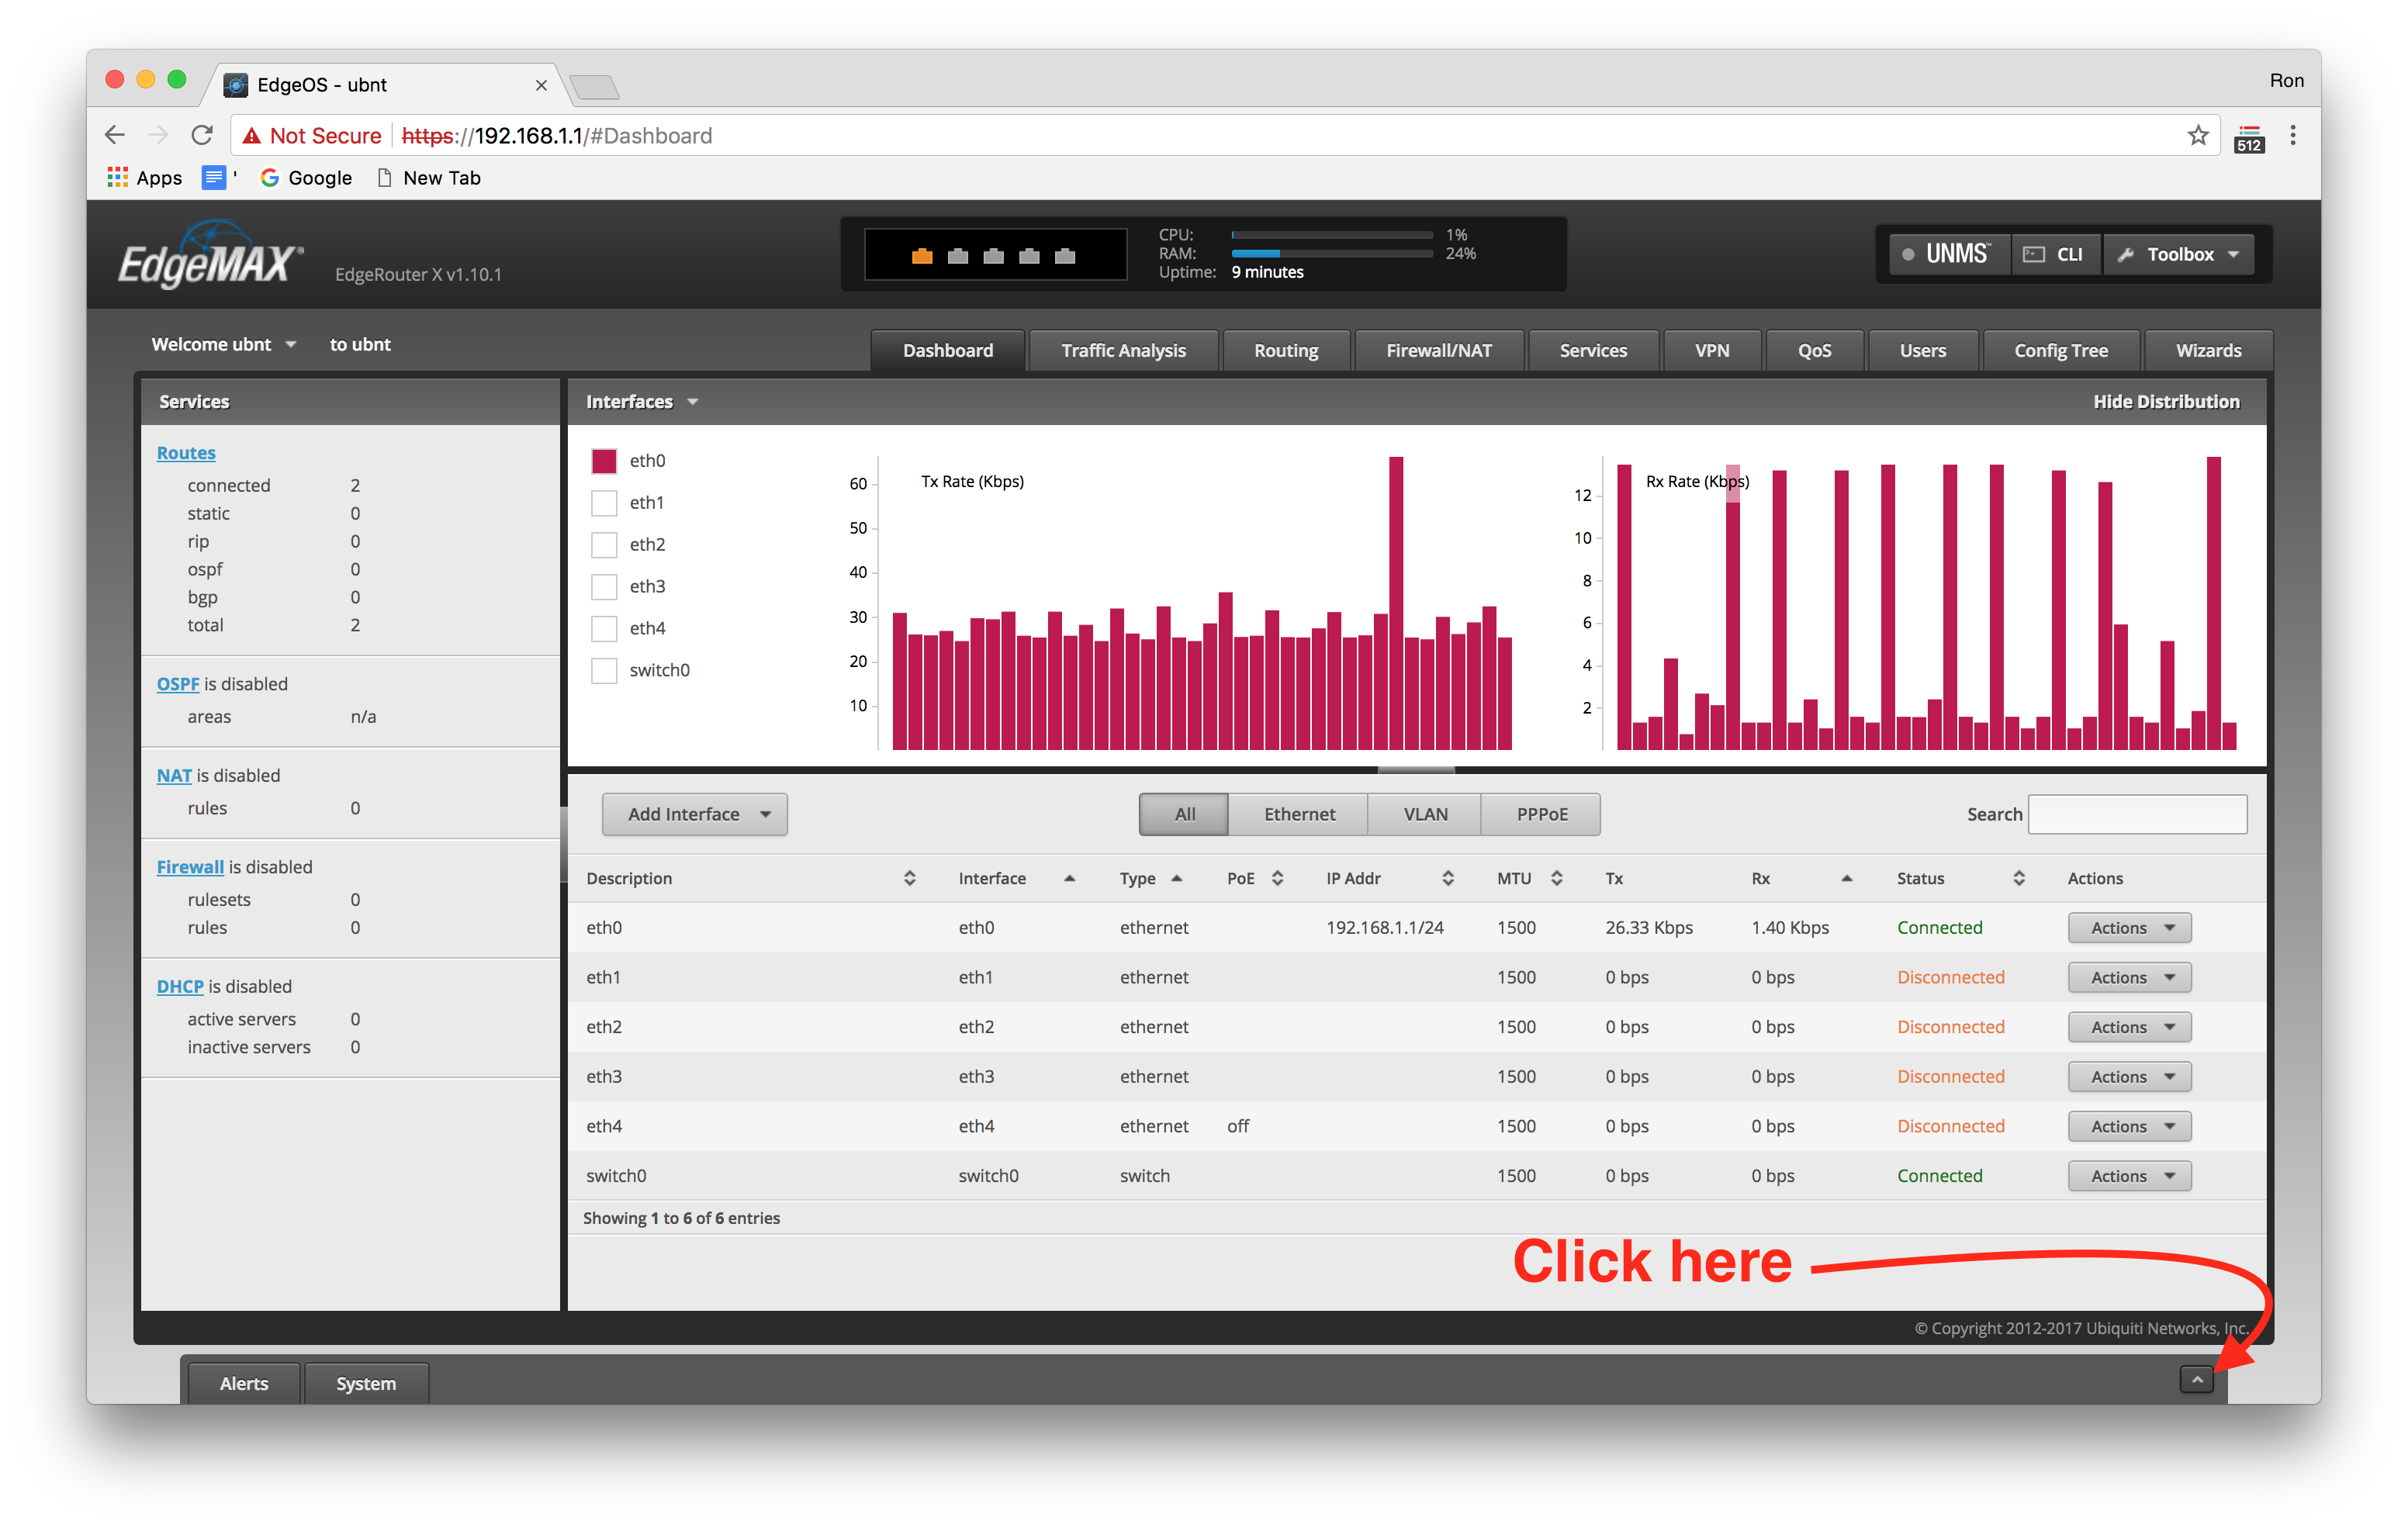
Once the file is downloaded, open a browser to 192.168.1.1 and login to your Edge Router with the default username/password ubnt/ubnt. Once logged in, click on the alert/system tab on the bottom right hand corner as follows:
Next click on the system tab next to the alert tab as follows:
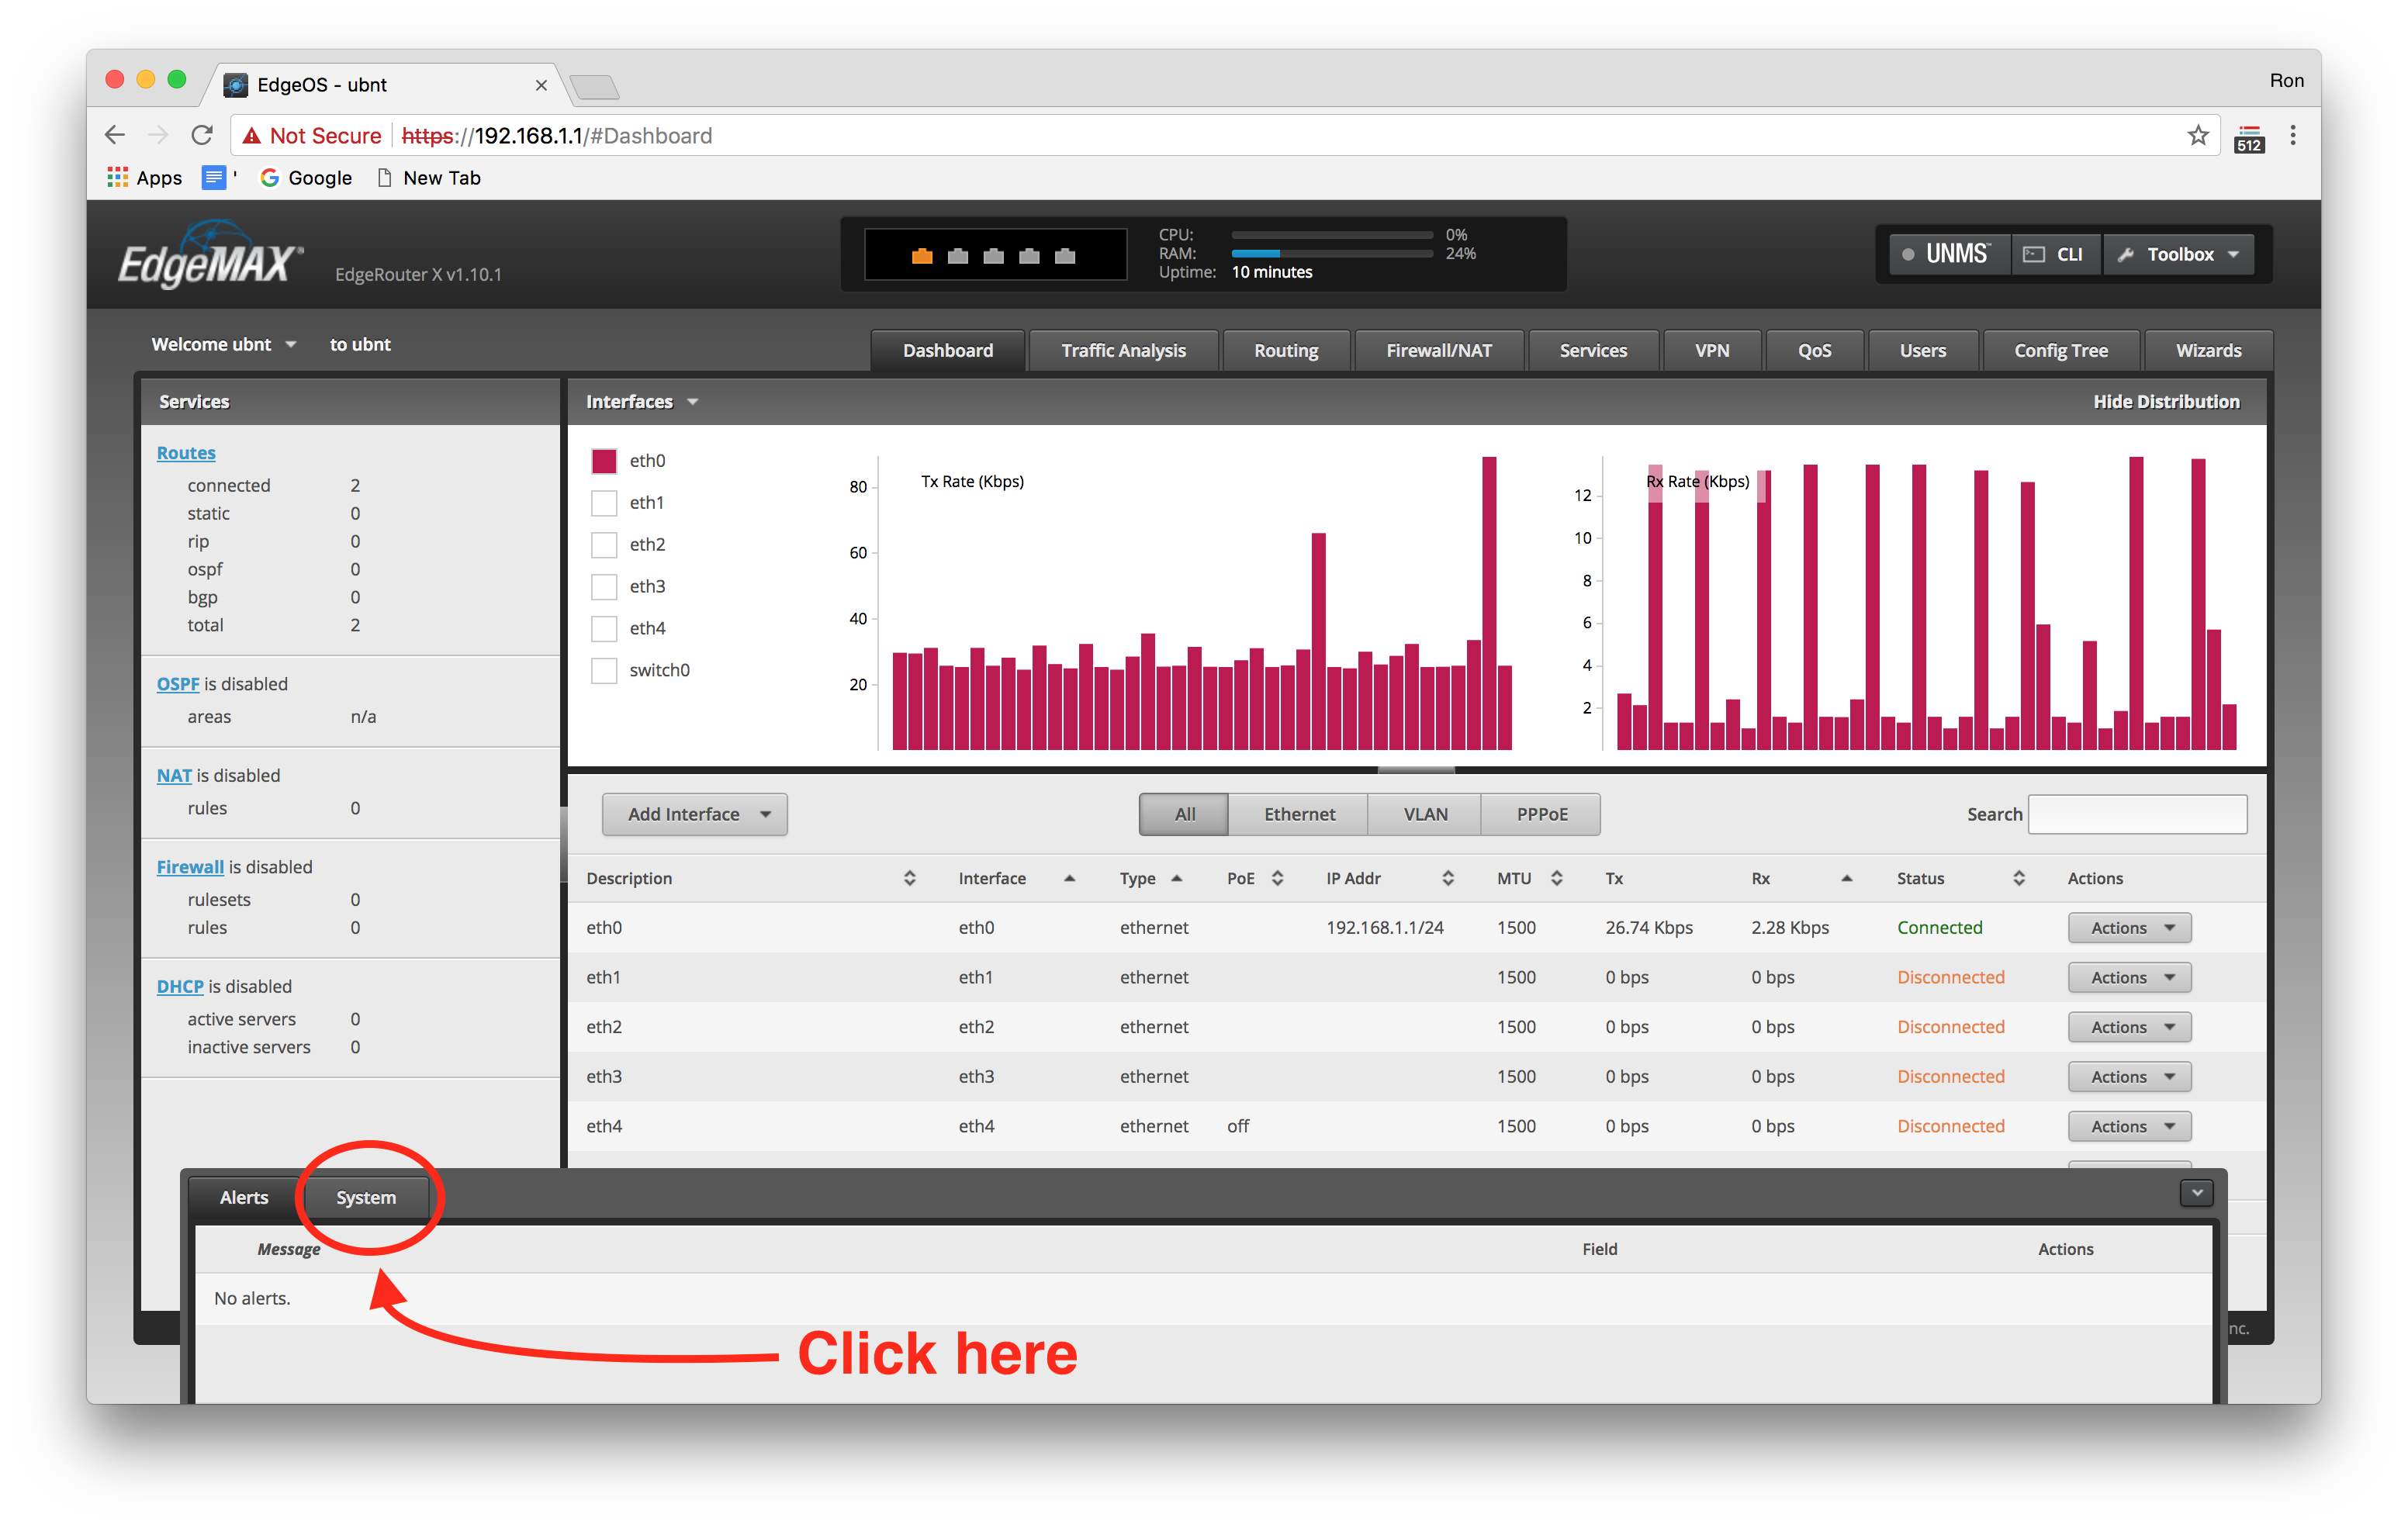
Finally, scroll down to the bottom of the page that opens, and click upload a file:
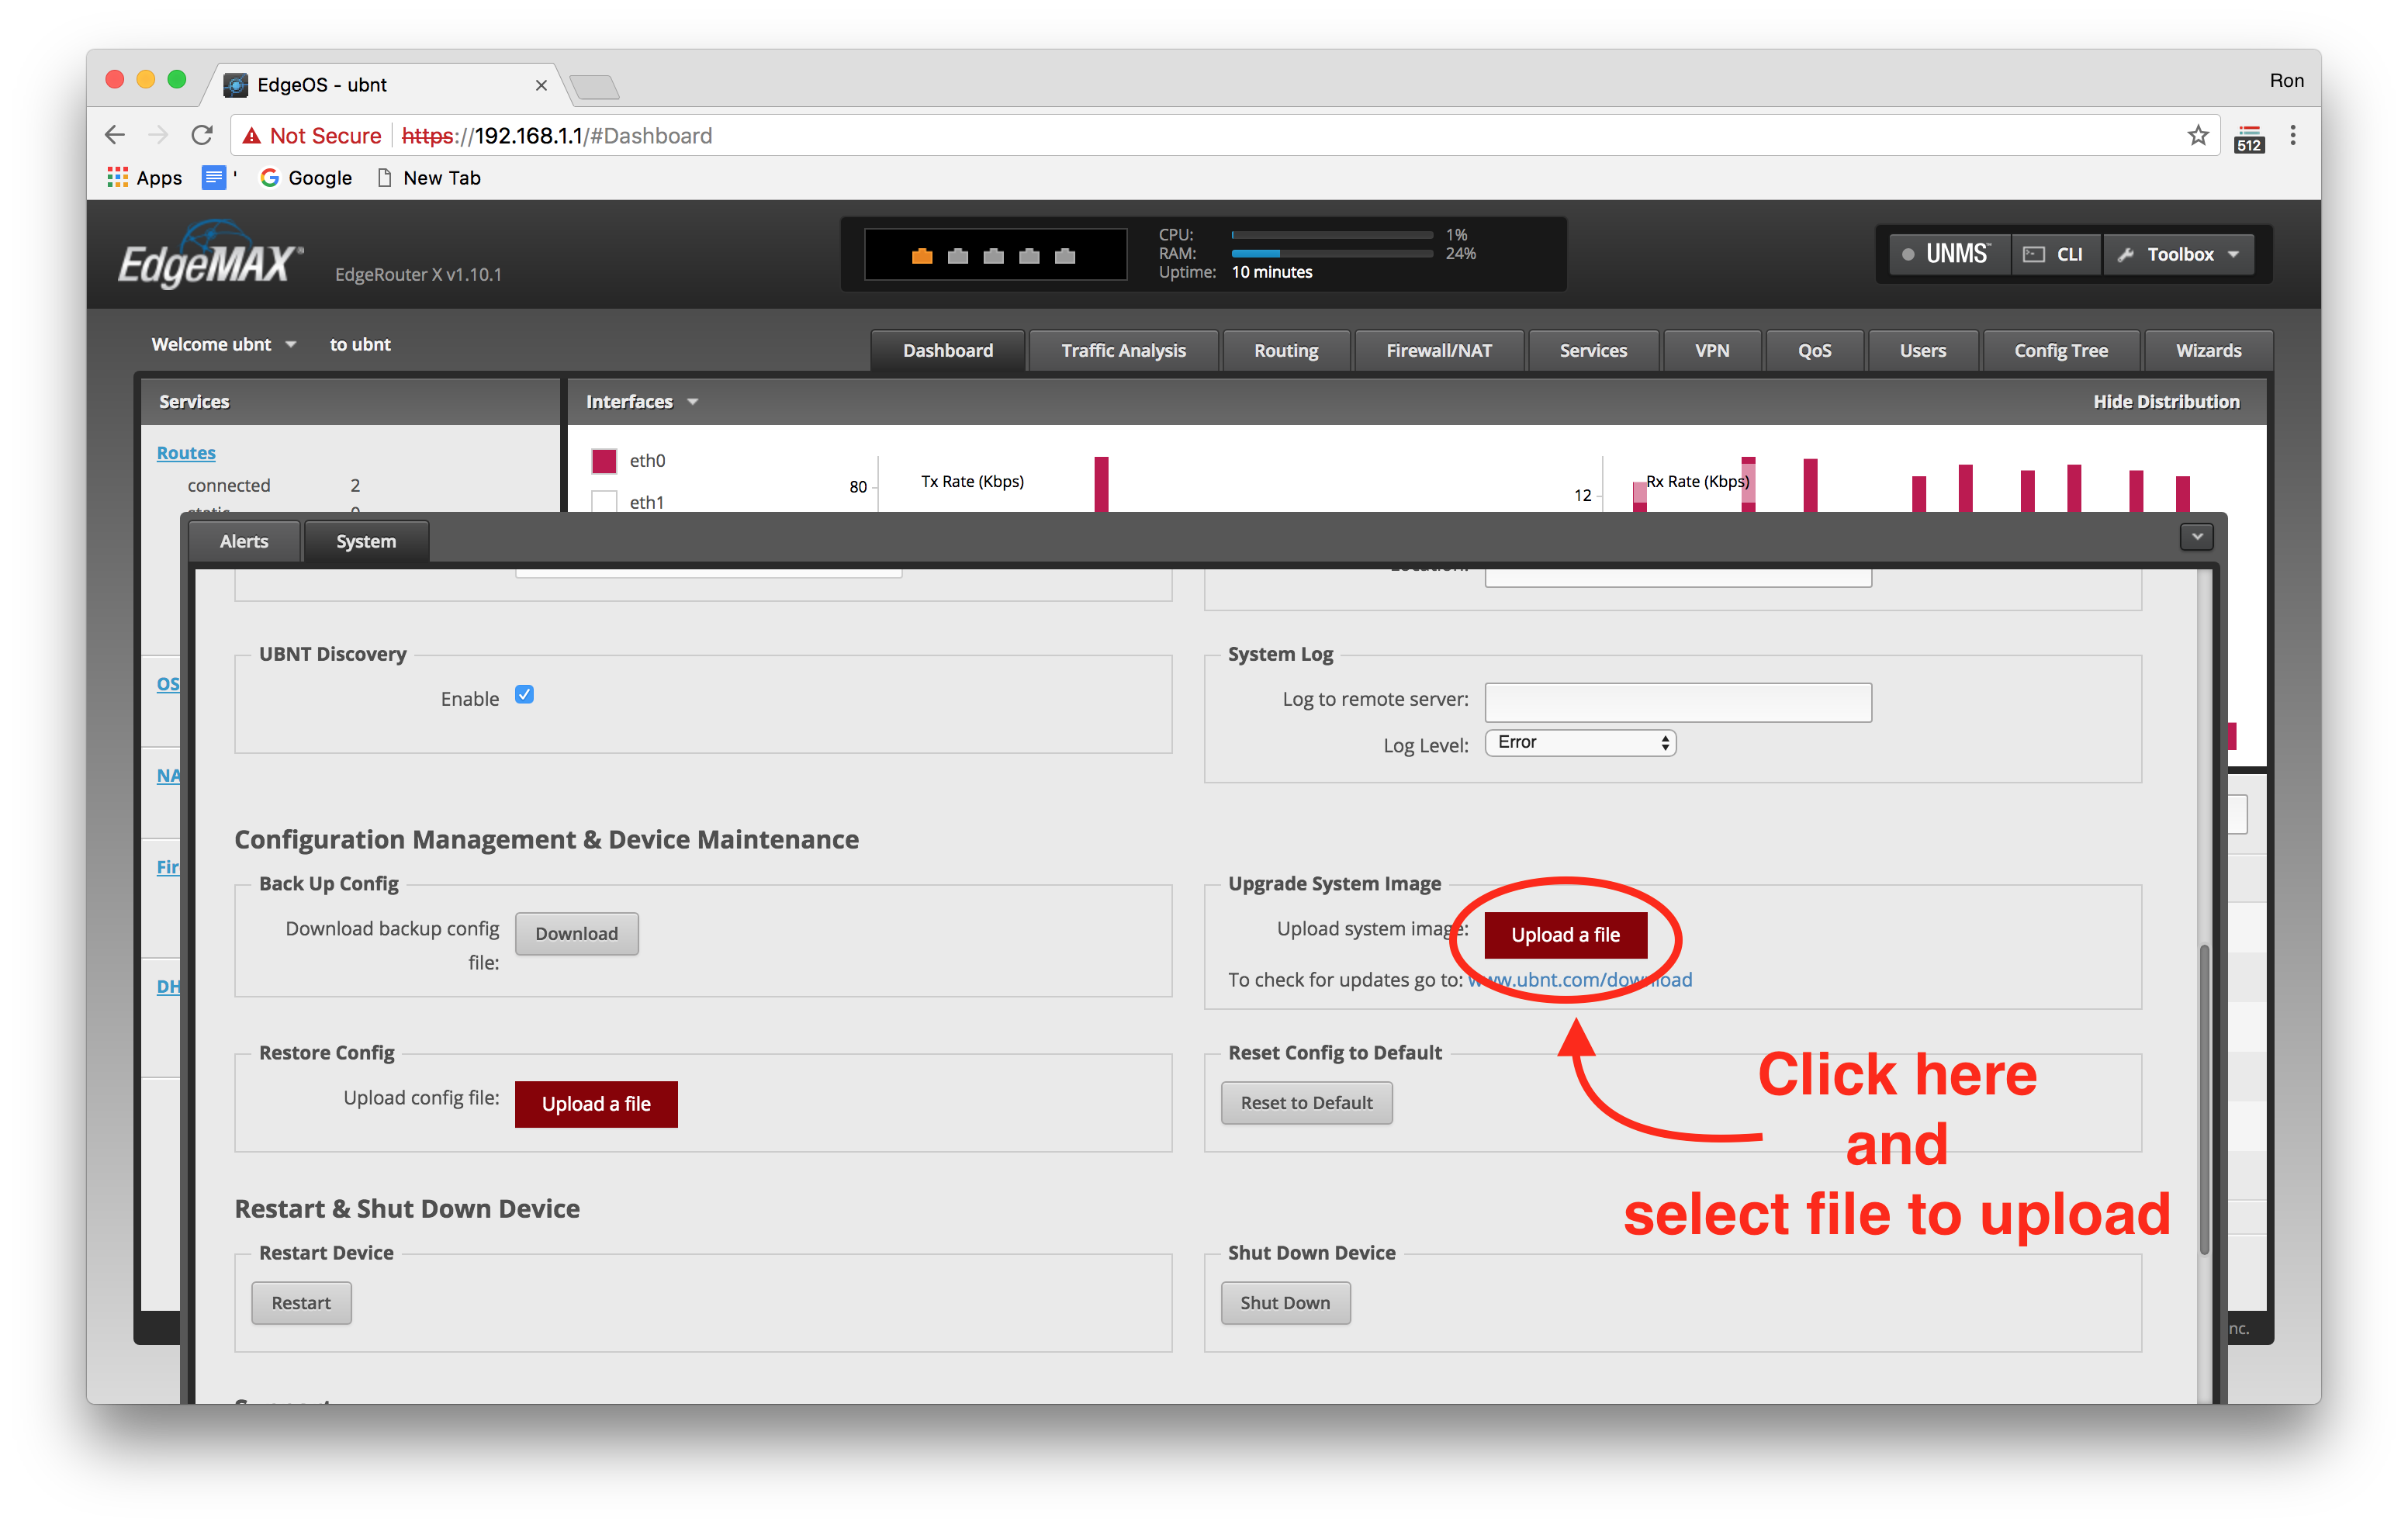
This will start off the updating process, and the router will then install, and restart. Once it reboots, you will be able to continue with configuring the router.
Router Configuration
The following section will cover how to complete the setup and configuration of your router. It is highly recommended to use the pre-made config file.
Upload Pre-made Configuration File (optional)
While you are more than welcome to skip this section and follow the “basic configuration” that is outlined in the next section, it is highly recommended you complete your setup by uploading this pre-made configuration file.
“Why should I … “ you may ask, and here is why:
- Because all the performance configurations have been turned on
- Because all the security issues have been secured
- Because it’s really easy.
That should have convinced you (if you’re not a masochist). To get started go ahead and click the config file download link below:
A word of caution before continuing: This config file was created on an Edge Router ER-X model with firmware version v1.10. Please make sure you have followed the steps in the last section to upgrade the firmware before proceeding further.
Now that you have the file downloaded, and you are sure you have updated the
firmware to version v1.10, you simply need to transfer the file you just
downloaded to your local machine to the router using a command call scp (short
for secure copy).7 It should look something like this:
$ scp path/to/your/download/config.boot.zerocool ubnt@192.168.1.1:/config
If like me you are using an Apple computer, then the file will be in your downloads folder and you can write the path as follows:
$ scp ~/Downloads/config.boot.zerocool ubnt@192.168.1.1:/config
Where ~ is shorthand for /Users/your_username/ which is your home directory.
Now the new config file will be in the /config directory on the router. We
just need to login to the router, cd /config to the config directory, make a
back up of the current config file, and then rename our new file as the old
config file. Sound easy? It is don’t worry. First let’s login:
$ ssh ubnt@192.168.1.1
Welcome to EdgeOS

By logging in, accessing, or using the Ubiquiti product, you
acknowledge that you have read and understood the Ubiquiti
License Agreement (available in the Web UI at, by default,
http://192.168.1.1) and agree to be bound by its terms.

ubnt@192.168.1.1's password:
Again, for the password just type ubnt and you’re good to go
ubnt@192.168.1.1's password: ubnt
Linux ubnt 3.10.107-UBNT #1 SMP Mon Mar 5 18:53:35 UTC 2018 mips
Welcome to EdgeOS
ubnt@ubnt:~$ cd /config
ubnt@ubnt:/config$
The above command simply got us logged in with the password, followed by a
change of directory (i.e. cd) to the /config directory. Now let’s finish
by backing up the original config.boot file, and renaming the
config.boot.zerocool file:
ubnt@ubnt:/config$ mv config.boot config.boot.original
ubnt@ubnt:/config$ mv config.boot.zerocool config.boot
Now everything is in place and we simply need to reboot the system (using the
shutdown command):
ubnt@ubnt:/config$ sudo shutdown -r 1

Broadcast message from ubnt@ubnt (pts/0) (Tue Jun 12 17:26:30 2018):

The system is going DOWN for reboot in 1 minute!
After 1 minute you will be logged out and the router will begin to reboot.
During this one minute, proceed to the Configuration Complete section, and follow the instructions about configuring the DHCP on your network settings. Once you have read that section you may want to return here and test your login to the router using the new username and password:
$ ssh zerocool@192.168.1.1
Welcome to EdgeOS

By logging in, accessing, or using the Ubiquiti product, you
acknowledge that you have read and understood the Ubiquiti
License Agreement (available in the Web UI at, by default,
http://192.168.1.1) and agree to be bound by its terms.

zerocool@192.168.1.1's password: hack the planet
Linux erx001 3.10.107-UBNT #1 SMP Mon Mar 5 18:53:35 UTC 2018 mips
Welcome to EdgeOS
Last login: Tue Jun 12 17:17:40 2018 from 192.168.1.42
zerocool@erx001:~$
If everything was successful (you used the new username zerocool with password
hack the planet) you should see the above login screen. Notice the user is
zerocool and the hostname is erx001. While this is more secure than the
default username/password that comes with the router, you may still want to
change this to an even more obscure username/password. Please refer to the
Advanced Configurations: Adding/Removing Users to find out how to
add/remove users to the router login system.
Finally your router is now configured and ready to be connected to the internet. You can proceed to the Internet Access section and complete the setup
Basic Configuration Wizard
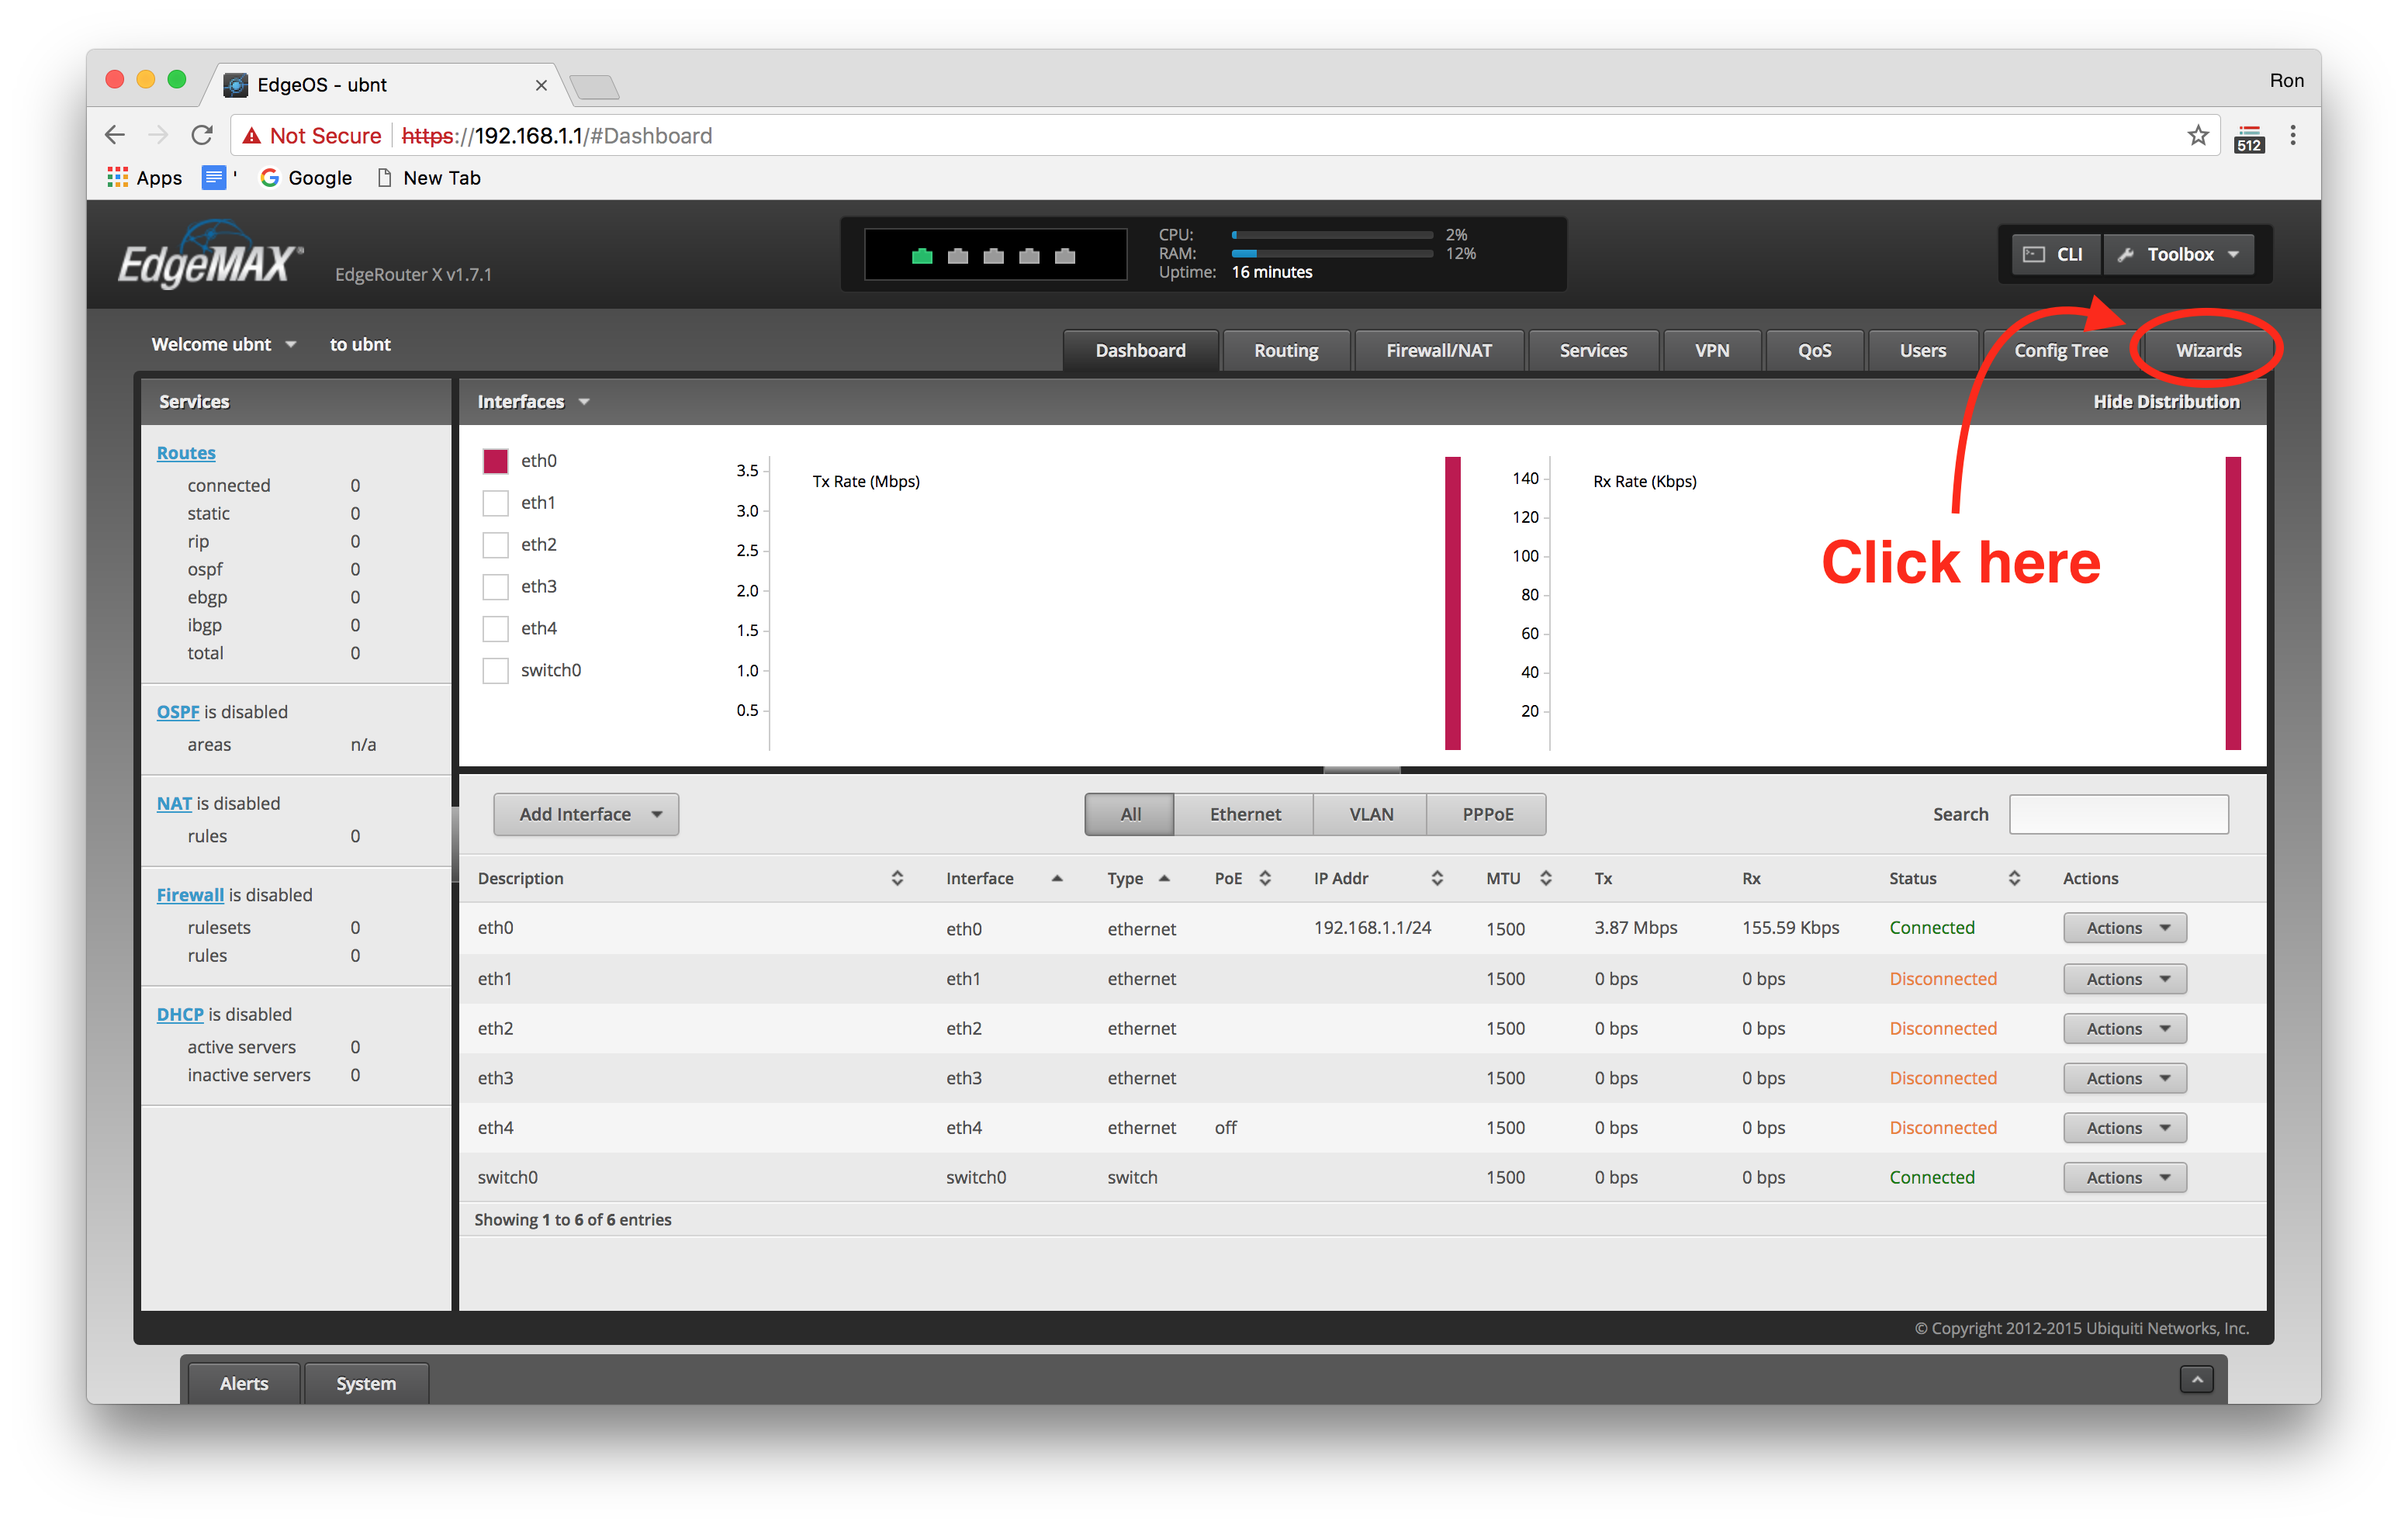
Please make sure you have read the previous section, as it is the best way to configure your router. If for some reason you have decided against this way, which is highly ill advised, then you will need to proceed with the basic configuration wizard. To begin the basic configuration, we need to click on the Wizards tab in the upper right portion of the dashboard (just below the Toolbox button):
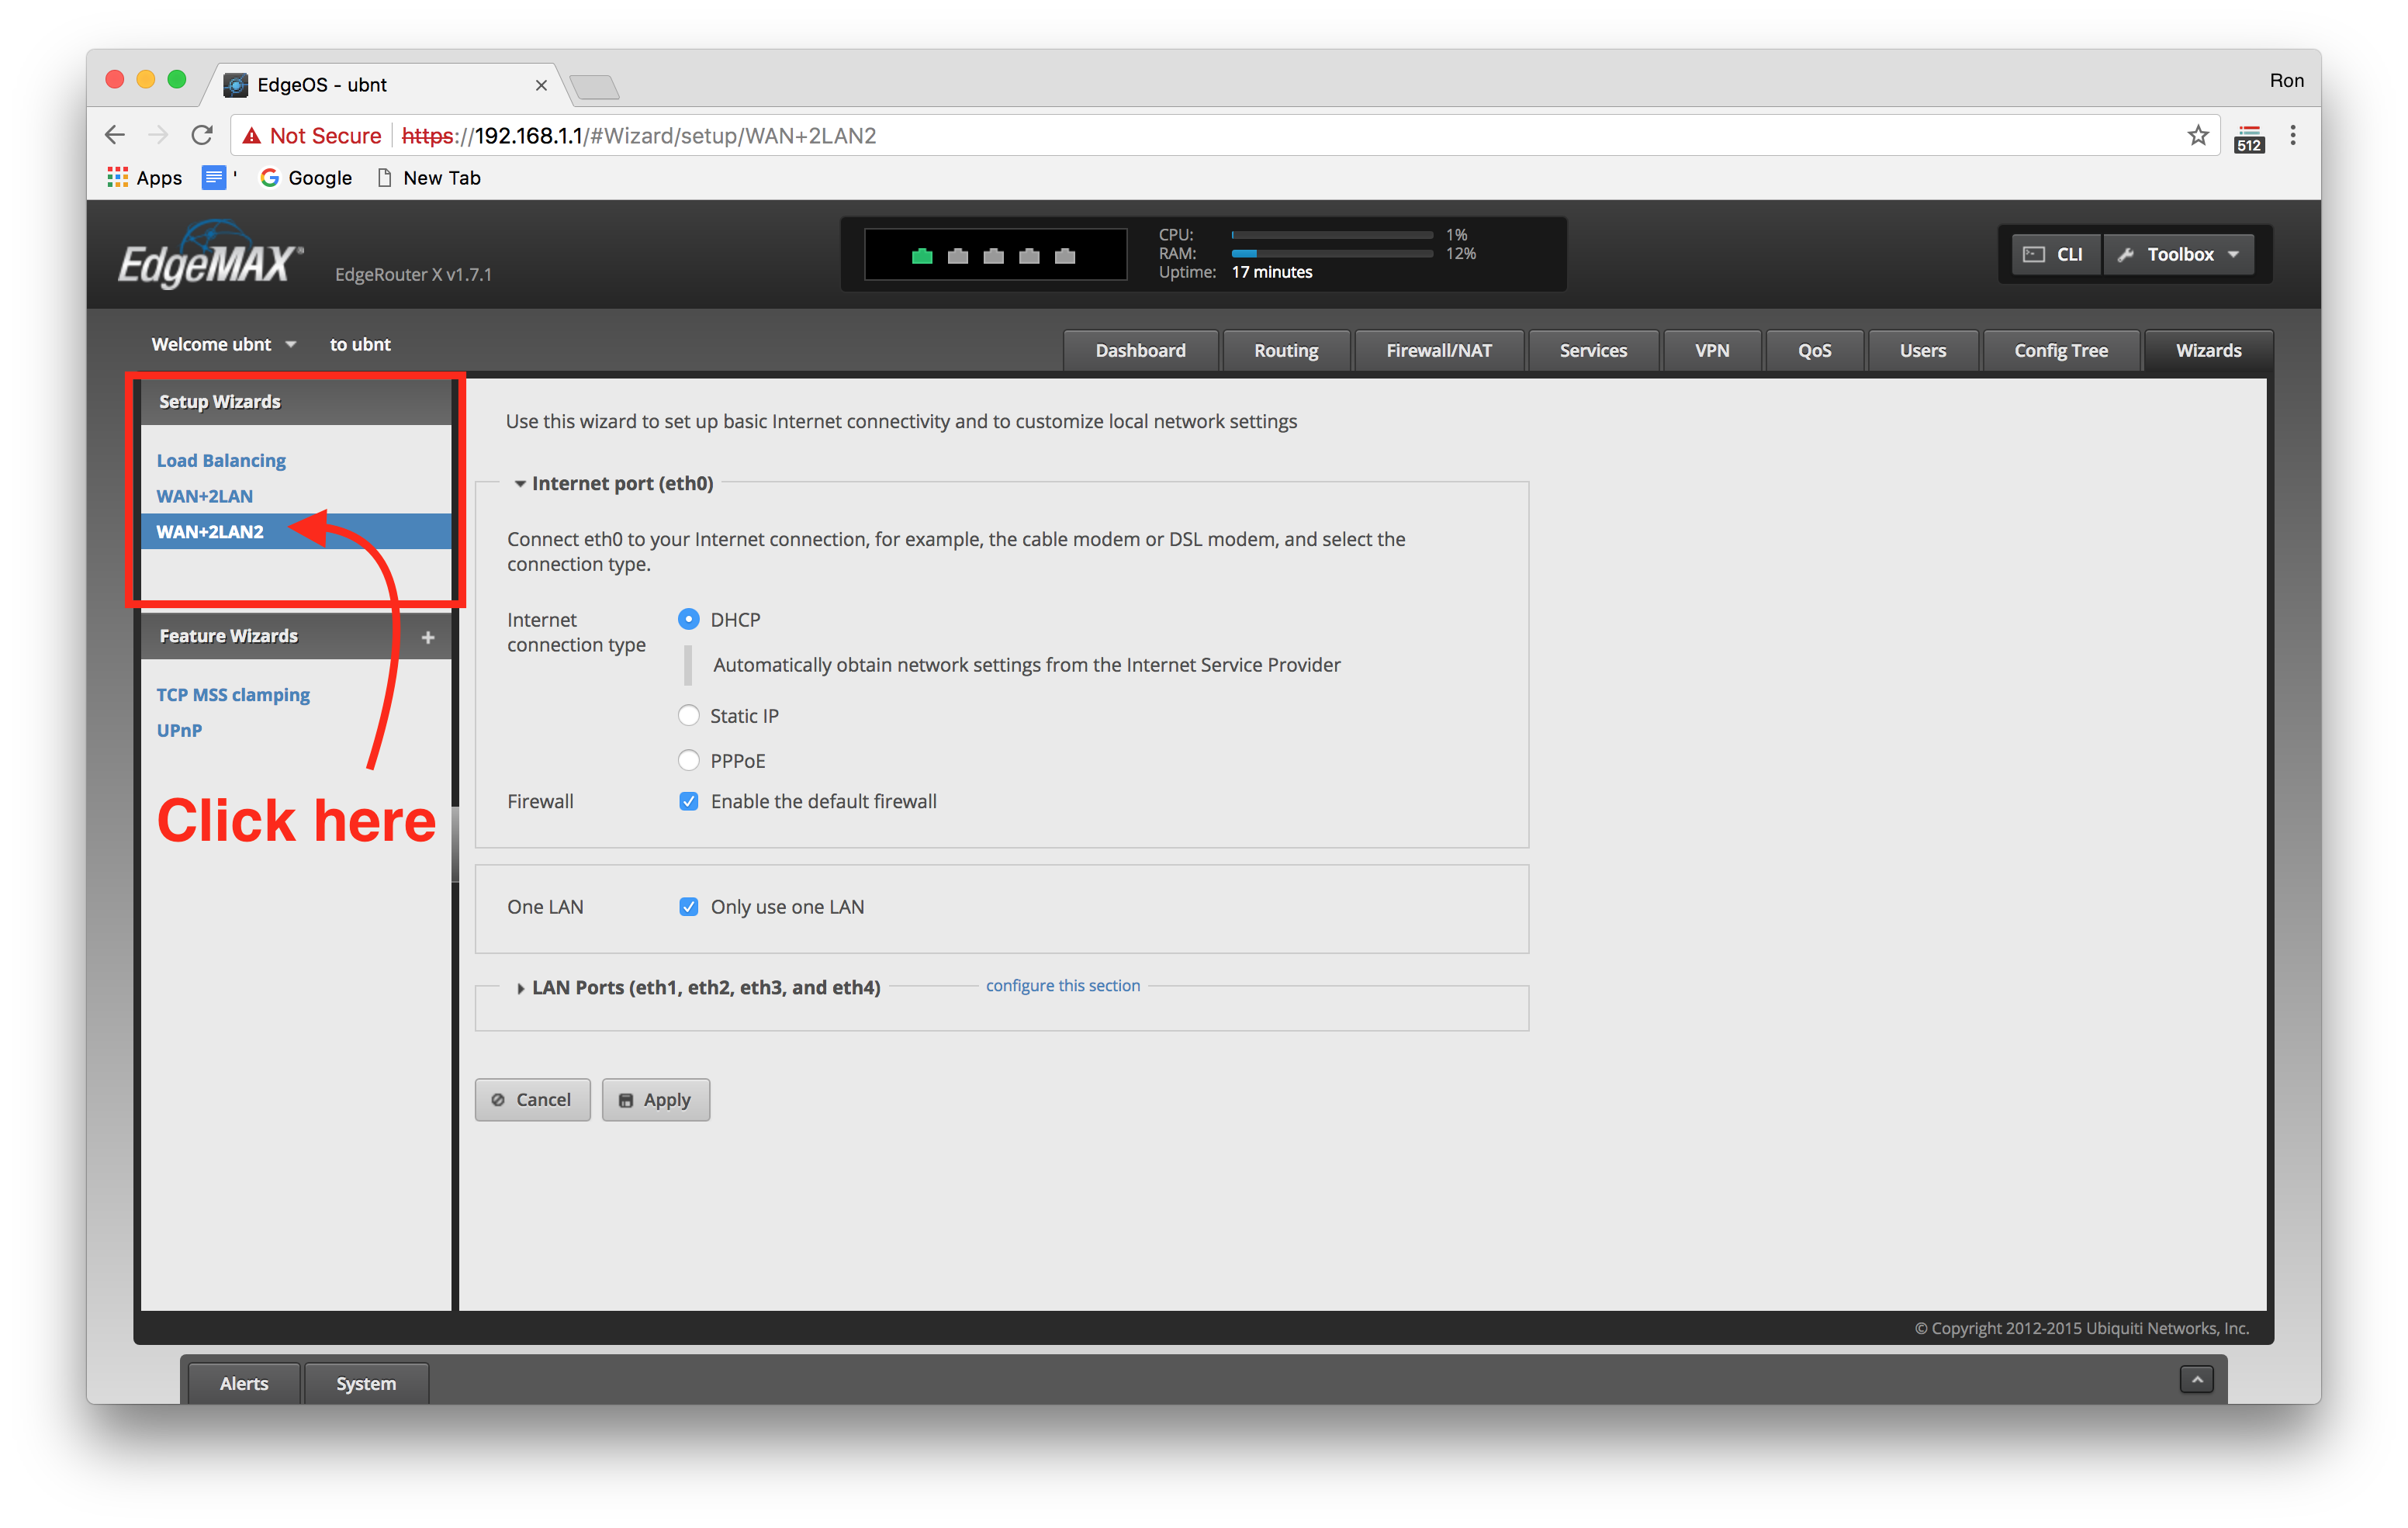
Once you are on the Wizards page, find the list of wizards on the left side, and click on WAN + 2LAN2:
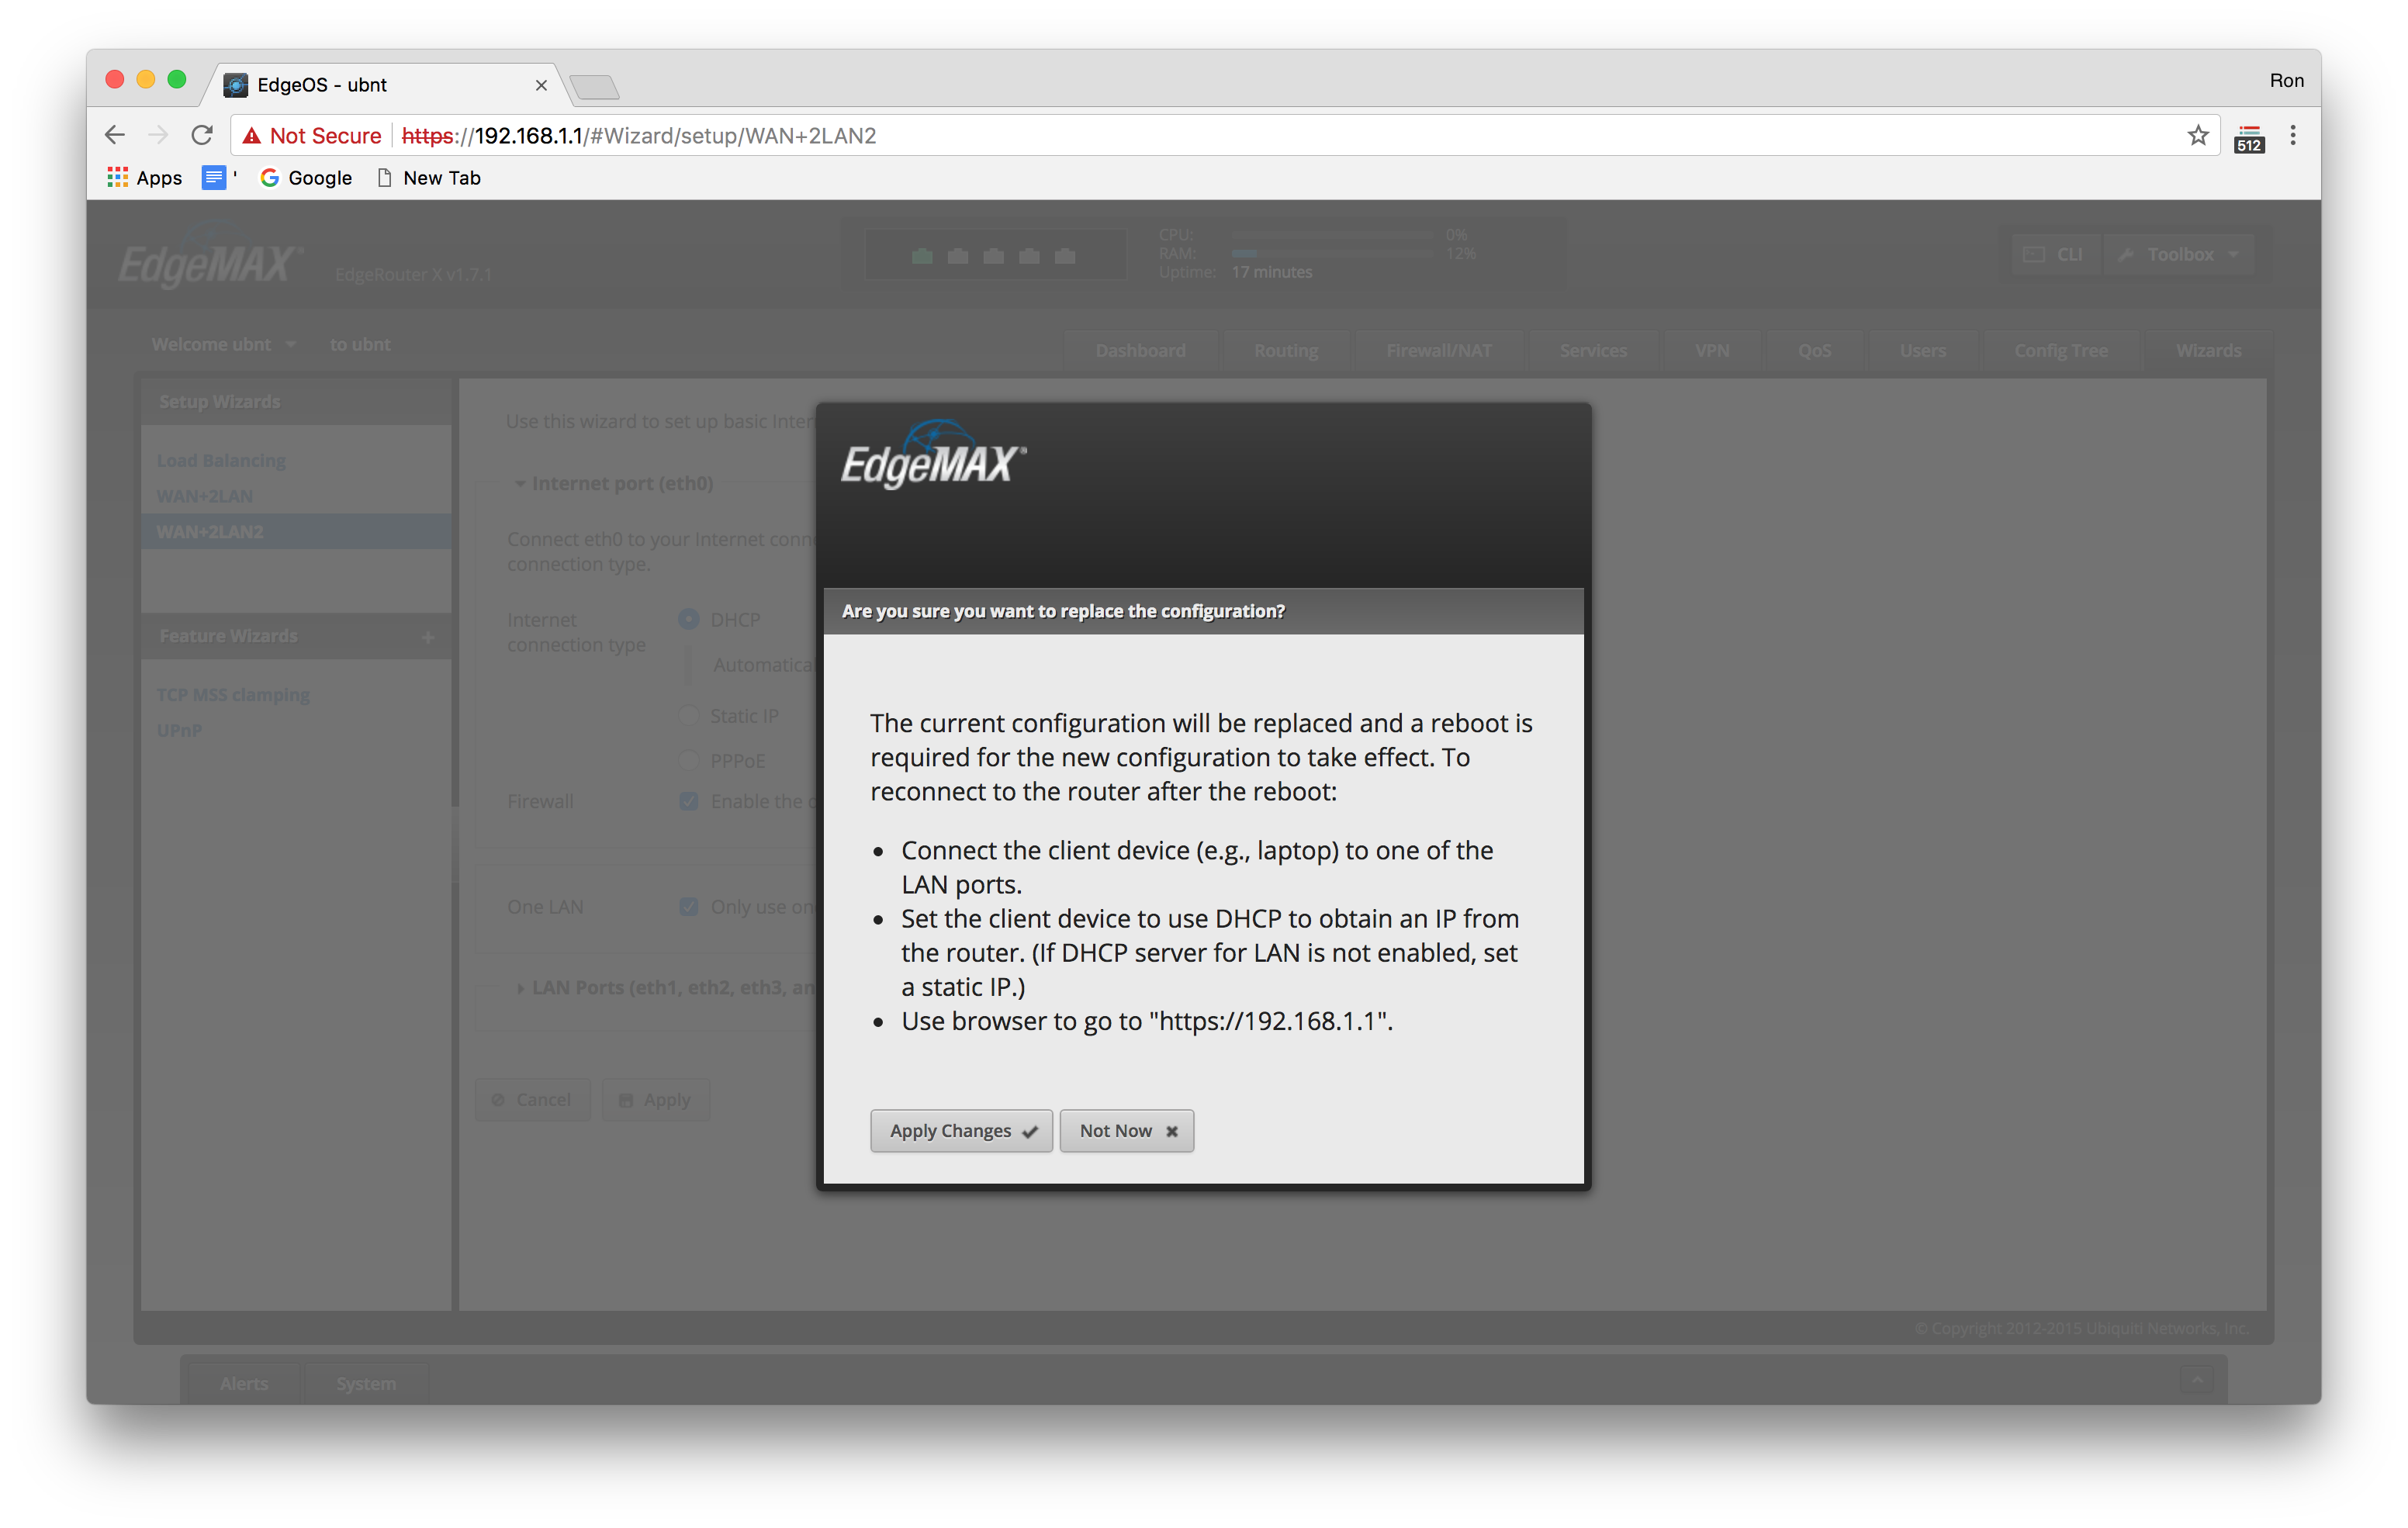
Just leave the configuration setup as is, do not change anything, and click apply to implement the configuration:
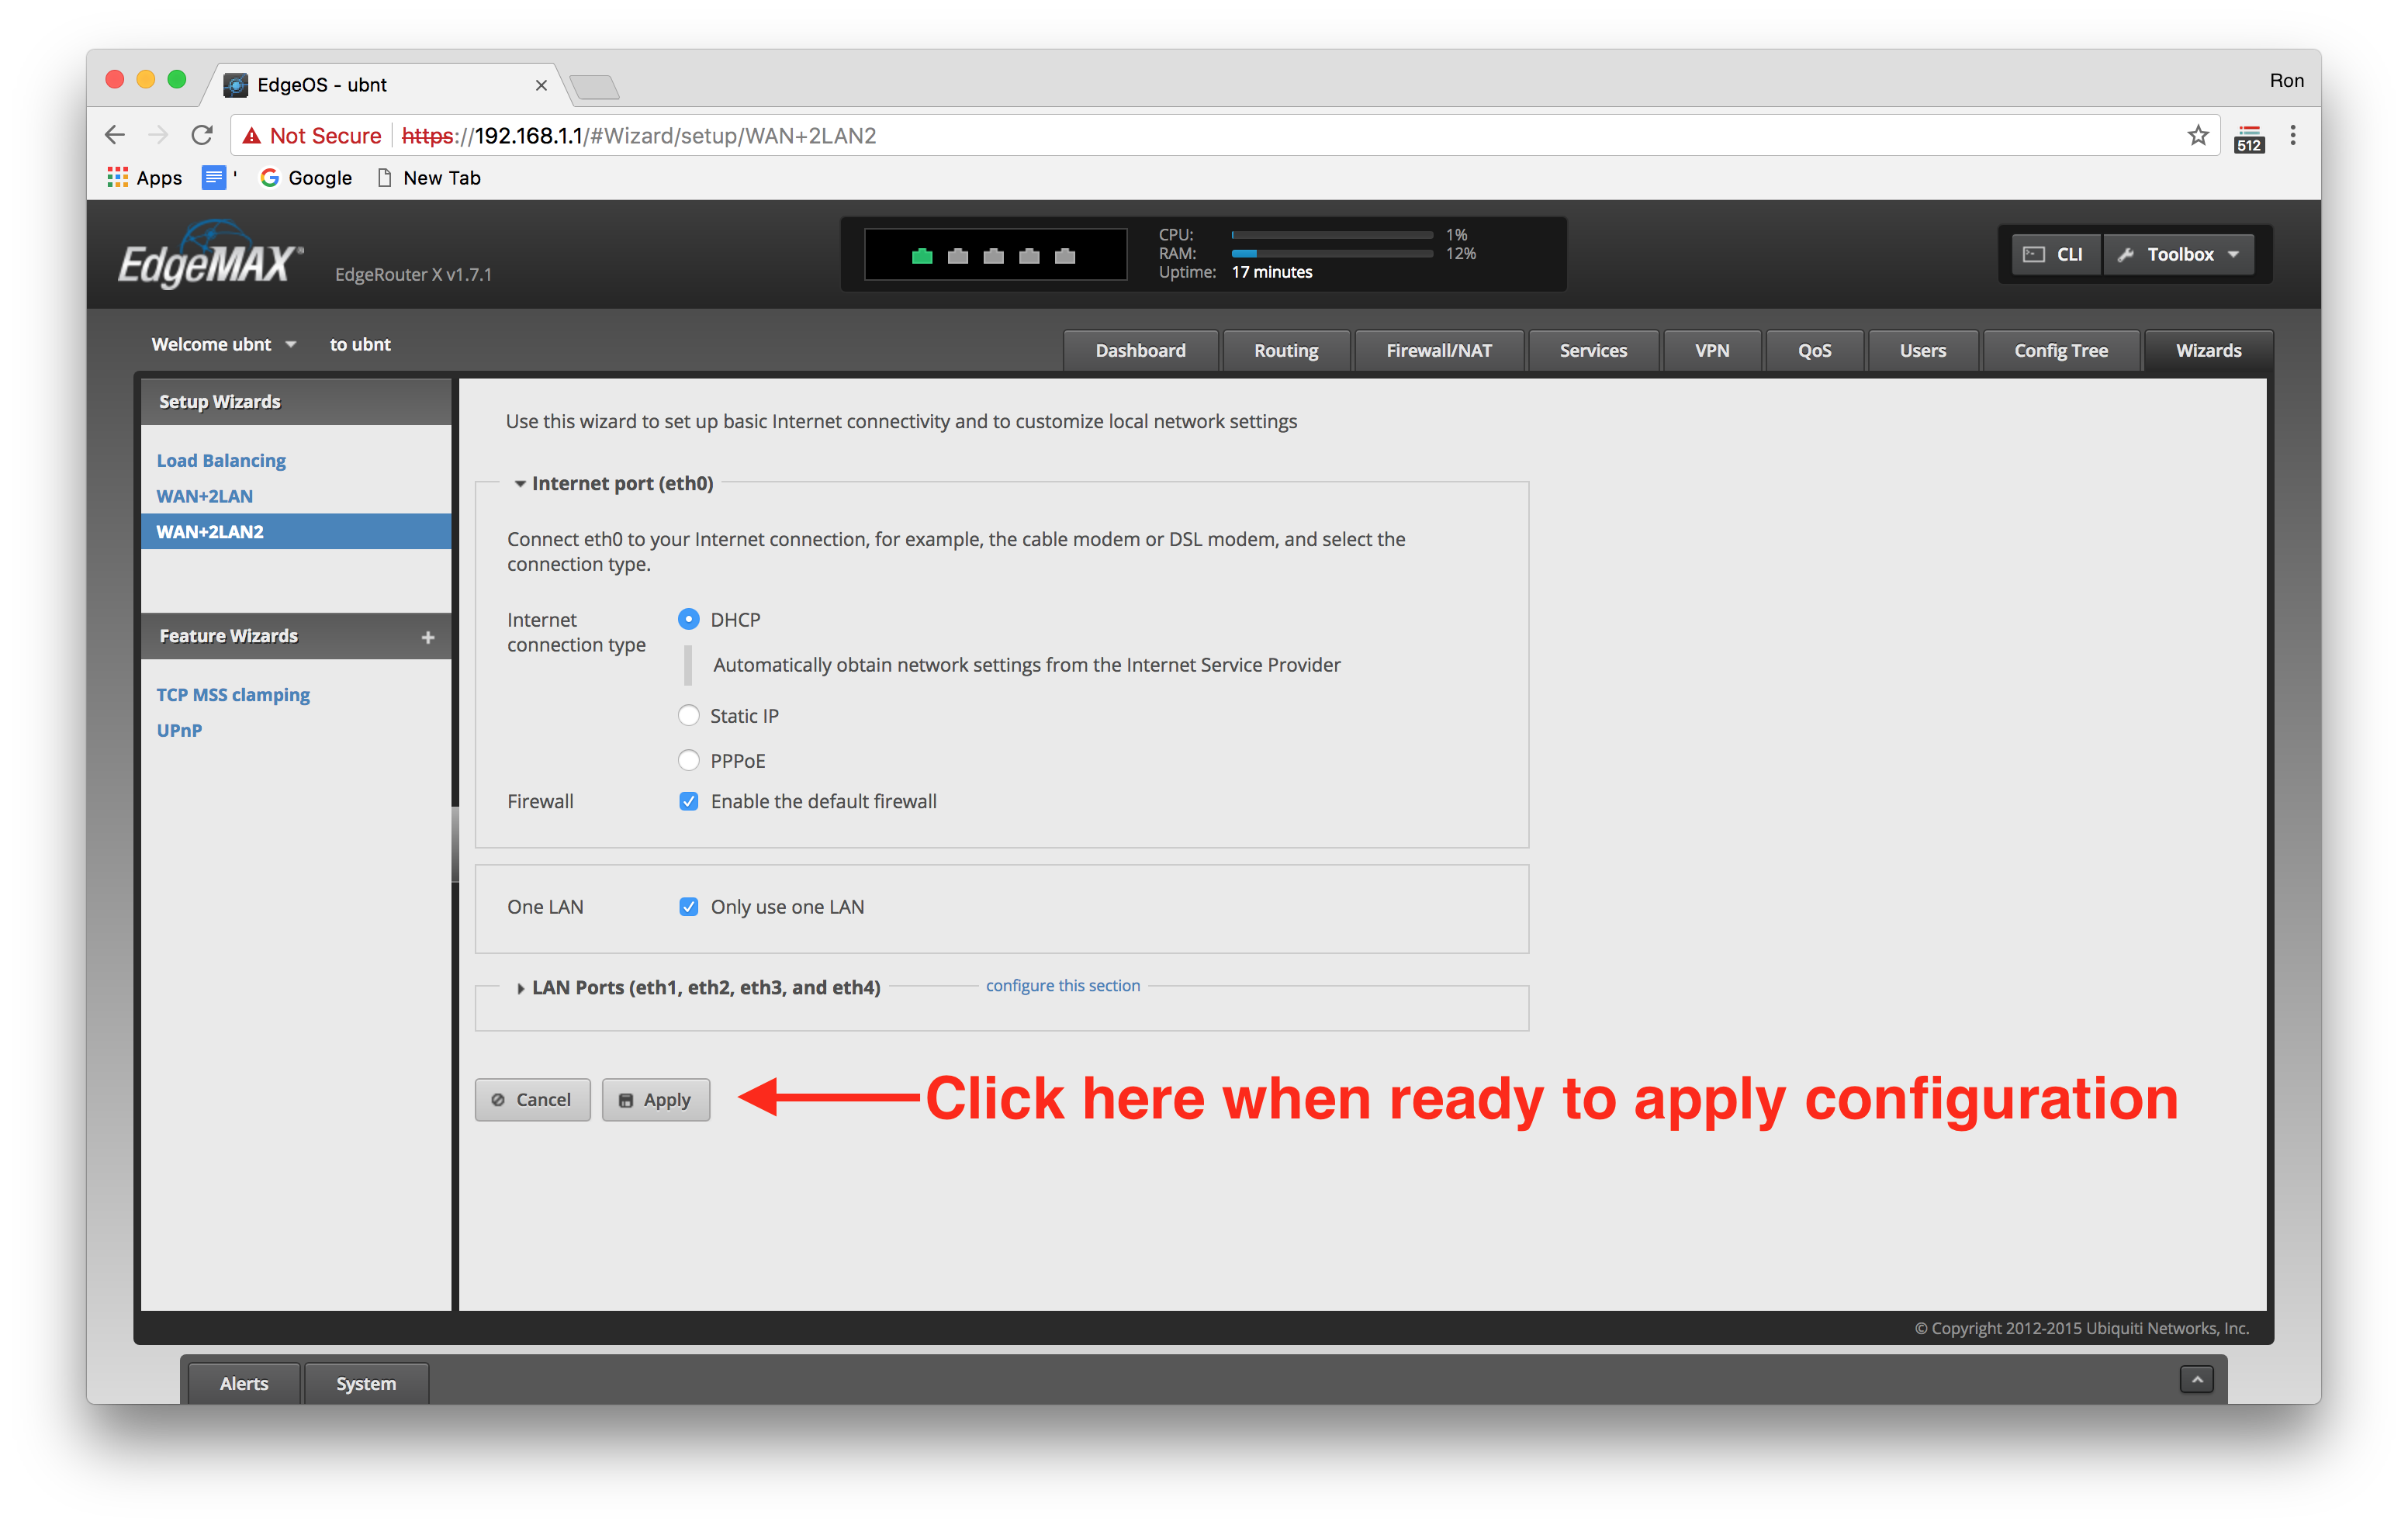
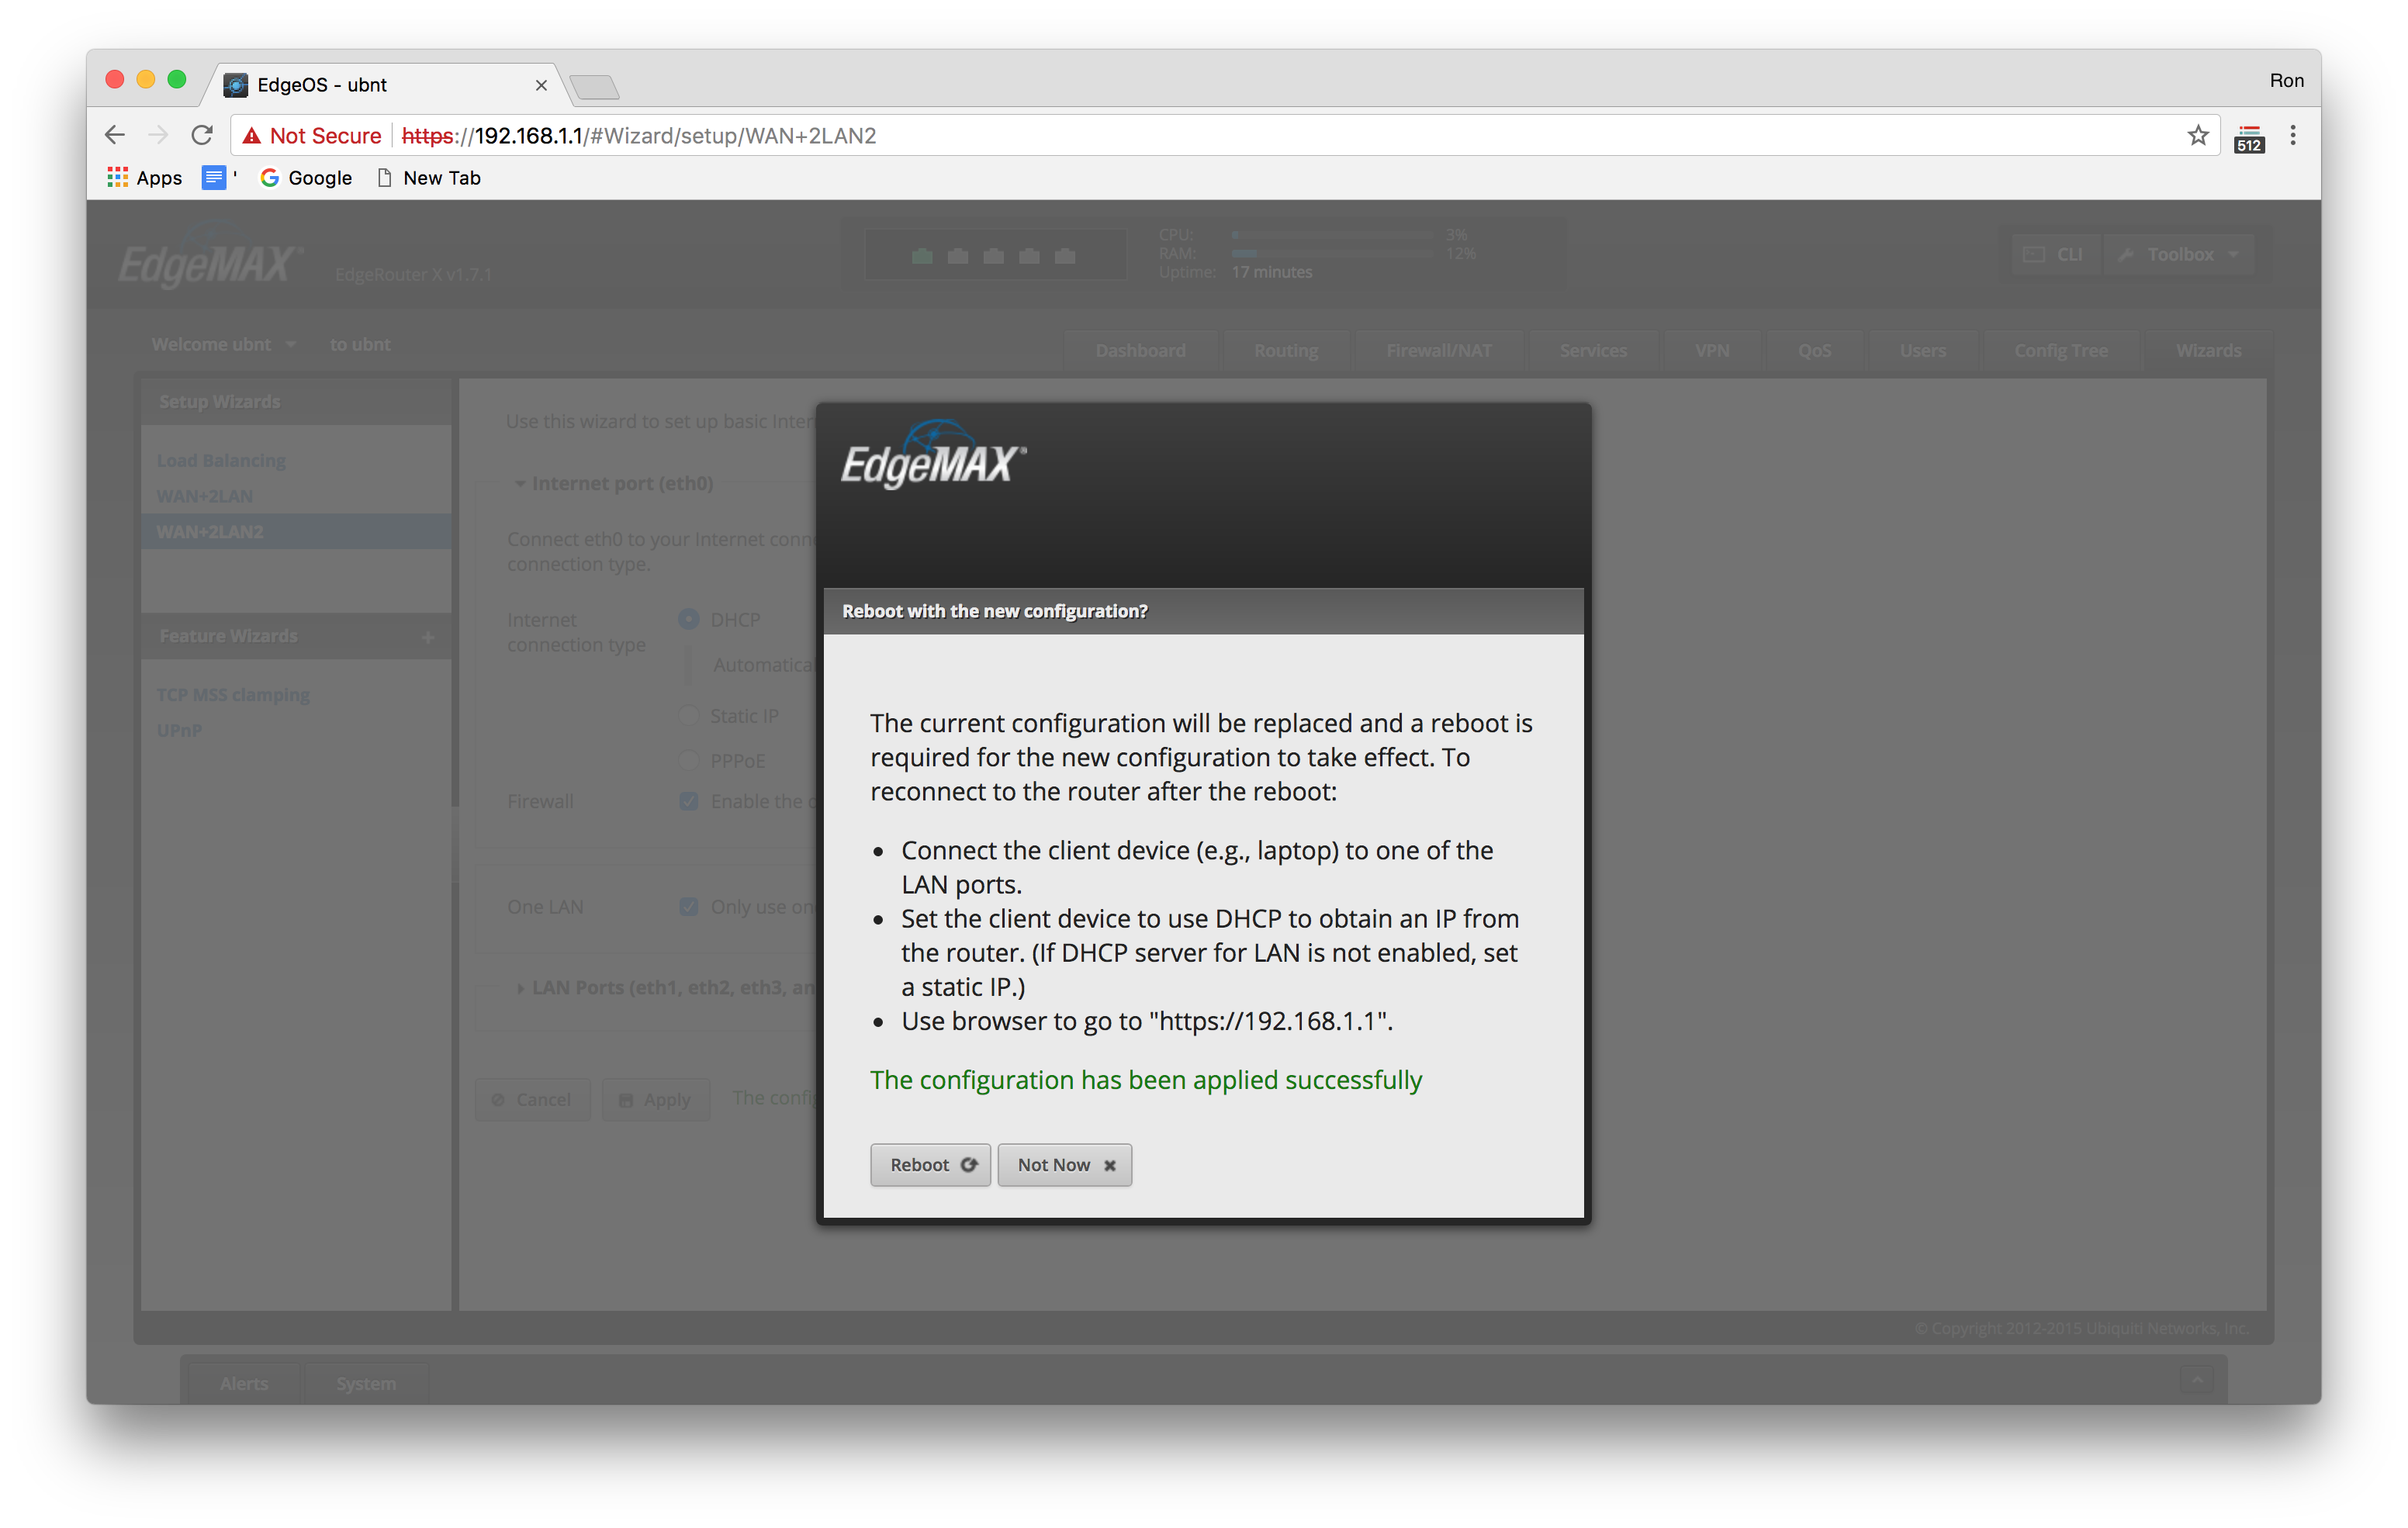
After you click apply you will see a series of prompts asking you about applying changes, and then rebooting, and then are you sure. Just click yes:

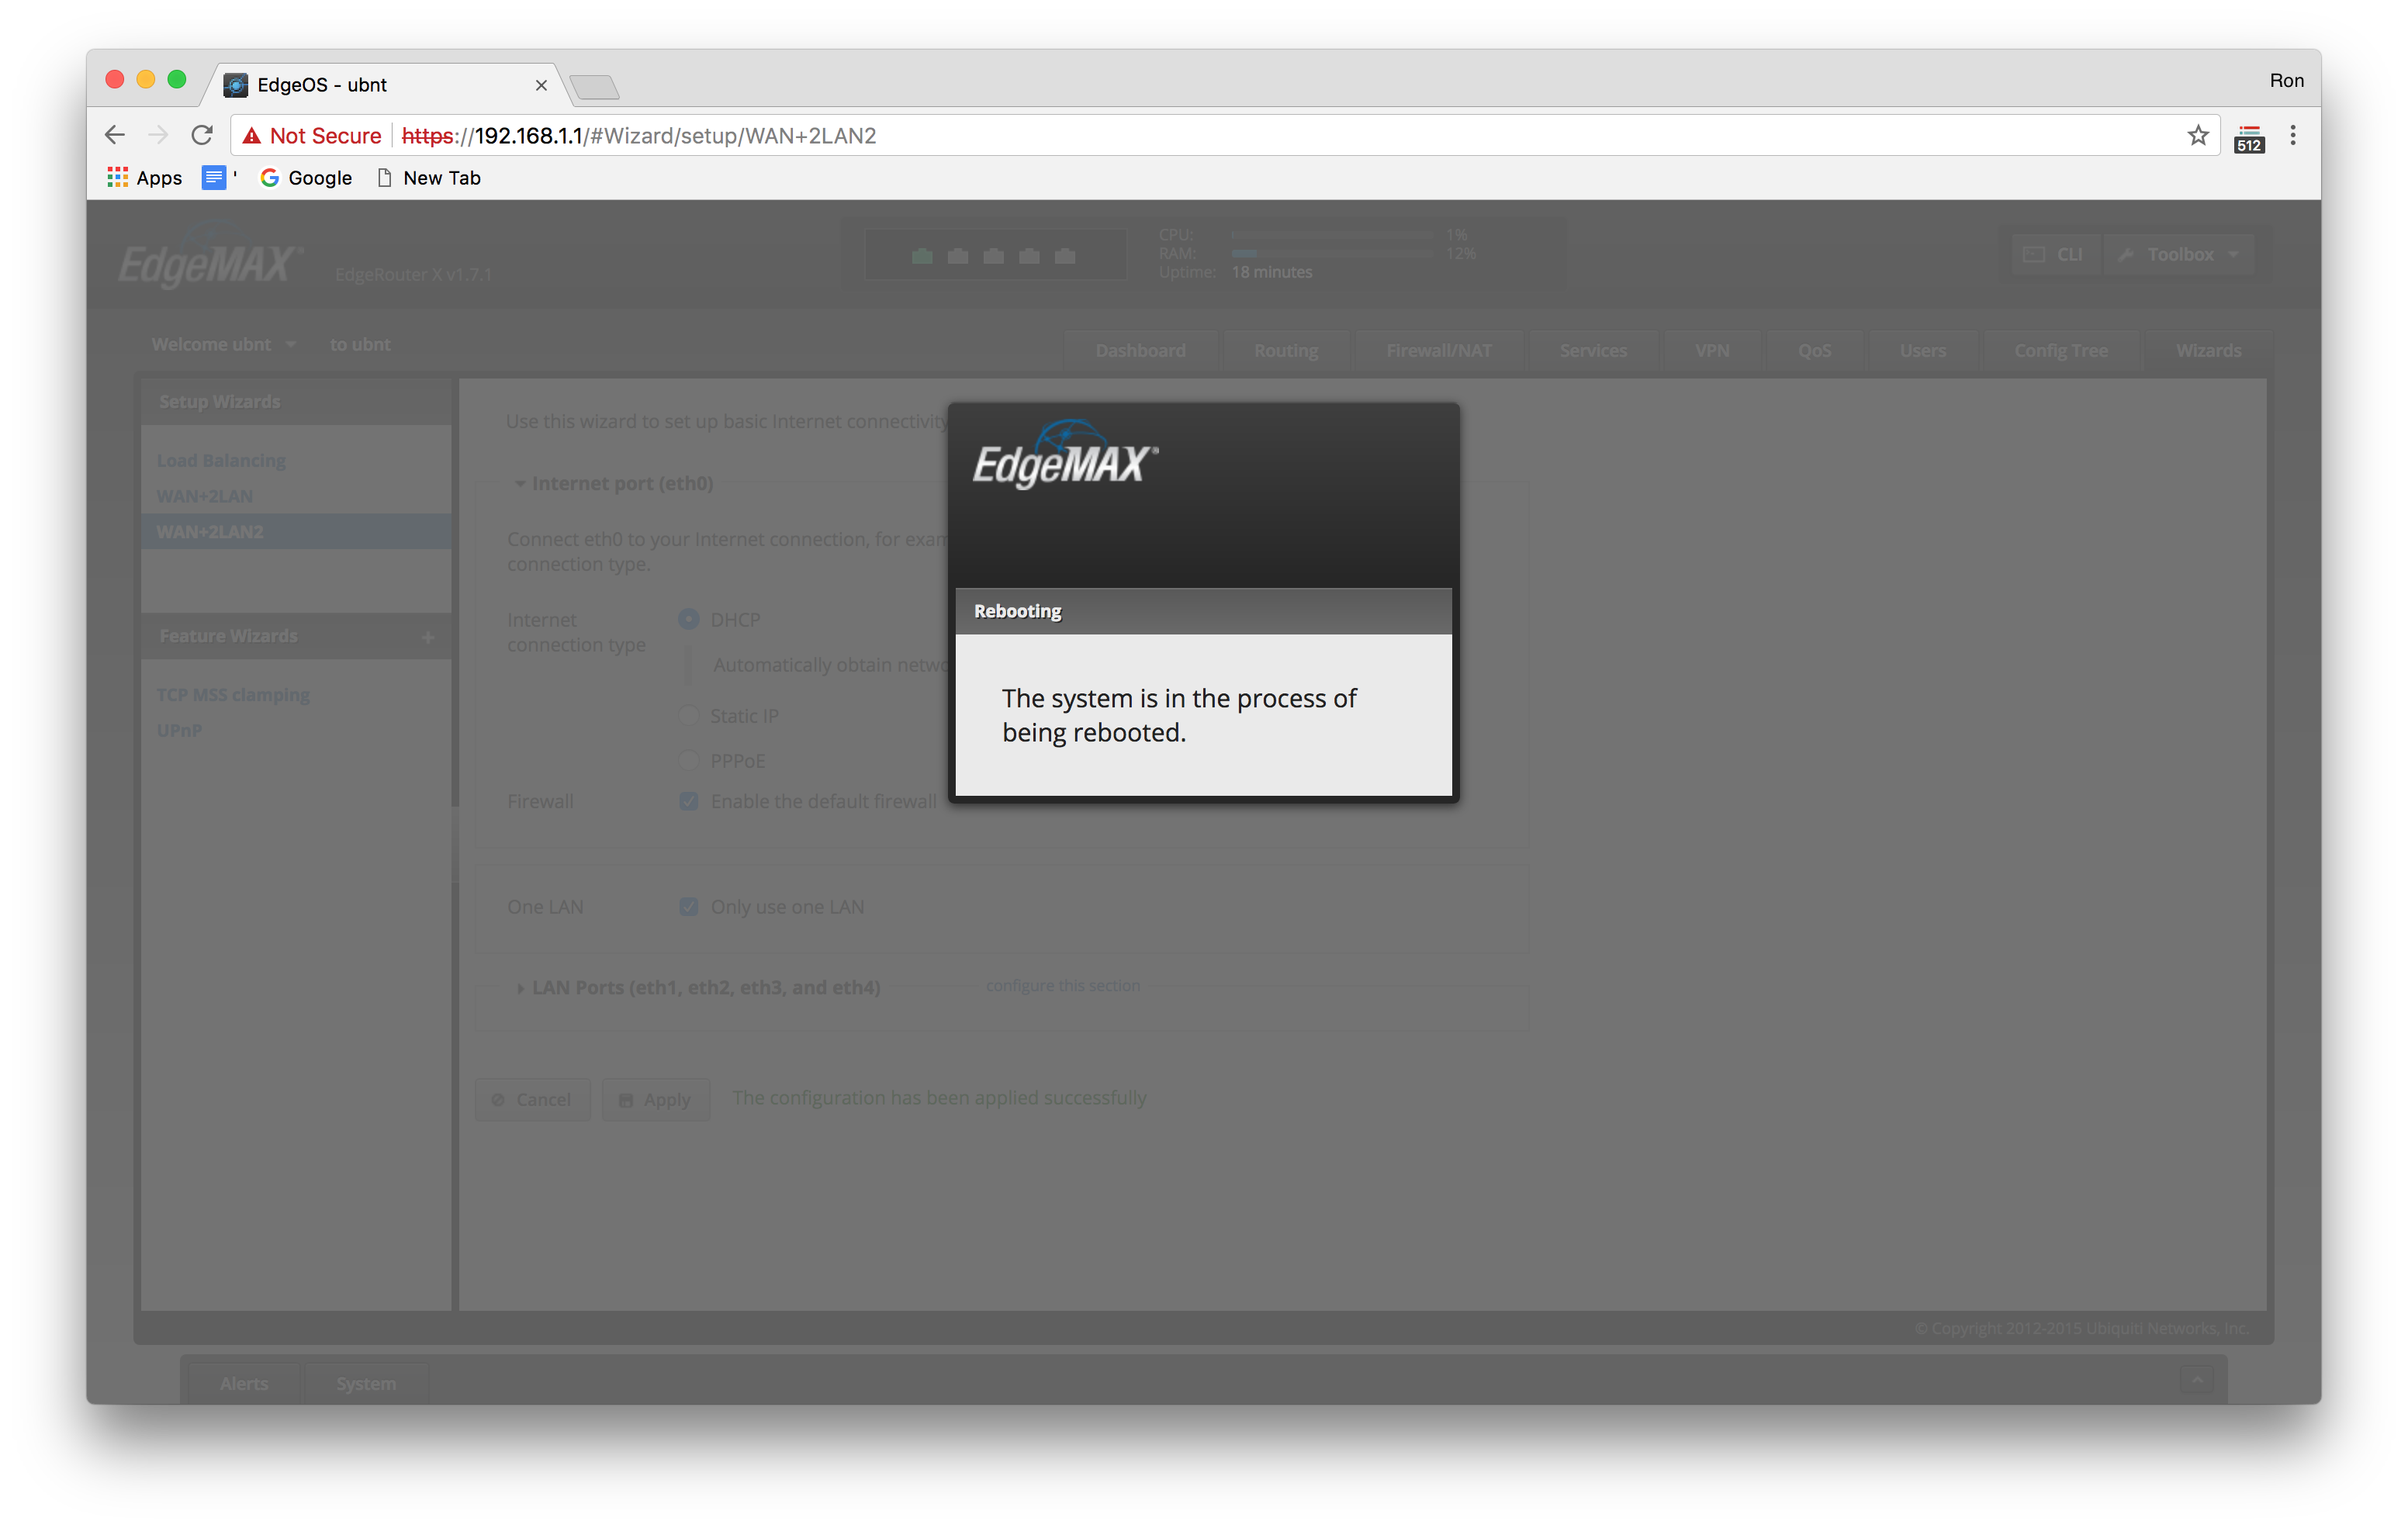
Configuration Complete
Now, the router will be rebooting, and loading the newly setup basic configuration. While it is rebooting, disconnect the ethernet cable from the router port eth0 and connect it to eth1. Open up the network preferences, find Thunderbolt Ethernet in the list on the left of the page, click on Configure IPv4, and switch it to Using DHCP like the following:
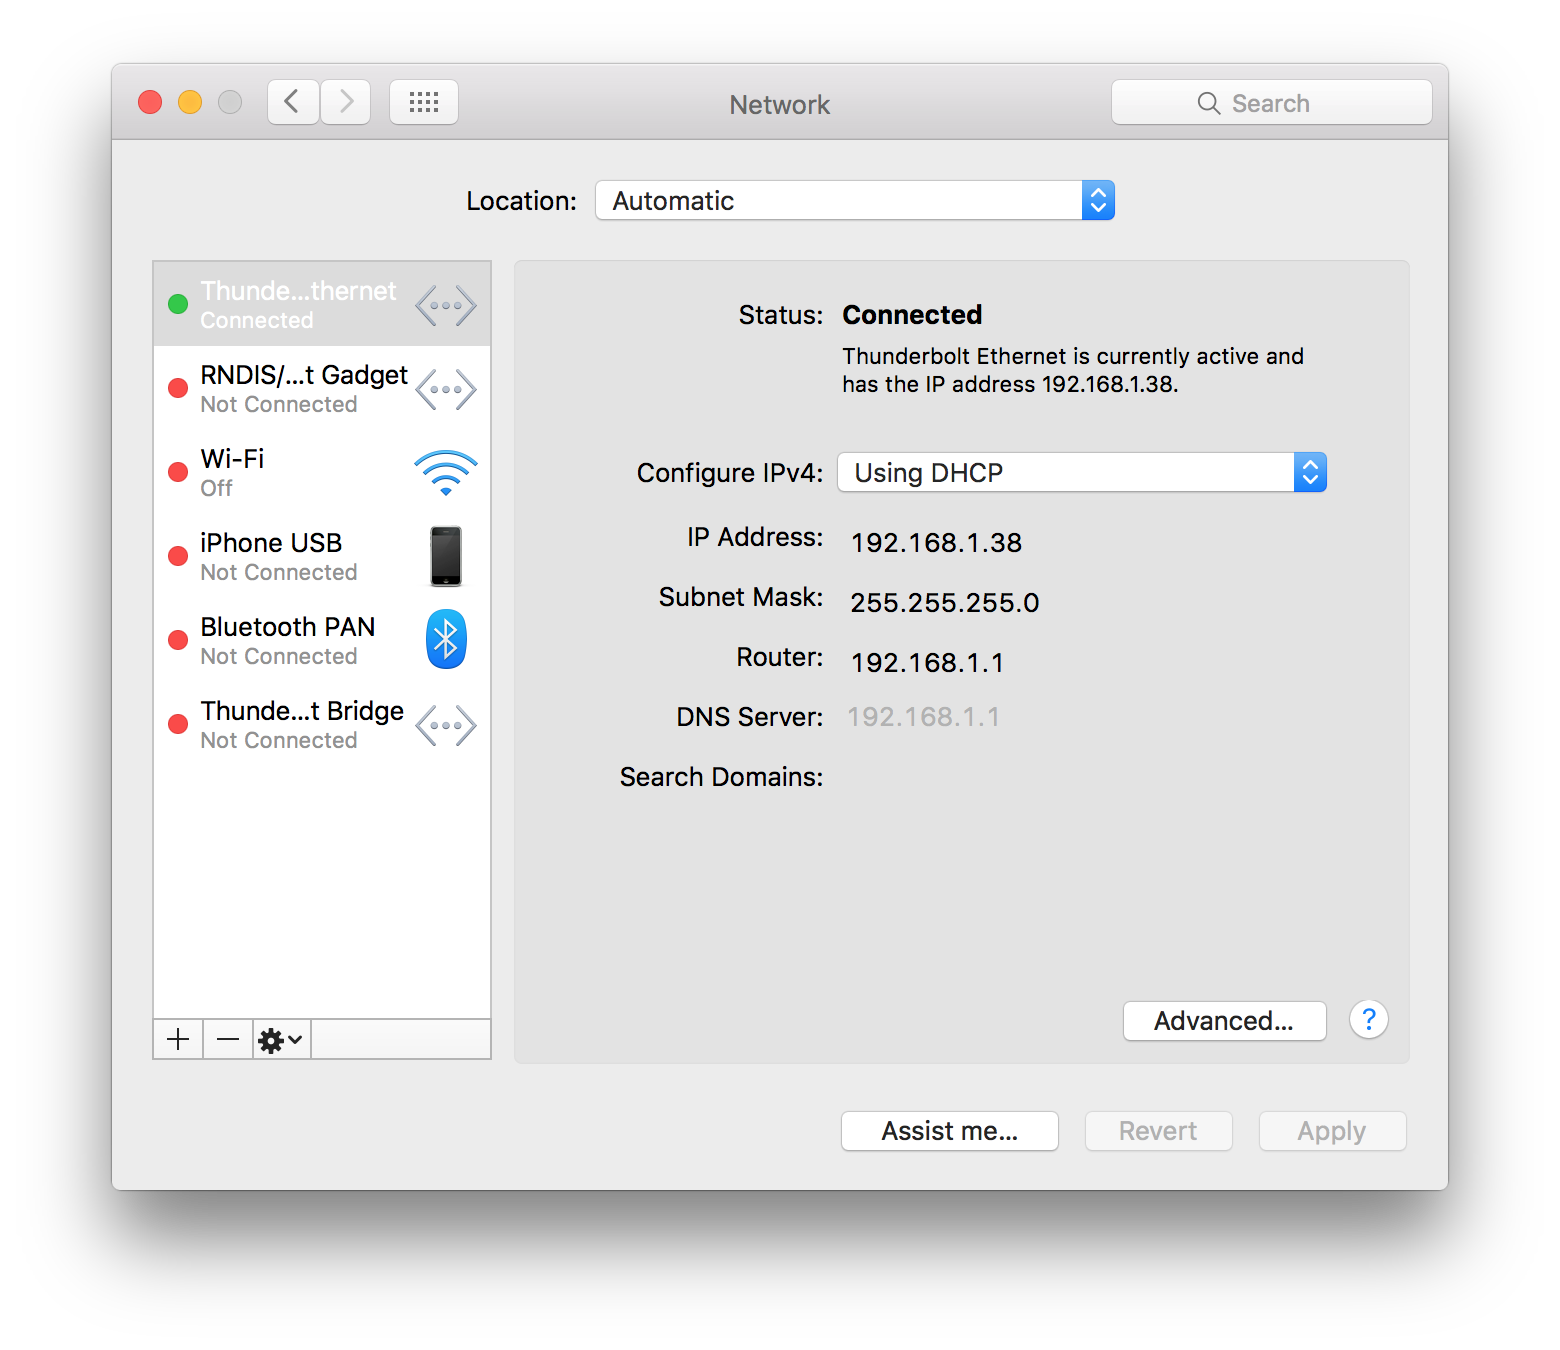
You may find that it will take a minute or two for the router to assign you an IP address. Before it looks like the above image, it may look like the following image:
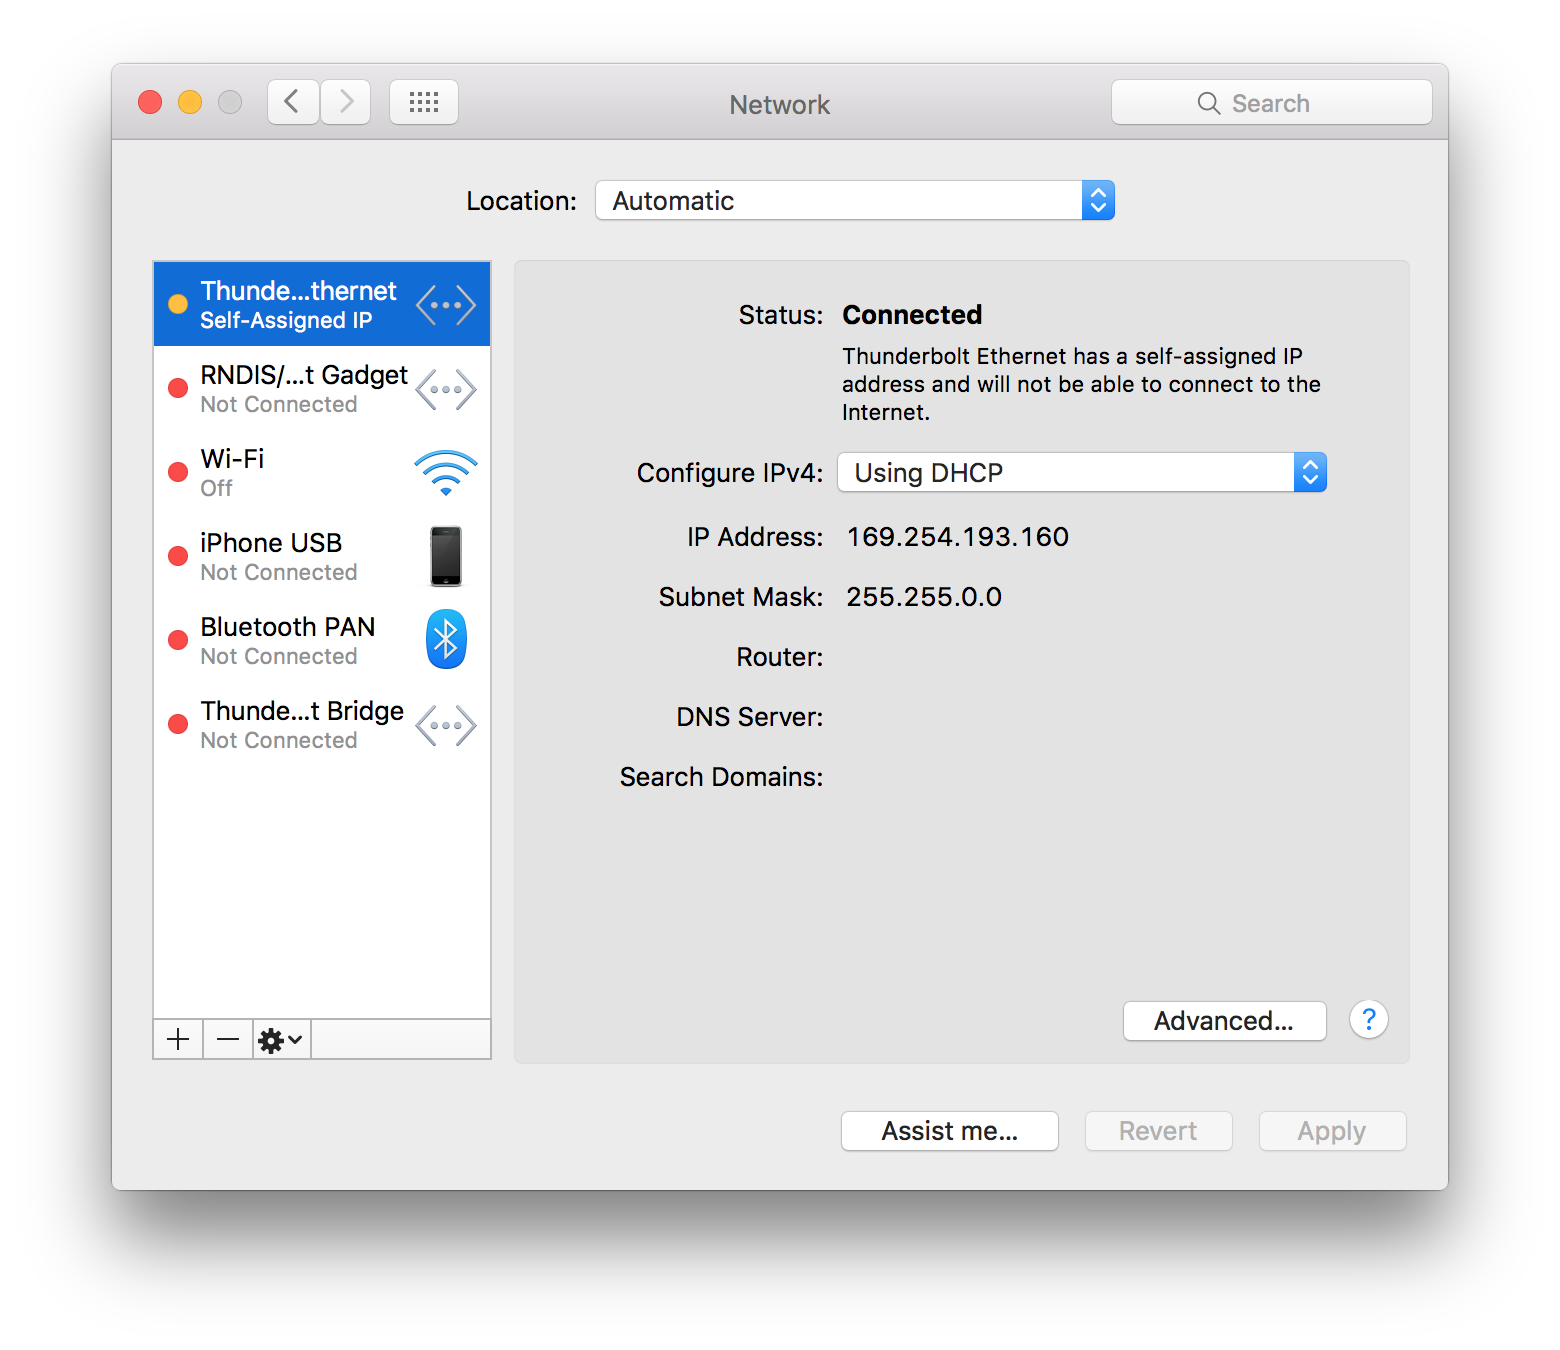
This is normal, and it may sit on this for a minute or more. Just let it work its magic. Once it looks like the following you are good to move on to the next section on Internet Access:
Internet Access
Once the router finishes booting up, it will assign you an address (here it was 192.168.1.38), and you will be on the network. From here there are two options to be aware of:
-
if you have a pre-existing network, disconnect your modem from your old router and power cycle the modem (i.e. unplug the modem, wait 30s, plug it back in)
-
if no pre-existing network, simply power up the modem
- NOTE: you must disconnect the modem completely, power cycle it, and after it boots up reconnect it to eth0 on the router. So, make sure you disconnect the modem before you power cycle or power it up. Then after it is up you can connect it to eth0 on the router.
This completes the basic configuration. (woooooooooh!!) Your network should now be working, and all the hosts connected to ports eth1-4 will be able to see and access each other. To confirm that you are connected to the internet, go ahead and test the connection from your terminal commandline as follows (ignore the “$” sign and only copy the ping google.com into your terminal
):
$ ping google.com
PING google.com (172.217.0.78): 56 data bytes
64 bytes from 172.217.0.78: icmp_seq=0 ttl=53 time=34.728 ms
64 bytes from 172.217.0.78: icmp_seq=1 ttl=53 time=34.097 ms
64 bytes from 172.217.0.78: icmp_seq=2 ttl=53 time=32.616 ms
64 bytes from 172.217.0.78: icmp_seq=3 ttl=53 time=33.569 ms
64 bytes from 172.217.0.78: icmp_seq=4 ttl=53 time=34.591 ms

--- google.com ping statistics ---
5 packets transmitted, 5 packets received, 0.0% packet loss
round-trip min/avg/max/stddev = 32.616/33.920/34.728/0.769 ms
What this does is send a PING packet to Google’s servers at google.com. First your router needs to resolve the domain name “google.com” which it does as you can see in parentheses above (172.217.0.78). Then it sends packets to the server to test if it can route. If you get something similar to the above, you are good to go, your router is connected to the internet and resolving domain names successfully.
Pull up the EdgeOS dashboard at 192.168.1.1 and you should see something
like this:
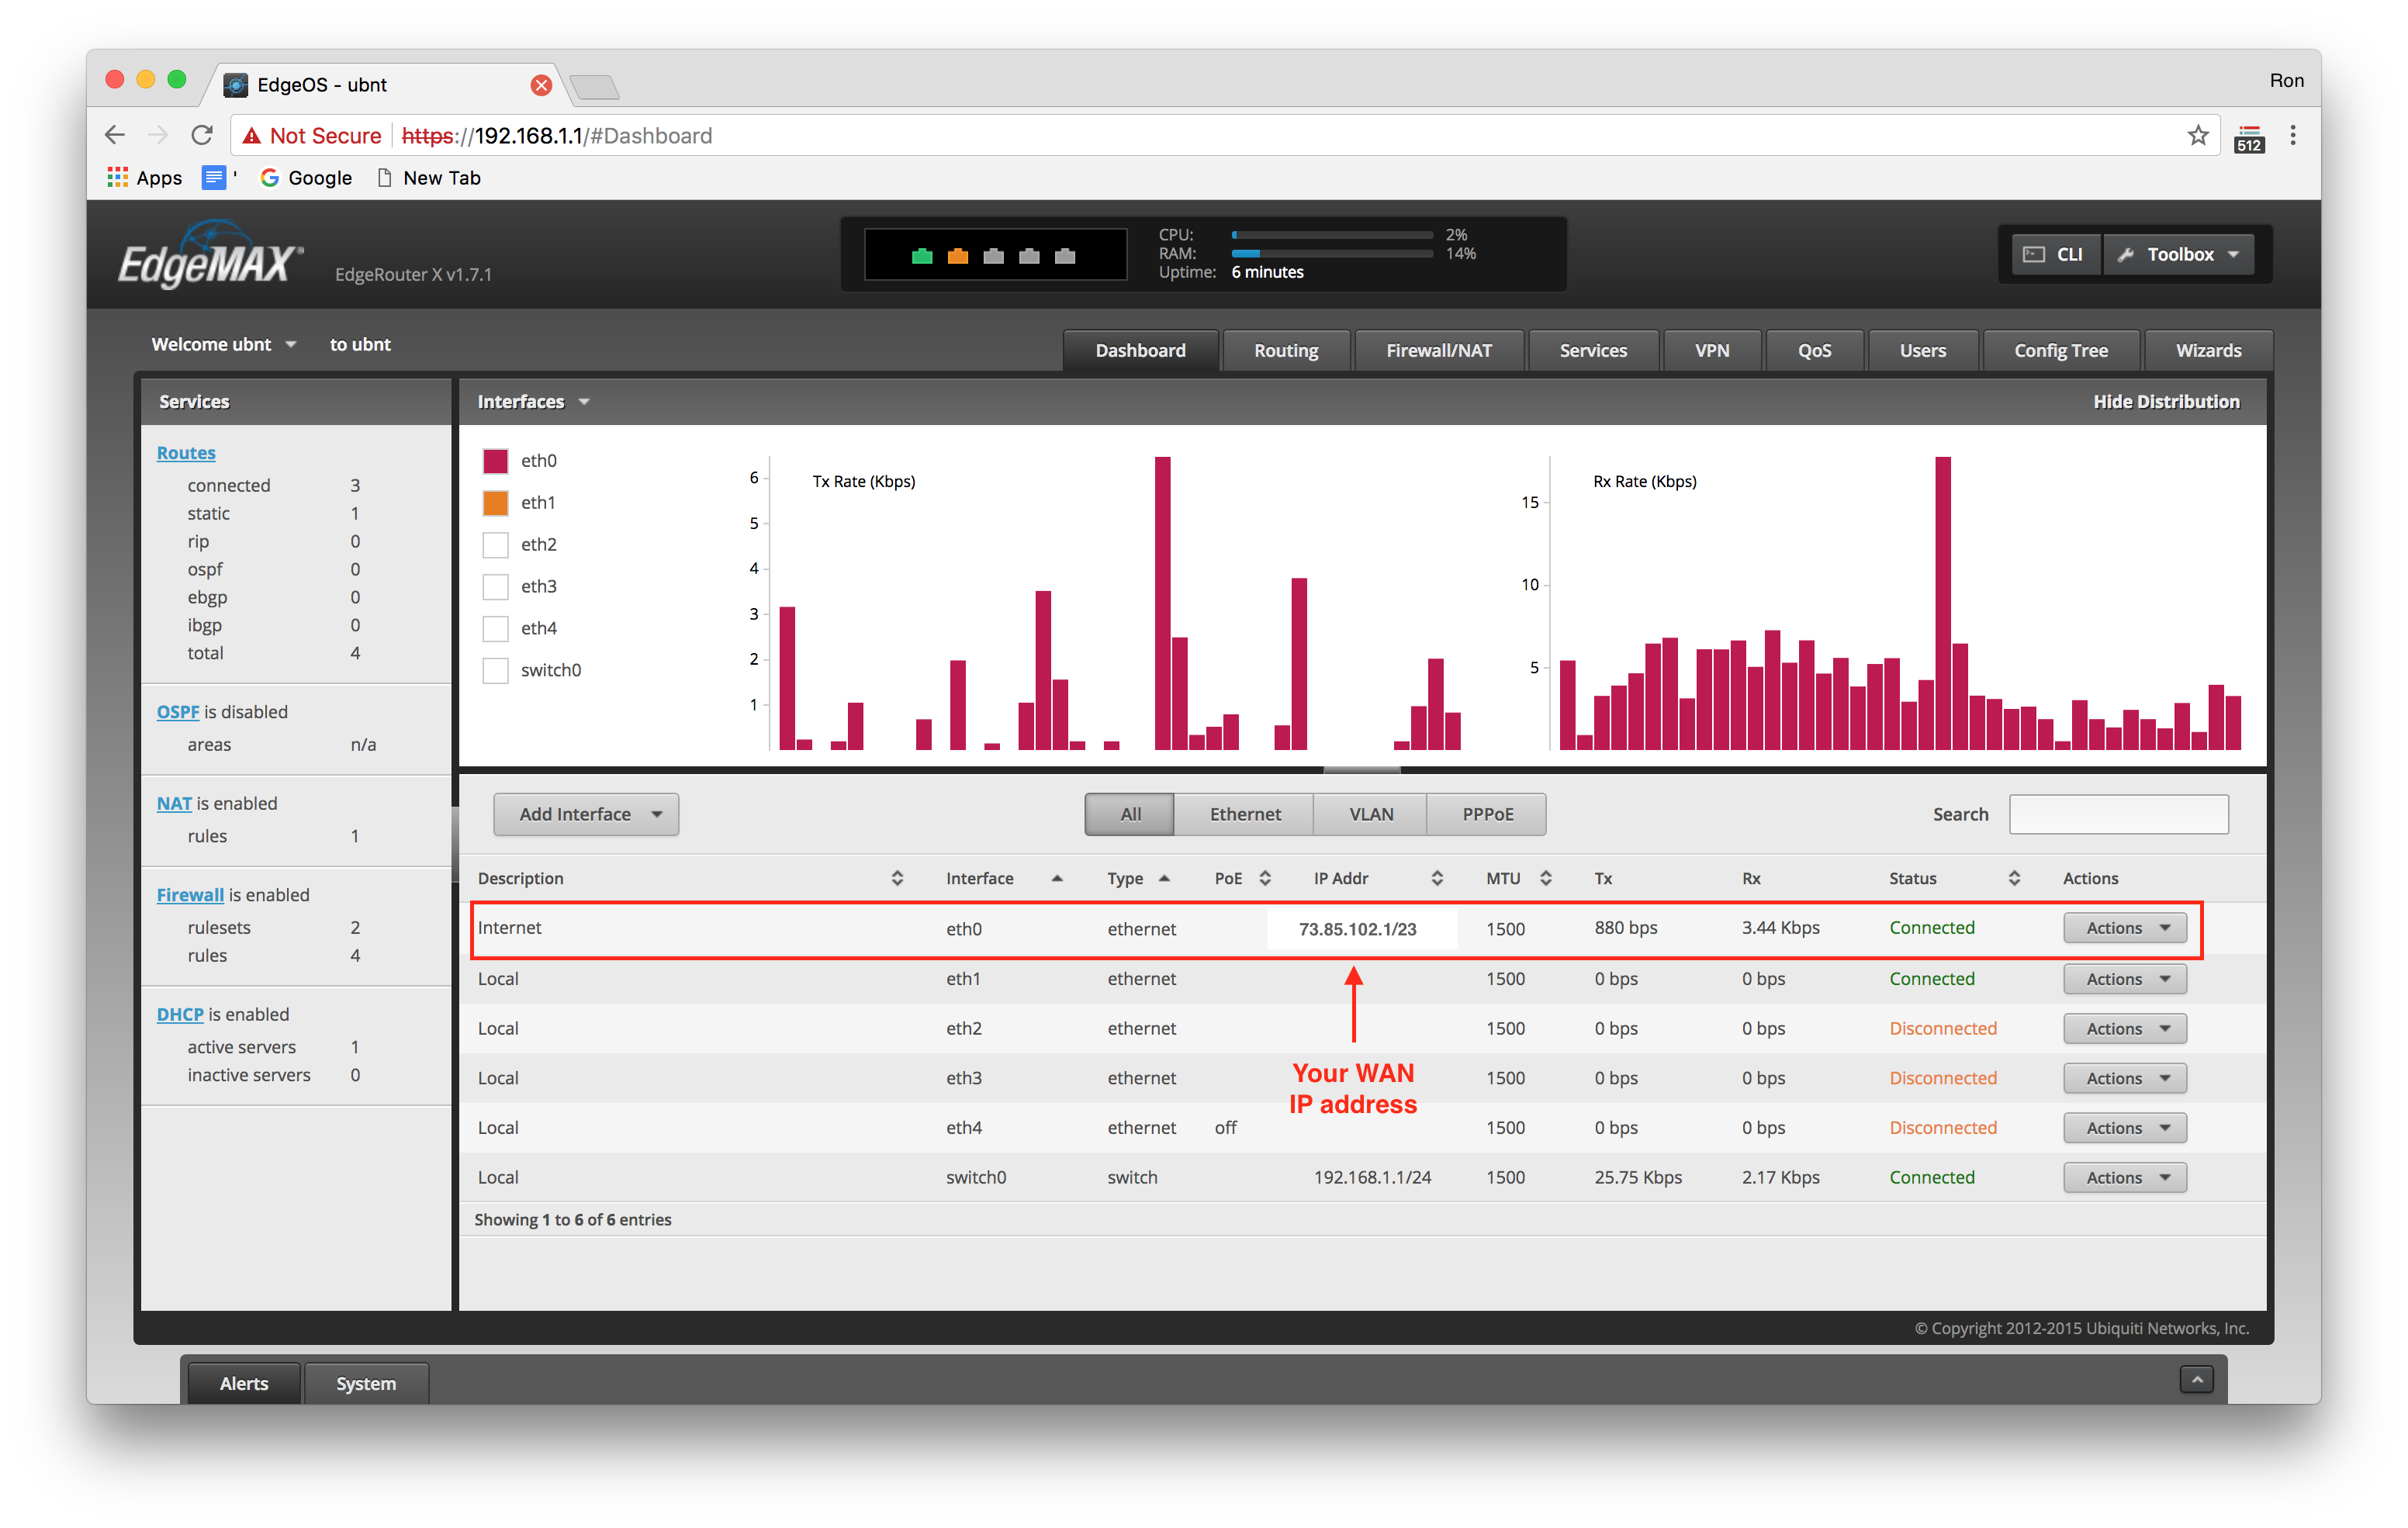
Notice how there is an IP address for eth0. This is your router’s address on the WAN (i.e. internet). Again, this confirms the router and modem have successfully established a connection, and your internet access is open.
To be clear, this is only the most basic configuration that allows you to use eth0 as the internet source, and eth1-4 as your LAN switch. But you may want to continue to configure your network (most likely to add an access point for wireless internet). From here there are some options:
-
continue with the network setup by configuring a wireless access point (see our guide6)
-
begin configuring a more advanced setup. The latter will be covered in the next section
Advanced Configurations
Here we will cover some of the basic advanced configuration features and options. Some will be related to security, others to port forwarding, performance, etc …
Port Forwarding
Port forwarding is a very common feature to setup on a router. This whole topic has been written at length about in another post on this website that can be found here:
Ubiquiti EdgeRouter Configuration: DHCP Reservation and Port Forwarding
Adding/Removing Users
It’s almost trivial to add or delete users. The below command line snippets show the process.
Adding: First login, type the configure command, and then type a series of commands with arguments as follows (NOTE: this example assumes that zerocool is still your default username):
$ ssh zerocool@192.168.1.1
Welcome to EdgeOS

By logging in, accessing, or using the Ubiquiti product, you
acknowledge that you have read and understood the Ubiquiti
License Agreement (available in the Web UI at, by default,
http://192.168.1.1) and agree to be bound by its terms.

zerocool@192.168.1.1's password: hack the planet
Linux erx001 3.10.107-UBNT #1 SMP Mon Mar 5 18:53:35 UTC 2018 mips
Welcome to EdgeOS
Last login: Tue Jun 12 17:17:40 2018 from 192.168.1.42
zerocool@erx001:~$ configure
zerocool@erx001# set system login user crashoverride authentication plaintext-password
'mess with the best die like the rest'
zerocool@erx001# commit
zerocool@erx001# save
zerocool@erx001# exit
zerocool@erx001:~$ exit
To recap what we did: we logged into the router using the username zerocool
and password hack the planet, followed by the configure command, followed by
the set system login user command where we created a new user named
crashoverride with password mess with the best die like the rest (notice
the single quotes around the password), followed by the commit command, the
save command, and finally exit twice to logout of the router completely.
Just switch out crashoverride for whatever username you want and change
the password mess with the best die like the rest to whatever password you
want (remember to surround it with single quotes!!!). Then commit, save, and
exit. You will now have a new user.
Deleting: Just like adding a user, we must first login (NOTE: this example assumes that zerocool is still your default username):
$ ssh zerocool@192.168.1.1
Welcome to EdgeOS

By logging in, accessing, or using the Ubiquiti product, you
acknowledge that you have read and understood the Ubiquiti
License Agreement (available in the Web UI at, by default,
http://192.168.1.1) and agree to be bound by its terms.

zerocool@192.168.1.1's password: hack the planet
Linux erx001 3.10.107-UBNT #1 SMP Mon Mar 5 18:53:35 UTC 2018 mips
Welcome to EdgeOS
Last login: Tue Jun 12 17:17:40 2018 from 192.168.1.42
zerocool@erx001:~$ configure
zerocool@erx001# delete system user crashoverride
zerocool@erx001# commit
zerocool@erx001# save
zerocool@erx001# exit
zerocool@erx001:~$ exit
This is trivial in comparison to adding a user. In this case you only need to
replace crashoverride with whatever username on your router you want to
delete!