Ubiquiti EdgeRouter Configuration: DHCP Reservation and Port Forwarding
Table of Contents
Introduction
One of the many configurations you will likely want to make to your Edge Router1 involves setting up remote access to the hosts connected (usually via a wired ethernet connection) to the Edge Router network. There are a variety of reasons for this: home hosting (i.e. hosting your own website from your home LAN), remote file sharing, and remote login to name just a few. The point is that having remote access (i.e. external access from your WAN, aka internet), is a very common need. In this tutorial, we will be looking at how to set a DHCP reservation for your hosts, followed by port forwarding to that host. (NOTE: while this tutorial uses an Edge Router model ER-X as the router, it is very reasonable to apply these same steps to any Edge Router running the EdgeOS software).
DHCP Reservation
To clarify, “DHCP” stands for Dynamic Host Configuration Protocol. It is a more technical way of saying “a protocol that allows for host local IP addresses to be configured in real time.” This means that when you connect a computer (i.e. laptop, PC, Raspberry Pi, Linux server) to the network (and assuming you have authenticated this connection by giving the password), the router on the network will “dynamically” assign an IP address to the computer (without YOU being forced to manually assign it). It is a convenience that makes it easier to add and remove hosts from the network without having to manually change their IP address every time.
The only issue with DHCP, and it’s not really an issue, is that the IP addresses given out to the hosts on the network are “leased.” This means they are temporary, and will expire. Again, this is so that if the host is removed at some point, that “leased” IP address that the router gave out, will expire and become “free” to be given out. Imagine the alternative: the router gives out only 200 IP addresses, and after the 200th address, no more will be given out. Does that make sense? Not really, because in our modern networks (e.g. a coffee shop, your corporate office, the local College campus) hosts are constantly joining and leaving the network. But many may not be back to the network for a long long time. Maybe they were just visiting. Maybe they came for a tour of the campus. Maybe the only get coffee once month. Meanwhile, you have new people coming in constantly wanting access to your network. They will need a new IP address. Hence DHCP saves the day.
But this also means that if you have a host you want to keep permanently on the network, then you will likely want that host to have what is called a static IP address. This is an address that is usually “outside” the range of addresses that the router leases to hosts, and that will never expire. A DHCP reservation is simply “reserving” an IP address, i.e. making a static IP address for a given host (who is identified to the network by its MAC address).
To configure a new DHCP reservation, first login to your router:
$ ssh username@192.168.1.1
Notice here that username is ubnt and the password is also ubnt on the default setup for the EdgeOS. So if you have just setup your router, and have not changed the admin username/password then it will be ubnt/ubnt respectively.
Now that you are logged in, the commands you will be submitting to create the DHCP reservation look something like the following:
ubnt@edgerouter $ configure
ubnt@edgerouter# set service dhcp-server shared-network-name <LAN_NAME> subnet
192.168.1.0/24 static-mapping <HOST_NAME> ip-address <STATIC_IP_ADDRESS>
ubnt@edgerouter# set service dhcp-server shared-network-name <LAN_NAME> subnet
192.168.1.0/24 static-mapping <HOST_NAME> mac-address '<MAC_ADDRESS>'
ubnt@edgerouter# commit; save; exit
In this example, LAN_NAME is simply going to be the name of your Local
Area Network (LAN). In most cases, this will be simply LAN. The
HOST_NAME and STATIC_IP_ADDRESS, will be of your choosing. But keep in
mind, the default configuration for the router’s DHCP lease range starts at
192.168.1.38 and ends at 192.168.1.243. A good choice would be some address in
the range 192.168.1.2 - 192.168.1.37 (NOTE: Here we excluded 192.168.1.1
because that is the router’s address). Finally you will need the MAC_ADDRESS
for your host. On most Linux and macOS systems this can be found using the
ifconfig (interface configuration) command. Simply look for the interface that
is active and has an IP address in the range of your network (e.g. 192.168.1.45
like the Raspberry Pi host in the picture below).
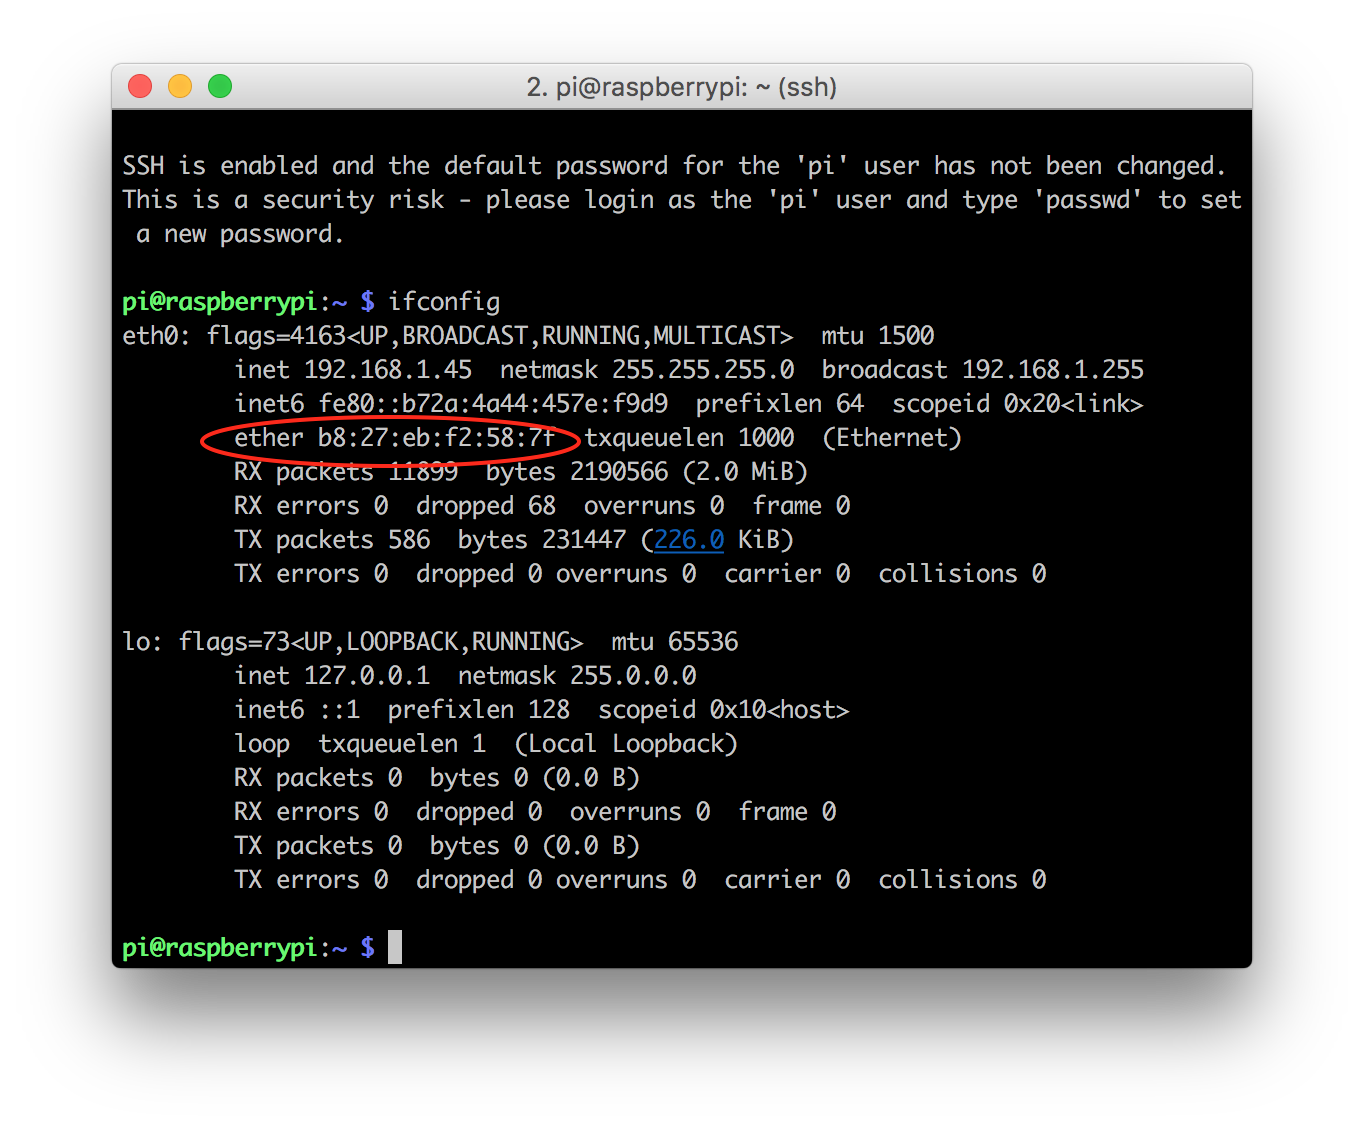
Here is an example DHCP reservation based on the Raspberry Pi host pictured above, using 192.168.1.30 as the reserved IP address:
ubnt@edgerouter $ configure
ubnt@edgerouter# set service dhcp-server shared-network-name LAN subnet
192.168.1.0/24 static-mapping raspberrypi ip-address 192.168.1.30
ubnt@edgerouter# set service dhcp-server shared-network-name LAN subnet
192.168.1.0/24 static-mapping raspberrypi mac-address 'b8:27:eb:f2:587f'
ubnt@edgerouter# commit; save; exit
Notice the “ ‘ “ (single quotes) around the MAC_ADDRESS? Don’t forget those.
If all went well, you should see the router stop and start the DHCP server, and reload the /config/config.boot file. Go ahead and run the following command to see if you can find the newest configuration:
ubnt@edgerouter $ show configuration commands
.
.
.
set service dhcp-server disabled false
set service dhcp-server hostfile-update disable
set service dhcp-server shared-network-name LAN authoritative enable
set service dhcp-server shared-network-name LAN subnet 192.168.1.0/24
default-router 192.168.1.1
set service dhcp-server shared-network-name LAN subnet 192.168.1.0/24
dns-server 192.168.1.1
set service dhcp-server shared-network-name LAN subnet 192.168.1.0/24
lease 86400
set service dhcp-server shared-network-name LAN subnet 192.168.1.0/24 start
192.168.1.38 stop 192.168.1.243
set service dhcp-server shared-network-name LAN subnet 192.168.1.0/24
static-mapping raspberrypi ip-address 192.168.1.30
set service dhcp-server shared-network-name LAN subnet
192.168.1.0/24 static-mapping raspberrypi mac-address 'b8:27:eb:f2:587f'
.
.
.
You should see a section on set service dhcp-server and it should look similar
to the above. If your configuration was successful, you will see the
configuration for your host’s IP address and MAC address. Now you are ready to
setup port forwarding.
Port Forwarding
Considering the amount of work required in the previous section, this section should be rather easy. Basically, port forwarding is where the router will translate requests (e.g. HTTP, HTTPS, SSH, TELNET, etc) that it receives on its WAN connection (the raw internet coming from the modem and being piped into the router) specifying a certain port (e.g. port 4000) to a different port on the LAN (e.g. port 80, 22, etc) for a specific host. Example:
An SSH request on port 2000, gets routed to the host with the local address
192.168.1.30 on port 22
Ahh, see why we needed the static IP/DHCP reservation? We need to make sure that ONLY that Raspberry Pi host (that we setup to have the static IP address 192.168.1.30 in the previous section) will get the SHH request on port 2000, and no other host will. If we did not setup our port forwarding using a static IP address, then when the lease runs out on the address, another host could end up receiving that IP address. As you can imagine this would cause all kinds of headaches and troubles, but with a static IP/DHCP reservation, we can rest assured that we can reach our desired host when we want to use SSH to remote login from the WAN (i.e. internet).
To get started, go ahead and login to your router as mentioned in the previous section (if you are not already logged in). The commands you will be submitting are similar to this:
ubnt@edgerouter $ configure
ubnt@edgerouter# set port-forward rule <NUMBER> description 'Simple Description'
ubnt@edgerouter# set port-forward rule <NUMBER> forward-to address <IP_ADDRESS>
ubnt@edgerouter# set port-forward rule <NUMBER> forward-to port <INTERNAL_PORT>
ubnt@edgerouter# set port-forward rule <NUMBER> original-port <EXTERNAL_PORT>
ubnt@edgerouter# set port-forward rule <NUMBER> protocol <PROTOCOL>
ubnt@edgerouter# commit; save; exit
The explanation for the above variables is simple. The IP_ADDRESS is simply the static IP address that we configured in the previous section. The INTERNAL_PORT and EXTERNAL_PORT are new, but not difficult to grasp. Think of the external port as the WAN port, i.e. the port the router is receiving requests from over the internet. The internal port is the port that the request received on the EXTERNAL_PORT, will be forwarded to (i.e. if external port is 2000, and internal port is 22, then all requests sent to the router over the WAN on port 2000, will be forwarded to the host at IP_ADDRESS on port INTERNAL_PORT). And finally PROTOCOL is simply the various protocols it will accept. You can cover your bases by just setting this to tcp_udp.
Now, continuing the setup of our Raspberry Pi host that we set up with the static IP address 192.168.1.30 previously, here is how we could setup the port forwarding for SSH over WAN access on port 2000:
ubnt@edgerouter $ configure
ubnt@edgerouter# set port-forward rule 1 description 'SSH access to my RPi'
ubnt@edgerouter# set port-forward rule 1 forward-to address 192.168.1.30
ubnt@edgerouter# set port-forward rule 1 forward-to port 22
ubnt@edgerouter# set port-forward rule 1 original-port 2000
ubnt@edgerouter# set port-forward rule 1 protocol tcp_udp
ubnt@edgerouter# commit; save; exit
This will allow us to access our host from the WAN on port 2000 to our LAN at the address 192.168.1.30 on port 22. And with that we are all done! You should now be able to remotely access your host (assuming you followed these steps accurately). One note, is that you will need to restart your host so that it will reconnect to the network and get its new IP address and hence receive port forwarded requests (yay!).