Raspberry Pi: Initial Setup and Configuration
Table of Contents
Introduction
Setting up a Raspberry Pi (RPi)1 can be very facile IF you follow the steps laid out in this guide.
Install OS
The first thing you need to do, before anything else, is download the Operating System (i.e. OS) and write it to an SD card. This guide will be using the Server OS version (usually has the word “lite” appended to the end of it).
Download OS
The OS can be downloaded here.2
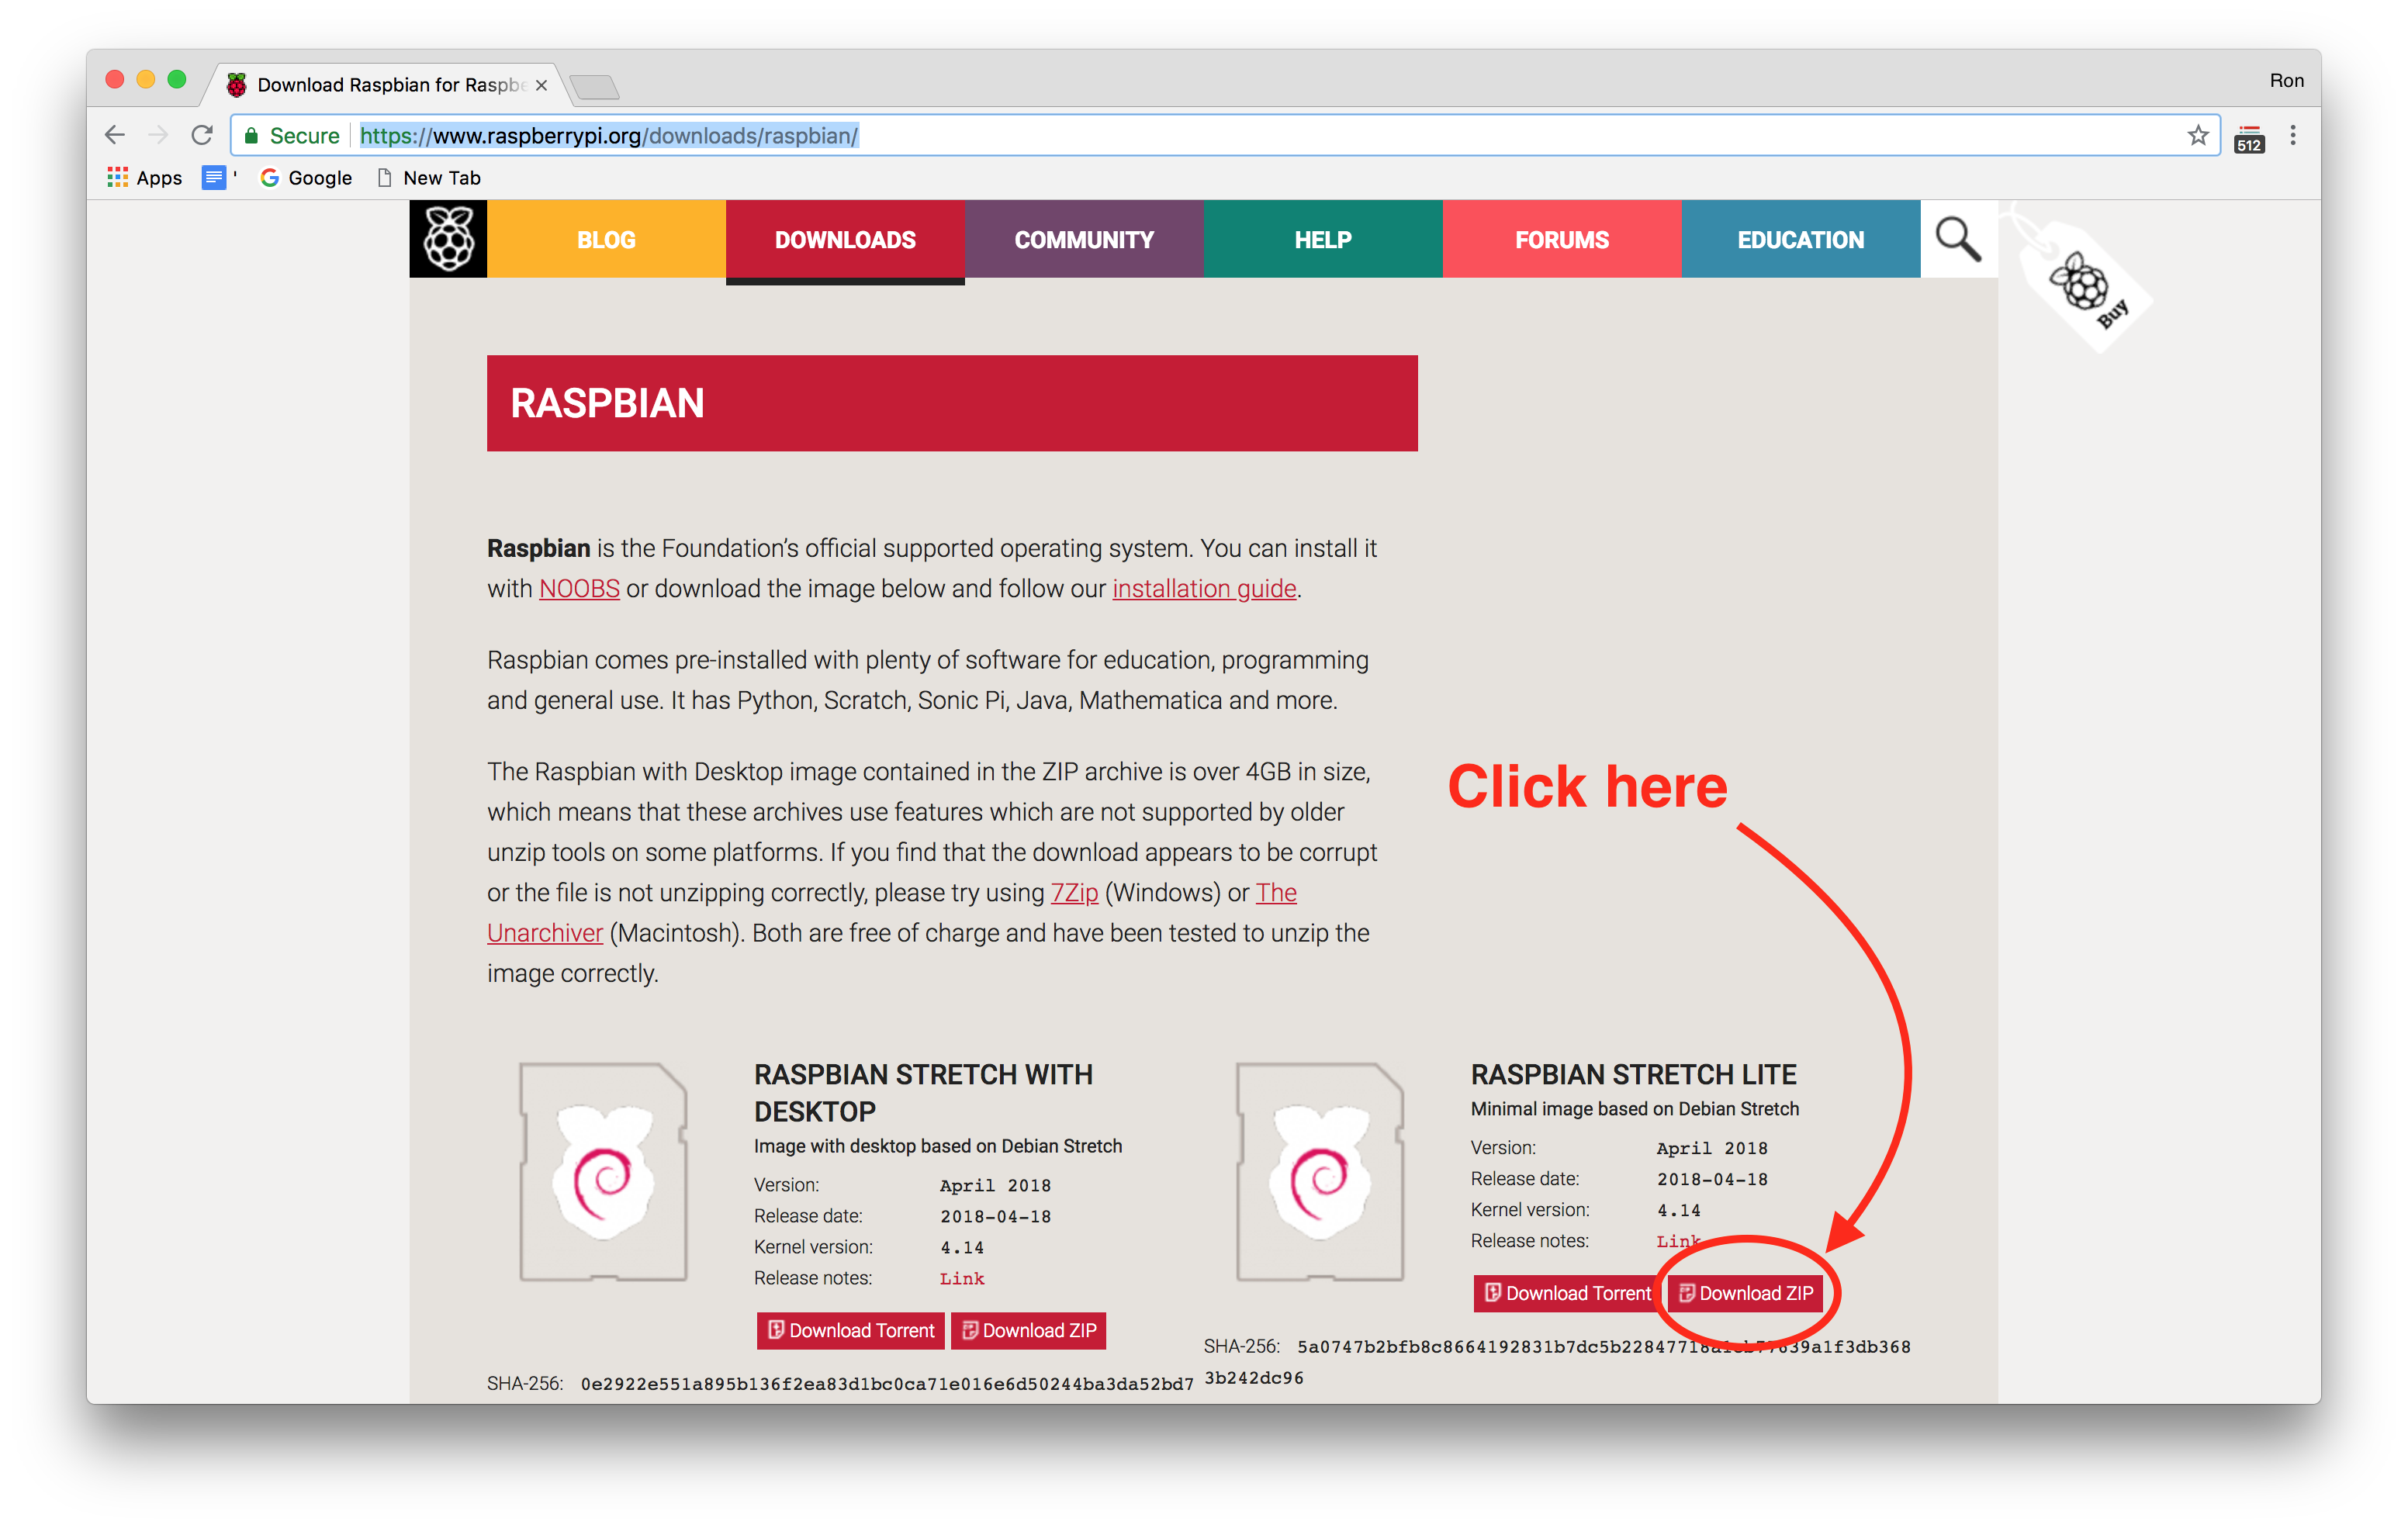
You should see a page similar to the above image (notice the “lite” word appended to the file on the right). This will download the server edition of the raspibian OS (i.e. no GUI). If desired, remote desktop can be setup later (using VNC).
Write OS to SD Card
Per the install documentation on raspberrypi.org,3 you simply need to download the OS image (as discussed previously), and download and run the software called Etcher.4
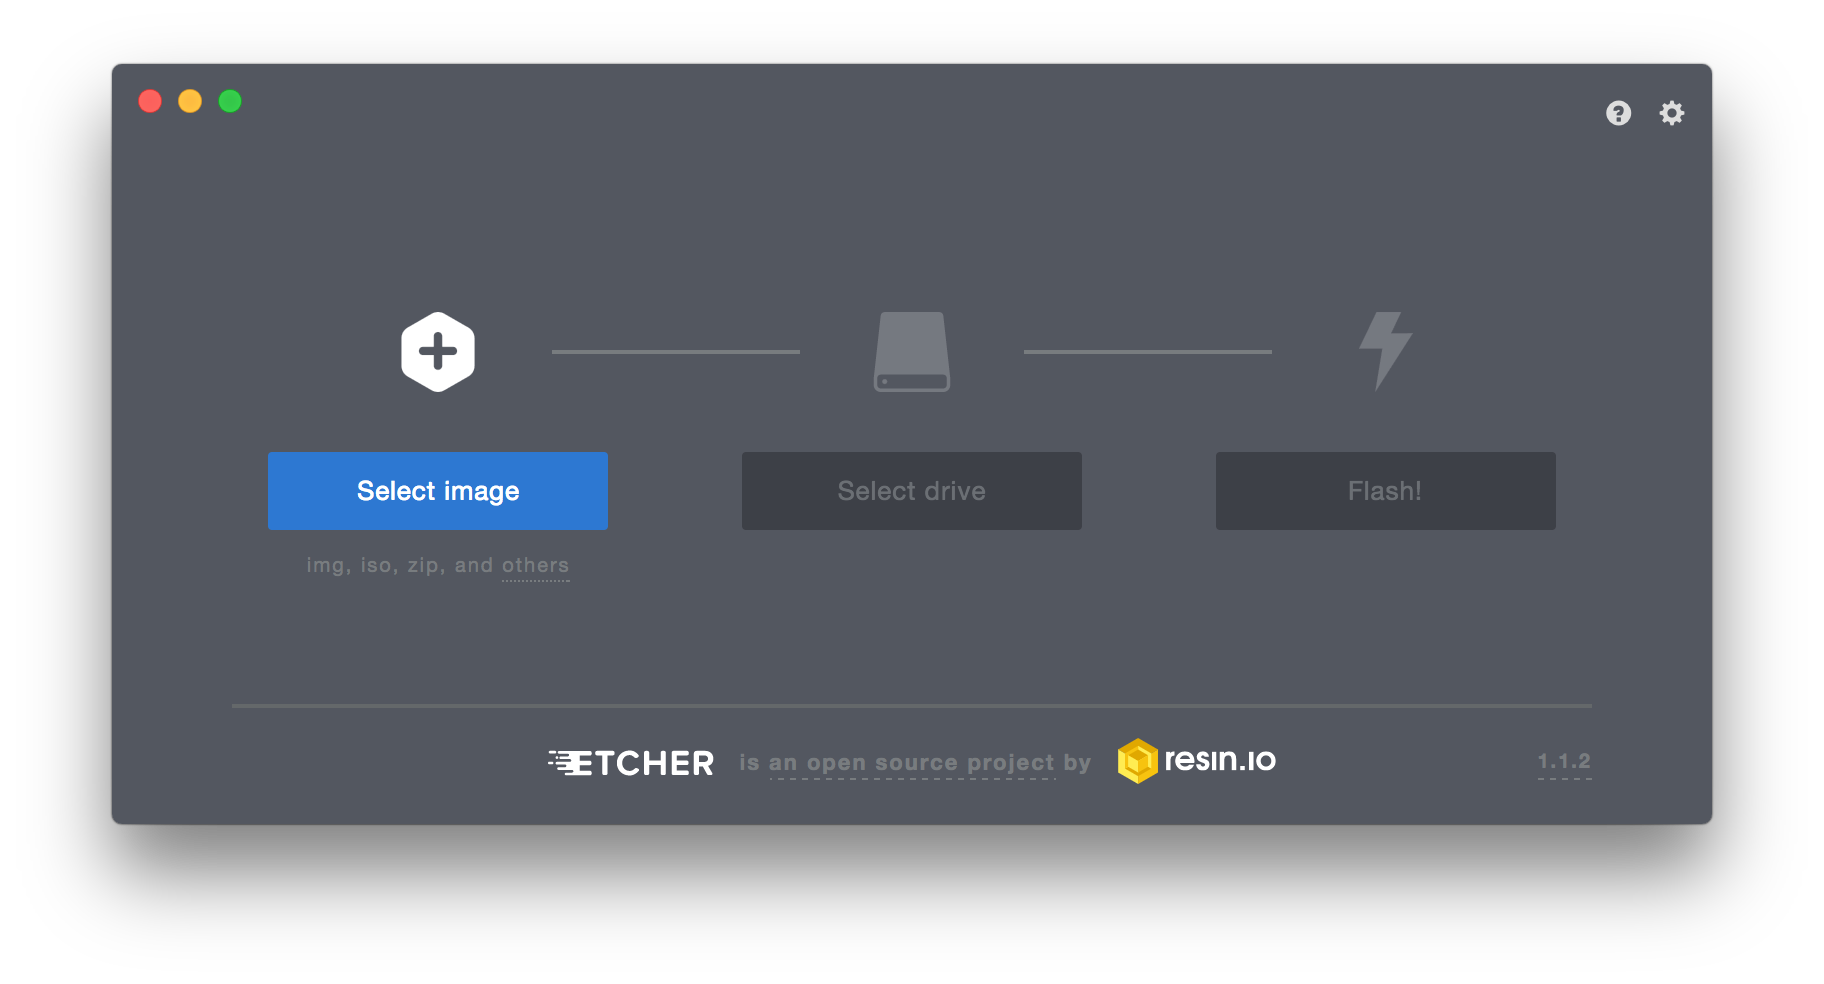
As you can see from the above image, you first click the left button and select the image you want to flash to the memory card (this will be the os file you downloaded earlier). Then click the middle button to select the drive you want to write to (this would be the SD card you want to flash). Finally, click the right button to beginning writing the OS to the SD card.
Once complete the card will be ejected, and you can simply remove it. But you will be reinserting it to complete the next part.
Enable SSH by Default
Before powering up your RPi, you will want to turn on SSH by default. To do
this, simply reinsert the SD card that you just flashed with the OS file, find
where it is mounted (on mac, it is in the /Volumes directory), and create a
file named ssh. For simplicity, you can follow the below command:
$ touch /Volumes/boot/ssh
$ diskutil umount /Volumes/boot
Let’s walk through this step by step. After we
previously flashed the SD card, the SD card was named boot. When
we insert the SD card, it will be mounted on macos in the /Volumes directory
as /Volumes/boot. Finally, to turn on ssh by default, we simply need to
create a file in the root directory of the recently flashed SD card, named
ssh. The touch command will merely create a file, with no contents, hence
touch /Volumes/boot/ssh. One last thing: unmount the SD card using the
diskutil umount command.
Now SSH is turned on, and we can login to the RPi and begin setting it up.
Enable WiFi by Default (Optional)
In some situations you may want to enable WiFi on boot (e.g. headless setup/install accessible over WiFi). With Raspberry Pi Zero W this is especially true, since these models lack any ethernet ports.
This can be done by simply creating a file named wpa_supplicant.conf5 in
the same location as the ssh file created in the previous section on
enabling SSH by default:
$ touch /Volumes/boot/wpa_supplicant.conf
To this file you will want to add a few lines:
network={
        ssid="testing"
        psk="testpassword"
}
To clarify what we are adding here: ssid is the name of your WiFi network
that you want the RPi to join, and psk is the password for the network.
In Raspberry Pi OS - Debian Buster and above,5 there is some additional
info you will need to add:
ctrl_interface=DIR=/var/run/wpa_supplicant GROUP=netdev
update_config=1
country=US
Again, to clarify, the main value you need to consider changing here is the
two character ISO 3166-1 alpha-2 country code (e.g. country=US).6 This
can be changed to the necessary country code for your location.
One final tip on security, after booting you can run the command
wpa_passphrase to generate a hash of your password to store in the
wpa_supplicant.conf file instead of storing your actual password:5
$ wpa_passphrase testing
# reading passphrase from stdin
testpassword
network={
       ssid="testing"
       #psk="testpassword"
       psk=6c87473aa5e4acaa702e8e0a78b8c36fffc24e966d2f38cb50b564d508a148ea
}
Initial Boot
Booting up is the easier part of this process. You will need:
- Raspberry Pi
- Power Supply
- Ethernet Cable
- Case (optional)
First, if you have a case, go ahead and insert the RPi into the case. Next, insert the SD card into the RPi. Then connect the ethernet cable to the RPi, and then into your network (i.e. switch, router, etc …). Finally connect the power supply to the RPi, and you now have a running RPi on your network!
The next step is logging in, configuring the system, and optionally installing additional software
Initial Setup
Setup of the RPi is trivial using the login script we have built.7 Simply login to the RPi, and pull down the script to be executed in Bash as follows:
$ ssh pi@raspberrypi.local
pi@raspberrypi:~ $ bash -c "$(curl -fsSL https://raw.githubusercontent.com/RagingTiger/config-rpi/master/config-rpi.sh)"
There are several prompts you will see: changing the default username/password,
setting up WiFi auto-join, install docker, etc. Type Y to the ones you want to
setup. If you choose to setup an SSH Key to do password-less entry, make sure to
pay attention to the end of the script. It explains what to do next. Here is
what it says:
Execute on your local machine (assumes rpi is on local network):
  $ scp ~/.ssh/id_rsa.pub USER@HOST.local:/home/USER/.ssh/authorized_keys
Here USER and HOST are just place holders for whatever username and hostname
, respectively, that you have chosen.
NOTE: Also keep in mind that this script can be run again if there is a
feature (for example to setup SSH key) that you did not select the first time,
but you decide later you would like to enable it. Just type Y to the prompts
for the features you want and have not already setup!
Advanced Config
Here we will cover more advanced configurations, both in terms of software and external hardware.
### Raspi-Config
### Scheduling Jobs with ‘crontab’