-
Raspberry Pi: Initial Setup and Configuration
Table of Contents
Introduction
Setting up a Raspberry Pi (RPi)1 can be very facile IF you follow the steps laid out in this guide.
Install OS
The first thing you need to do, before anything else, is download the Operating System (i.e. OS) and write it to an SD card. This guide will be using the Server OS version (usually has the word “lite” appended to the end of it).
Download OS
The OS can be downloaded here.2
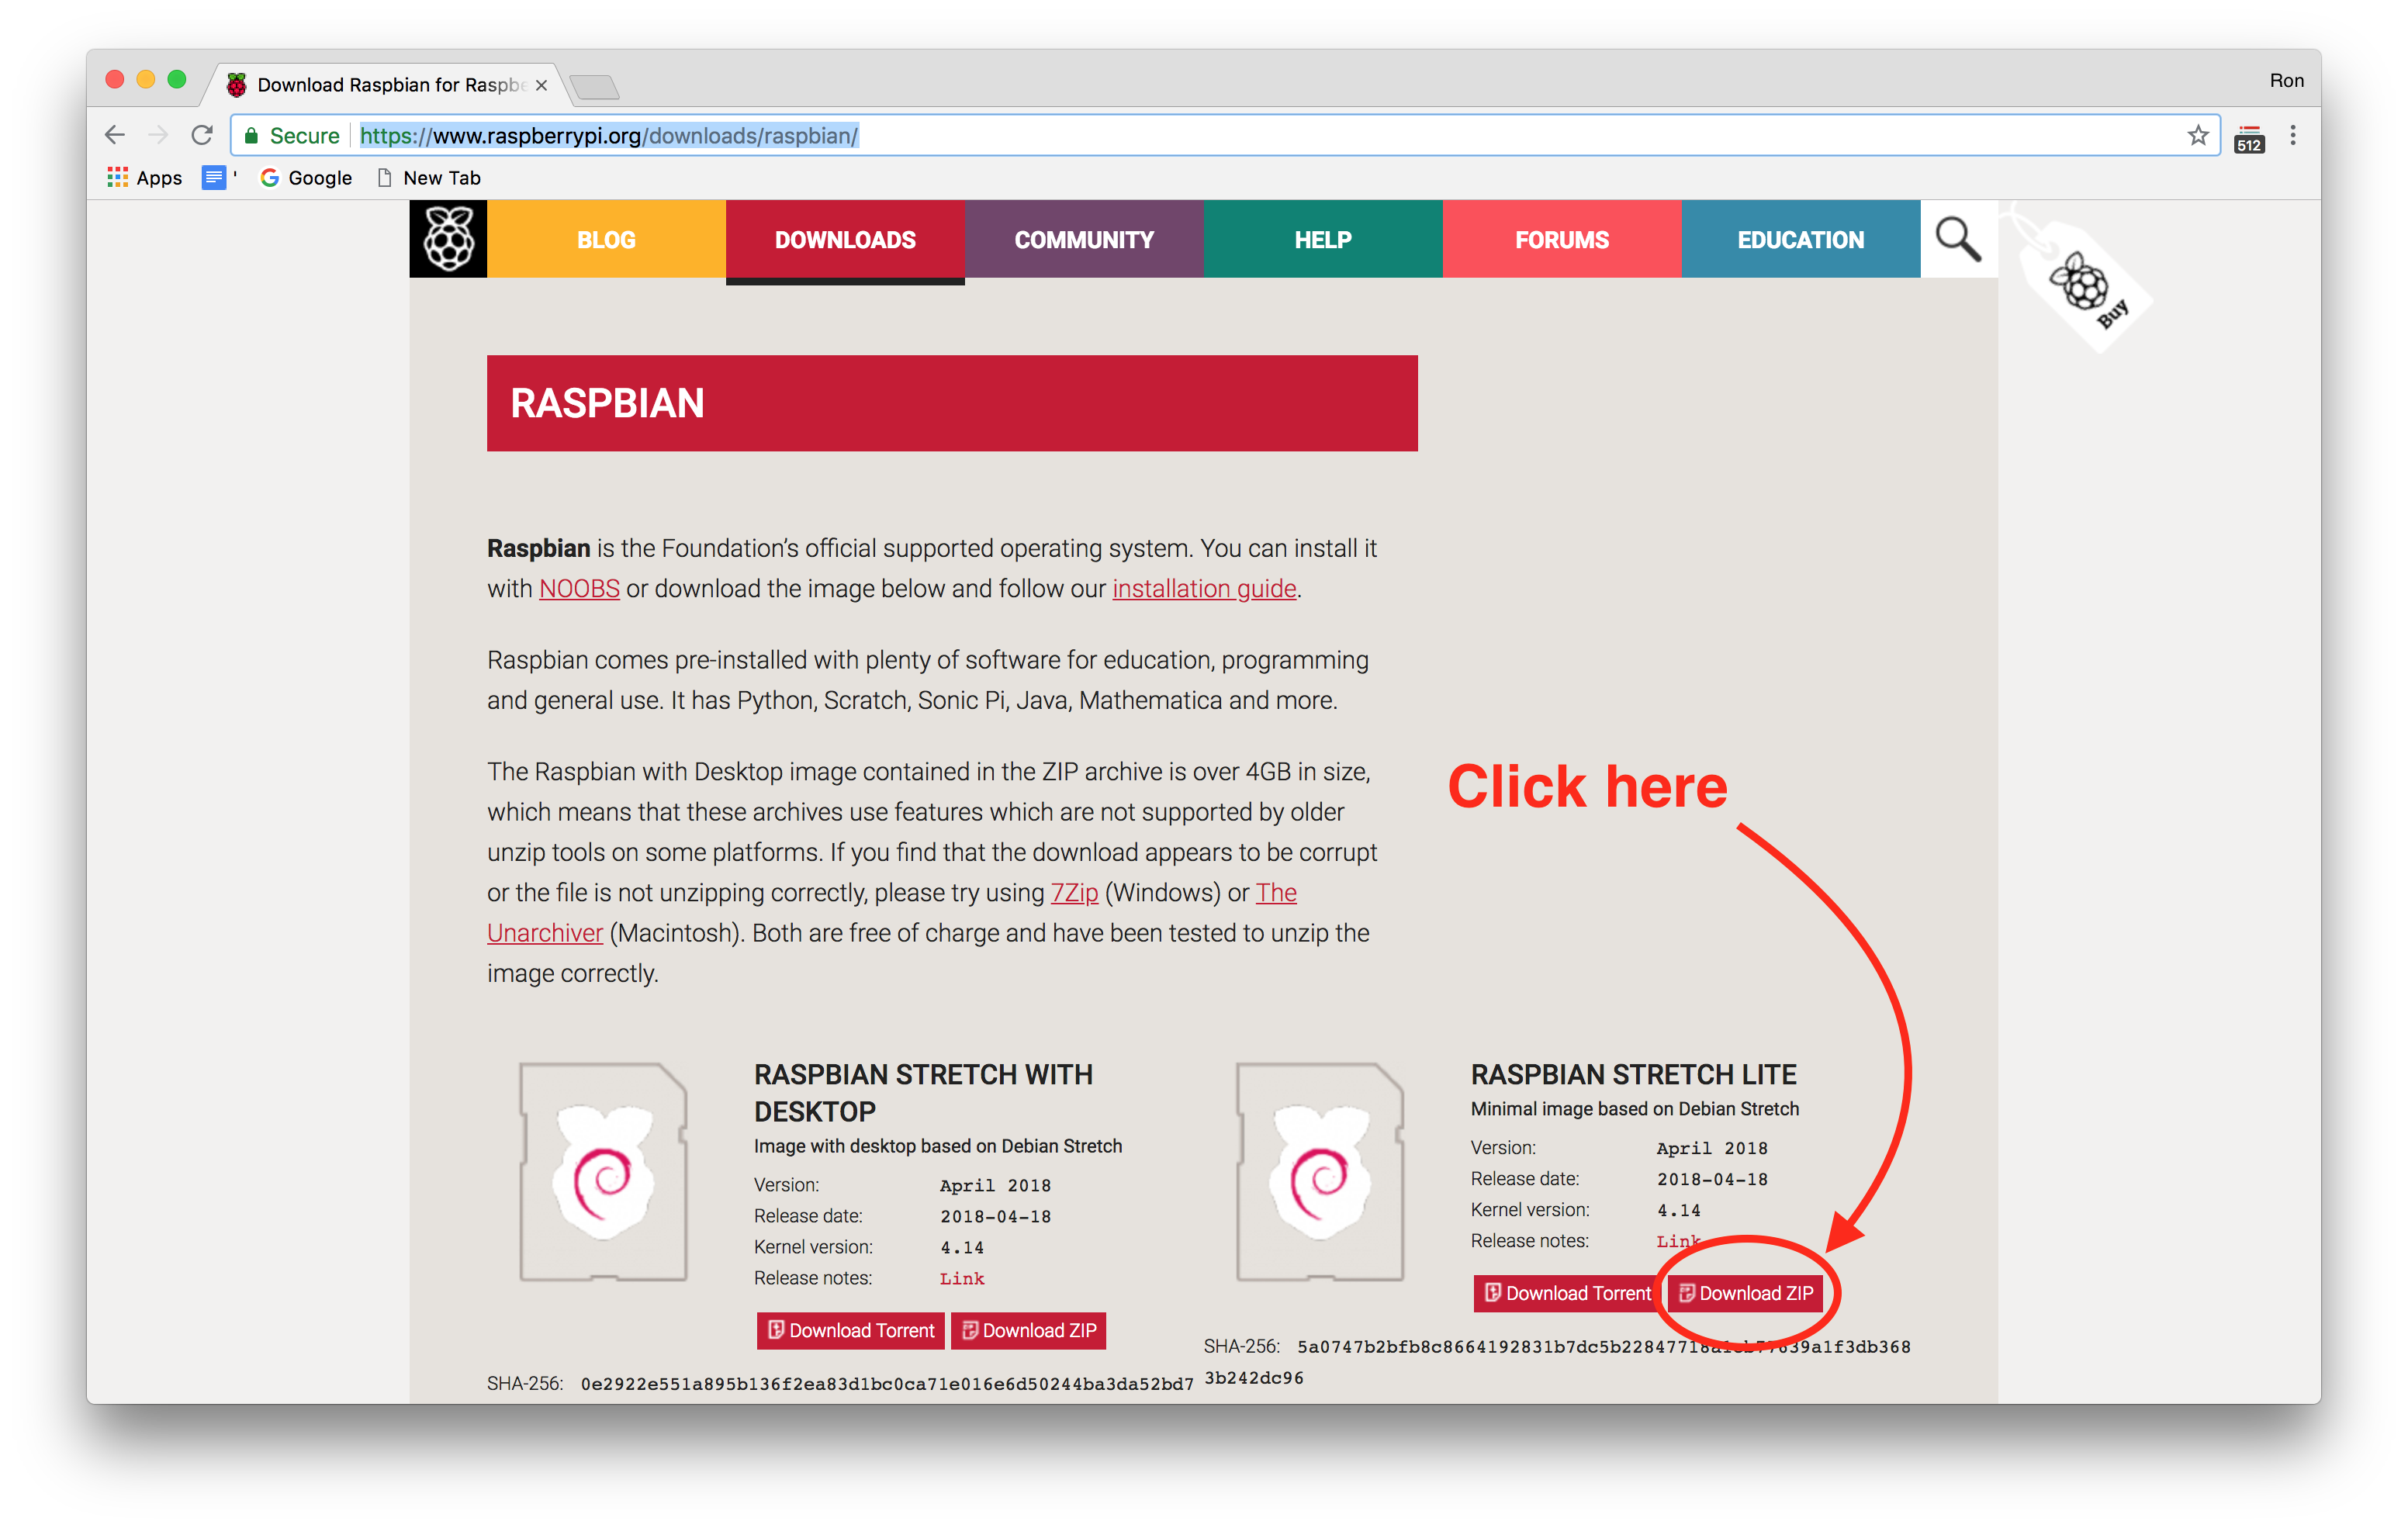
You should see a page similar to the above image (notice the “lite” word appended to the file on the right). This will download the server edition of the raspibian OS (i.e. no GUI). If desired, remote desktop can be setup later (using VNC).
Write OS to SD Card
Per the install documentation on raspberrypi.org,3 you simply need to download the OS image (as discussed previously), and download and run the software called Etcher.4
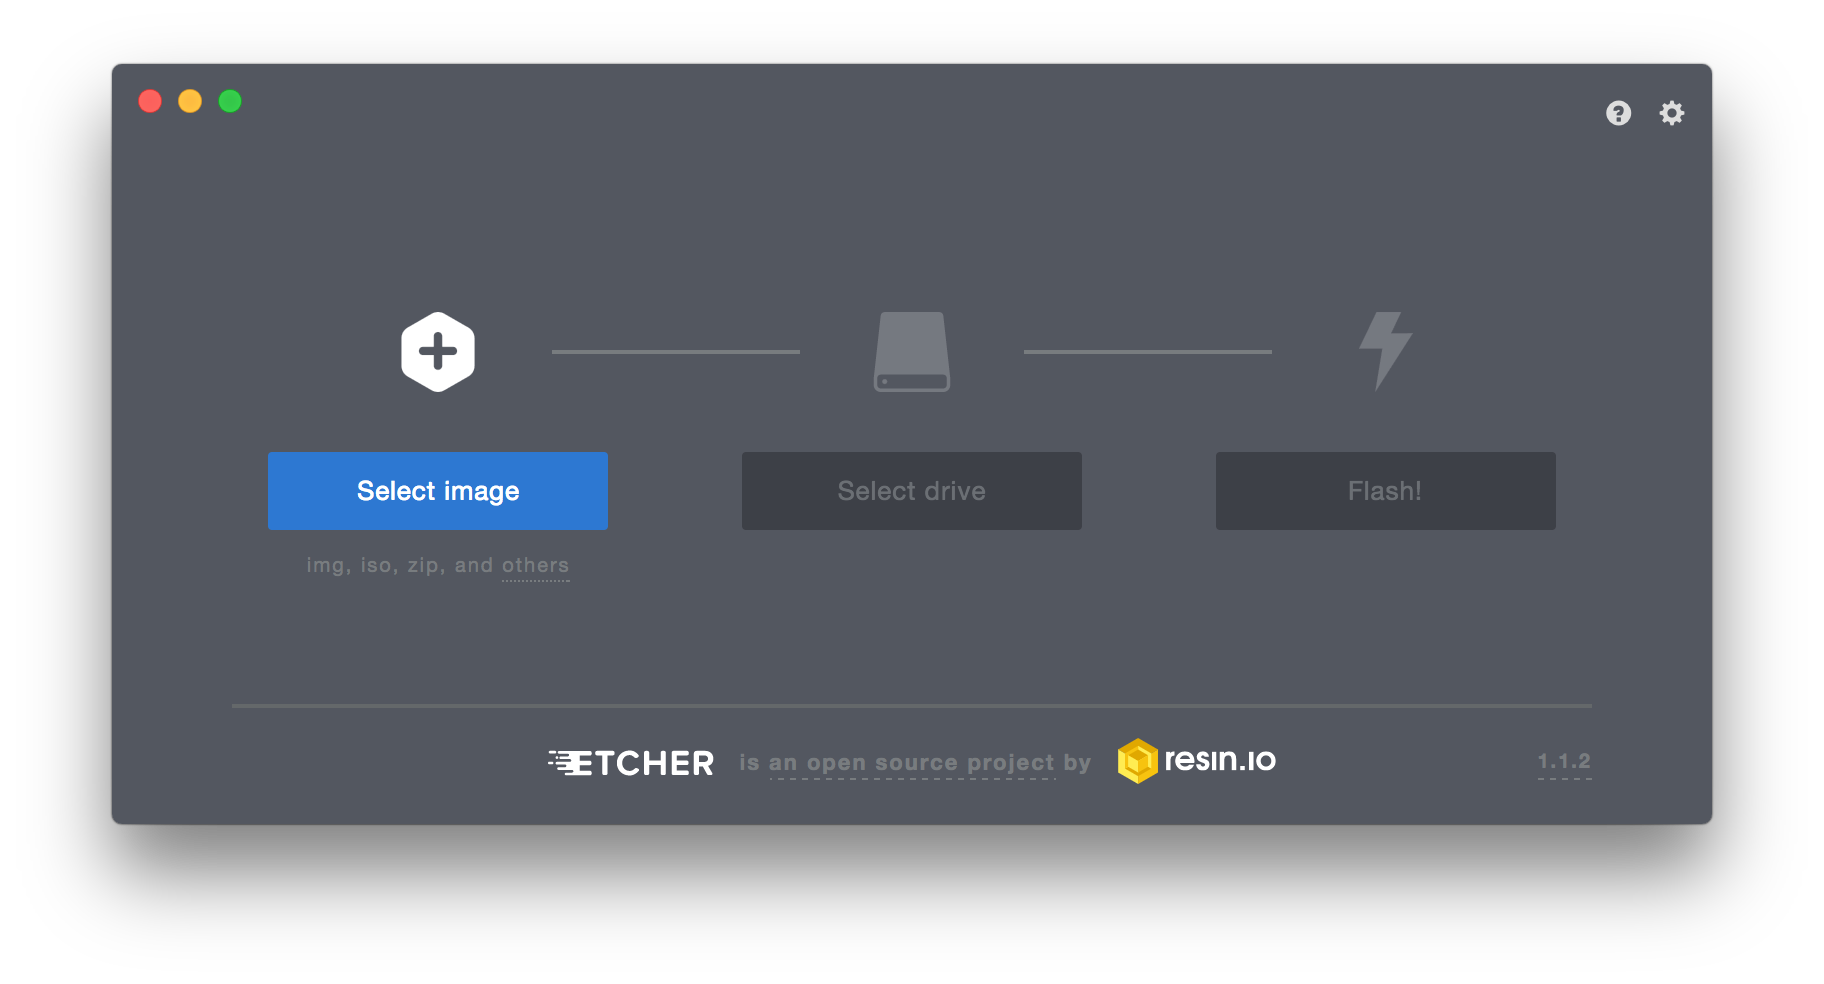
As you can see from the above image, you first click the left button and select the image you want to flash to the memory card (this will be the os file you downloaded earlier). Then click the middle button to select the drive you want to write to (this would be the SD card you want to flash). Finally, click the right button to beginning writing the OS to the SD card.
Once complete the card will be ejected, and you can simply remove it. But you will be reinserting it to complete the next part.
Enable SSH by Default
Before powering up your RPi, you will want to turn on SSH by default. To do this, simply reinsert the SD card that you just flashed with the OS file, find where it is mounted (on mac, it is in the
/Volumesdirectory), and create a file namedssh. For simplicity, you can follow the below command:$ touch /Volumes/boot/ssh $ diskutil umount /Volumes/bootLet’s walk through this step by step. After we previously flashed the SD card, the SD card was named
boot. When we insert the SD card, it will be mounted onmacosin the/Volumesdirectory as/Volumes/boot. Finally, to turn on ssh by default, we simply need to create a file in the root directory of the recently flashed SD card, namedssh. The touch command will merely create a file, with no contents, hencetouch /Volumes/boot/ssh. One last thing: unmount the SD card using thediskutil umountcommand.Now SSH is turned on, and we can login to the RPi and begin setting it up.
Enable WiFi by Default (Optional)
In some situations you may want to enable WiFi on boot (e.g. headless setup/install accessible over WiFi). With Raspberry Pi Zero W this is especially true, since these models lack any ethernet ports.
This can be done by simply creating a file named
wpa_supplicant.conf5 in the same location as thesshfile created in the previous section on enabling SSH by default:$ touch /Volumes/boot/wpa_supplicant.confTo this file you will want to add a few lines:
network={
        ssid="testing"
        psk="testpassword"
}
To clarify what we are adding here:
ssidis the name of yourWiFinetwork that you want theRPito join, andpskis the password for the network.In
Raspberry Pi OS - Debian Busterand above,5 there is some additional info you will need to add:ctrl_interface=DIR=/var/run/wpa_supplicant GROUP=netdev update_config=1 country=USAgain, to clarify, the main value you need to consider changing here is the two character ISO 3166-1 alpha-2 country code (e.g.
country=US).6 This can be changed to the necessary country code for your location.One final tip on security, after booting you can run the command
wpa_passphraseto generate a hash of your password to store in thewpa_supplicant.conffile instead of storing your actual password:5$ wpa_passphrase testing # reading passphrase from stdin testpassword network={ ssid="testing" #psk="testpassword" psk=6c87473aa5e4acaa702e8e0a78b8c36fffc24e966d2f38cb50b564d508a148ea }Initial Boot
Booting up is the easier part of this process. You will need:
- Raspberry Pi
- Power Supply
- Ethernet Cable
- Case (optional)
First, if you have a case, go ahead and insert the RPi into the case. Next, insert the SD card into the RPi. Then connect the ethernet cable to the RPi, and then into your network (i.e. switch, router, etc …). Finally connect the power supply to the RPi, and you now have a running RPi on your network!
The next step is logging in, configuring the system, and optionally installing additional software
Initial Setup
Setup of the RPi is trivial using the login script we have built.7 Simply login to the RPi, and pull down the script to be executed in Bash as follows:
$ ssh pi@raspberrypi.local
pi@raspberrypi:~ $ bash -c "$(curl -fsSL https://raw.githubusercontent.com/RagingTiger/config-rpi/master/config-rpi.sh)"
There are several prompts you will see: changing the default username/password, setting up WiFi auto-join, install docker, etc. Type
Yto the ones you want to setup. If you choose to setup an SSH Key to do password-less entry, make sure to pay attention to the end of the script. It explains what to do next. Here is what it says:Execute on your local machine (assumes rpi is on local network): $ scp ~/.ssh/id_rsa.pub USER@HOST.local:/home/USER/.ssh/authorized_keysHere
USERandHOSTare just place holders for whatever username and hostname , respectively, that you have chosen.NOTE:Also keep in mind that this script can be run again if there is a feature (for example to setup SSH key) that you did not select the first time, but you decide later you would like to enable it. Just typeYto the prompts for the features you want and have not already setup!Advanced Config
Here we will cover more advanced configurations, both in terms of software and external hardware.
### Raspi-Config
### Scheduling Jobs with ‘crontab’
References
-
Ubiquiti EdgeRouter Configuration: DHCP Reservation and Port Forwarding
Table of Contents
Introduction
One of the many configurations you will likely want to make to your Edge Router1 involves setting up remote access to the hosts connected (usually via a wired ethernet connection) to the Edge Router network. There are a variety of reasons for this: home hosting (i.e. hosting your own website from your home LAN), remote file sharing, and remote login to name just a few. The point is that having remote access (i.e. external access from your WAN, aka internet), is a very common need. In this tutorial, we will be looking at how to set a DHCP reservation for your hosts, followed by port forwarding to that host. (NOTE: while this tutorial uses an Edge Router model ER-X as the router, it is very reasonable to apply these same steps to any Edge Router running the EdgeOS software).
DHCP Reservation
To clarify, “DHCP” stands for Dynamic Host Configuration Protocol. It is a more technical way of saying “a protocol that allows for host local IP addresses to be configured in real time.” This means that when you connect a computer (i.e. laptop, PC, Raspberry Pi, Linux server) to the network (and assuming you have authenticated this connection by giving the password), the router on the network will “dynamically” assign an IP address to the computer (without YOU being forced to manually assign it). It is a convenience that makes it easier to add and remove hosts from the network without having to manually change their IP address every time.
The only issue with DHCP, and it’s not really an issue, is that the IP addresses given out to the hosts on the network are “leased.” This means they are temporary, and will expire. Again, this is so that if the host is removed at some point, that “leased” IP address that the router gave out, will expire and become “free” to be given out. Imagine the alternative: the router gives out only 200 IP addresses, and after the 200th address, no more will be given out. Does that make sense? Not really, because in our modern networks (e.g. a coffee shop, your corporate office, the local College campus) hosts are constantly joining and leaving the network. But many may not be back to the network for a long long time. Maybe they were just visiting. Maybe they came for a tour of the campus. Maybe the only get coffee once month. Meanwhile, you have new people coming in constantly wanting access to your network. They will need a new IP address. Hence DHCP saves the day.
But this also means that if you have a host you want to keep permanently on the network, then you will likely want that host to have what is called a static IP address. This is an address that is usually “outside” the range of addresses that the router leases to hosts, and that will never expire. A DHCP reservation is simply “reserving” an IP address, i.e. making a static IP address for a given host (who is identified to the network by its MAC address).
To configure a new DHCP reservation, first login to your router:
$ ssh username@192.168.1.1Notice here that username is ubnt and the password is also ubnt on the default setup for the EdgeOS. So if you have just setup your router, and have not changed the admin username/password then it will be ubnt/ubnt respectively.
Now that you are logged in, the commands you will be submitting to create the DHCP reservation look something like the following:
ubnt@edgerouter $ configure
ubnt@edgerouter# set service dhcp-server shared-network-name <LAN_NAME> subnet
192.168.1.0/24 static-mapping <HOST_NAME> ip-address <STATIC_IP_ADDRESS>
ubnt@edgerouter# set service dhcp-server shared-network-name <LAN_NAME> subnet
192.168.1.0/24 static-mapping <HOST_NAME> mac-address '<MAC_ADDRESS>'
ubnt@edgerouter# commit; save; exit
In this example, LAN_NAME is simply going to be the name of your Local Area Network (LAN). In most cases, this will be simply LAN. The HOST_NAME and STATIC_IP_ADDRESS, will be of your choosing. But keep in mind, the default configuration for the router’s DHCP lease range starts at 192.168.1.38 and ends at 192.168.1.243. A good choice would be some address in the range 192.168.1.2 - 192.168.1.37 (NOTE: Here we excluded 192.168.1.1 because that is the router’s address). Finally you will need the MAC_ADDRESS for your host. On most Linux and macOS systems this can be found using the
ifconfig(interface configuration) command. Simply look for the interface that is active and has an IP address in the range of your network (e.g. 192.168.1.45 like the Raspberry Pi host in the picture below).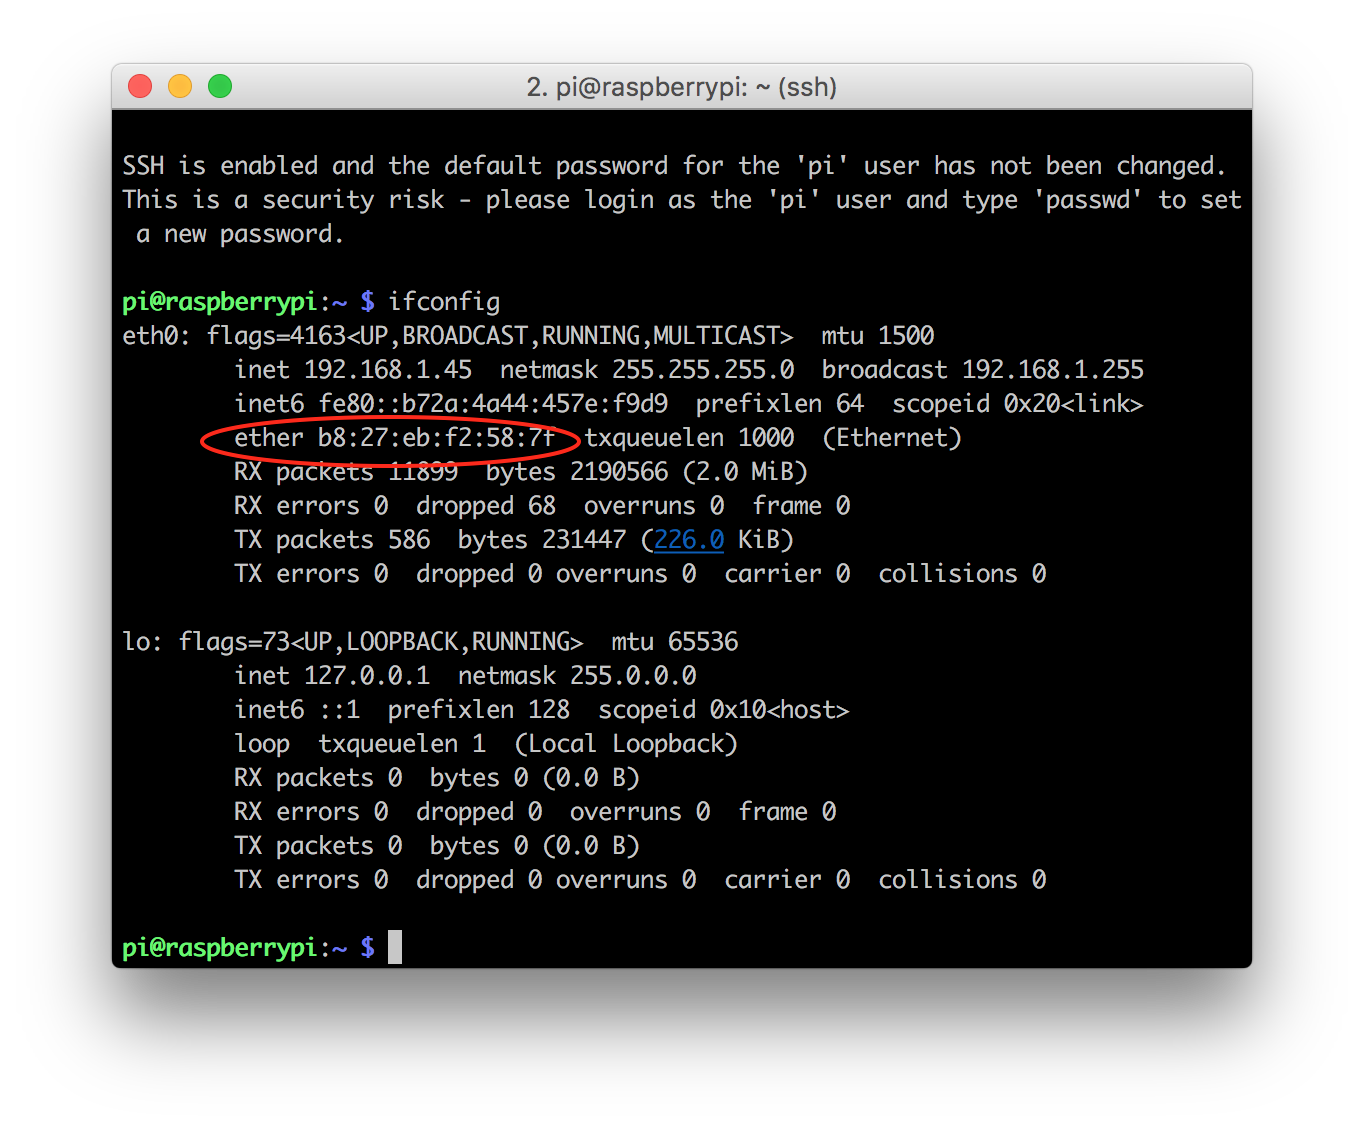
Here is an example DHCP reservation based on the Raspberry Pi host pictured above, using 192.168.1.30 as the reserved IP address:
ubnt@edgerouter $ configure
ubnt@edgerouter# set service dhcp-server shared-network-name LAN subnet
192.168.1.0/24 static-mapping raspberrypi ip-address 192.168.1.30
ubnt@edgerouter# set service dhcp-server shared-network-name LAN subnet
192.168.1.0/24 static-mapping raspberrypi mac-address 'b8:27:eb:f2:587f'
ubnt@edgerouter# commit; save; exit
Notice the “ ‘ “ (single quotes) around the MAC_ADDRESS? Don’t forget those.
If all went well, you should see the router stop and start the DHCP server, and reload the /config/config.boot file. Go ahead and run the following command to see if you can find the newest configuration:
ubnt@edgerouter $ show configuration commands
.
.
.
set service dhcp-server disabled false
set service dhcp-server hostfile-update disable
set service dhcp-server shared-network-name LAN authoritative enable
set service dhcp-server shared-network-name LAN subnet 192.168.1.0/24
default-router 192.168.1.1
set service dhcp-server shared-network-name LAN subnet 192.168.1.0/24
dns-server 192.168.1.1
set service dhcp-server shared-network-name LAN subnet 192.168.1.0/24
lease 86400
set service dhcp-server shared-network-name LAN subnet 192.168.1.0/24 start
192.168.1.38 stop 192.168.1.243
set service dhcp-server shared-network-name LAN subnet 192.168.1.0/24
static-mapping raspberrypi ip-address 192.168.1.30
set service dhcp-server shared-network-name LAN subnet
192.168.1.0/24 static-mapping raspberrypi mac-address 'b8:27:eb:f2:587f'
.
.
.
You should see a section on
set service dhcp-serverand it should look similar to the above. If your configuration was successful, you will see the configuration for your host’s IP address and MAC address. Now you are ready to setup port forwarding.Port Forwarding
Considering the amount of work required in the previous section, this section should be rather easy. Basically, port forwarding is where the router will translate requests (e.g. HTTP, HTTPS, SSH, TELNET, etc) that it receives on its WAN connection (the raw internet coming from the modem and being piped into the router) specifying a certain port (e.g. port 4000) to a different port on the LAN (e.g. port 80, 22, etc) for a specific host. Example:
An SSH request on port 2000, gets routed to the host with the local address
192.168.1.30 on port 22
Ahh, see why we needed the static IP/DHCP reservation? We need to make sure that ONLY that Raspberry Pi host (that we setup to have the static IP address 192.168.1.30 in the previous section) will get the SHH request on port 2000, and no other host will. If we did not setup our port forwarding using a static IP address, then when the lease runs out on the address, another host could end up receiving that IP address. As you can imagine this would cause all kinds of headaches and troubles, but with a static IP/DHCP reservation, we can rest assured that we can reach our desired host when we want to use SSH to remote login from the WAN (i.e. internet).
To get started, go ahead and login to your router as mentioned in the previous section (if you are not already logged in). The commands you will be submitting are similar to this:
ubnt@edgerouter $ configure
ubnt@edgerouter# set port-forward rule <NUMBER> description 'Simple Description'
ubnt@edgerouter# set port-forward rule <NUMBER> forward-to address <IP_ADDRESS>
ubnt@edgerouter# set port-forward rule <NUMBER> forward-to port <INTERNAL_PORT>
ubnt@edgerouter# set port-forward rule <NUMBER> original-port <EXTERNAL_PORT>
ubnt@edgerouter# set port-forward rule <NUMBER> protocol <PROTOCOL>
ubnt@edgerouter# commit; save; exit
The explanation for the above variables is simple. The IP_ADDRESS is simply the static IP address that we configured in the previous section. The INTERNAL_PORT and EXTERNAL_PORT are new, but not difficult to grasp. Think of the external port as the WAN port, i.e. the port the router is receiving requests from over the internet. The internal port is the port that the request received on the EXTERNAL_PORT, will be forwarded to (i.e. if external port is 2000, and internal port is 22, then all requests sent to the router over the WAN on port 2000, will be forwarded to the host at IP_ADDRESS on port INTERNAL_PORT). And finally PROTOCOL is simply the various protocols it will accept. You can cover your bases by just setting this to tcp_udp.
Now, continuing the setup of our Raspberry Pi host that we set up with the static IP address 192.168.1.30 previously, here is how we could setup the port forwarding for SSH over WAN access on port 2000:
ubnt@edgerouter $ configure
ubnt@edgerouter# set port-forward rule 1 description 'SSH access to my RPi'
ubnt@edgerouter# set port-forward rule 1 forward-to address 192.168.1.30
ubnt@edgerouter# set port-forward rule 1 forward-to port 22
ubnt@edgerouter# set port-forward rule 1 original-port 2000
ubnt@edgerouter# set port-forward rule 1 protocol tcp_udp
ubnt@edgerouter# commit; save; exit
This will allow us to access our host from the WAN on port 2000 to our LAN at the address 192.168.1.30 on port 22. And with that we are all done! You should now be able to remotely access your host (assuming you followed these steps accurately). One note, is that you will need to restart your host so that it will reconnect to the network and get its new IP address and hence receive port forwarded requests (yay!).
References
-
Ubiquiti UniFi Controller Setup Guide
Table of Contents
Introduction
One of the pros/cons of the Ubiquiti UniFi1 ecosystem is the necessity of the UniFi controller software.2 While this software ultimately works well, it does require downloading and installing.2 This can be a bit undesirable to your veteran developer/engineer/hacker that does not want more applications cluttering their file system.
Luckily there is a dockerized3 version of the application that we will be discussing here, as well as the traditional install method, and a strategy for deploying the docker container4 to a Raspberry Pi5 server.
Setup
Install Locally
Dockerized UniFi
Raspberry Pi UniFi
Assuming you have already setup a Raspberry Pi (RPi) server (if not please review the guide on initial setup of an RPi server), you can actually run the dockerized UniFi controller on the Raspberry Pi, and use it as your UniFi server!!!!
To get started, we simply need to install docker on the RPi. Again, this is handled by the install script mentioned above,6 BUT if you would like to install it directly simply use Docker’s automated installer as follows:
# NOTE: we assume you are logged into the RPi
$ curl -sSL https://get.docker.com | sh
Once docker is installed, we can simply run the dockerized UniFi controller (and pull down its image) as follows:
sudo docker run -d --restart=always --name=unifi
-v /home/$USER/unifi_ctrl_config:/config -e PGID=1001 -e PUID=1001
-p 3478:3478/udp -p 10001:10001/udp -p 8080:8080 -p 8081:8081 -p 8443:8443
-p 8843:8843 -p 8880:8880 -p 6789:6789 lsioarmhf/unifi
Let’s breakdown what this is doing, so we can be more secure about running this massively large command. First off, the
-doption simply turns on the daemon feature that allows the container to run in the background, and not block in the terminal. Next the--restart=alwayssimply insures that if the server crashes, or the system reboots, the container will simply reboot as well. With--name=unifi, this allows us to actually address this “specific” container by name (instead of the long complicated hash id that you won’t ever remember).The remaining options
-v, -e, -pare semi-transparent.-vsimply mounts a “volume” into the container as another directory. Here we are mounting the directoryunifi_ctrl_configwith path/home/$USER/, as the/configdirectory in the container. This means, if you login to the container andcdto the/configdirectory, you will see the contents of the/unifi_ctrl_configdirectory. The-eoption simply sets an environment variable (in this case$PGIDand$PUID). Finally the-poption sets the port mappings for the internal network of the container, to the external network of the system running the container. This means, for example, that traffic sent on port8080, to the RPi will be forwarded to the port8080on the container (this is akin to port forwarding on a router7). Finally, thelsioarmhf/unifiis simply the dockerhub account name, and image name (herelsioarmhfis the account name andunifiis the image name) that we want to pull/run.And with that, you should have a UniFi Controller running on your RPi that you can access from your network.
References
-
Ubiquiti UniFi Access Point Setup Guide
Table of Contents
Introduction
While most of today’s routers1 have a wireless access point builtin, Ubiquiti2 has taken a more modular3 approach: all the routers are wired and all the access points are separate products. This means when you buy a Ubiquiti router (e.g. the lovely EdgeRouter ER-X4), you will need to either connect an existing router (that has an access point) in bridge mode,5 or purchase a Ubiquiti UniFi Access Point.6 In this guide, the focus will be on using the UniFi AP-AC-LR7 to serve as the wireless access to your network.
By the way, have you set up your EdgeRouter yet? If not, go ahead and follow our guide8 to setup your router first, then return here to continue.
Setup
NOTE: When first setting up your access point, connect it directly to your EdgeRouter. DO NOT CONNECT TO A SWITCH!!! A switch could interfere with the DHCP for the access point and make the access point unreachable or unresponsive to the UniFi Controller software.6
UniFi Controller
References
-
Ubiquiti EdgeRouter Setup Guide
Table of Contents
Introduction
While researching enterprise routers to build my own enterprise LAN, I became acquainted with the Ubiquiti EdgeRouter series.1, 2, 3 I became very impressed with the whole Ubiquiti lineup, and I invested in the EdgeRouter ER-X4, and the UniFi AC LR AP5 (NOTE: setting up this access point will be discussed in a completely separate post6). What follows is a brief description of how I setup my EdgeRouter ER-x. (NOTE: since macOS is the OS that I used to setup my router, that is the OS that will be covered in this guide.)
Setup
Before you get started with setting up your router, make sure you have a few items:
- A competent modem for use with your router: Here is an example
- 3-5 foot cat6 ethernet cable for connecting router to modem: Here is an example
- 10 foot cat6 ethernet cable for connecting router to personal computer: Here is an example
- Ethernet-Thunderbolt adapter (depends on your computer): Here is an example
Once you have all these things, you can actually proceed with setting up your router and connecting it to the internet.
Initial Login
To start with, you will need to grab an ethernet cable (e.g. RJ45 cable), and a thunderbolt to ethernet adapter (if you don’t have an ethernet port). Go ahead and connect the adapter to the ethernet cable, and plug it into your mac. Plug the other end of the cable into the left most ethernet port labeled eth0 on the front of the router. Now power up the router by plugging in the 12V power supply.
With the router powered up, the ethernet cable plugged into the port eth0 on the front of the router, and the other end of the ethernet cable plugged into the thunderbolt adapter (which is plugged into your mac), open the Network Preferences under System Preferences.
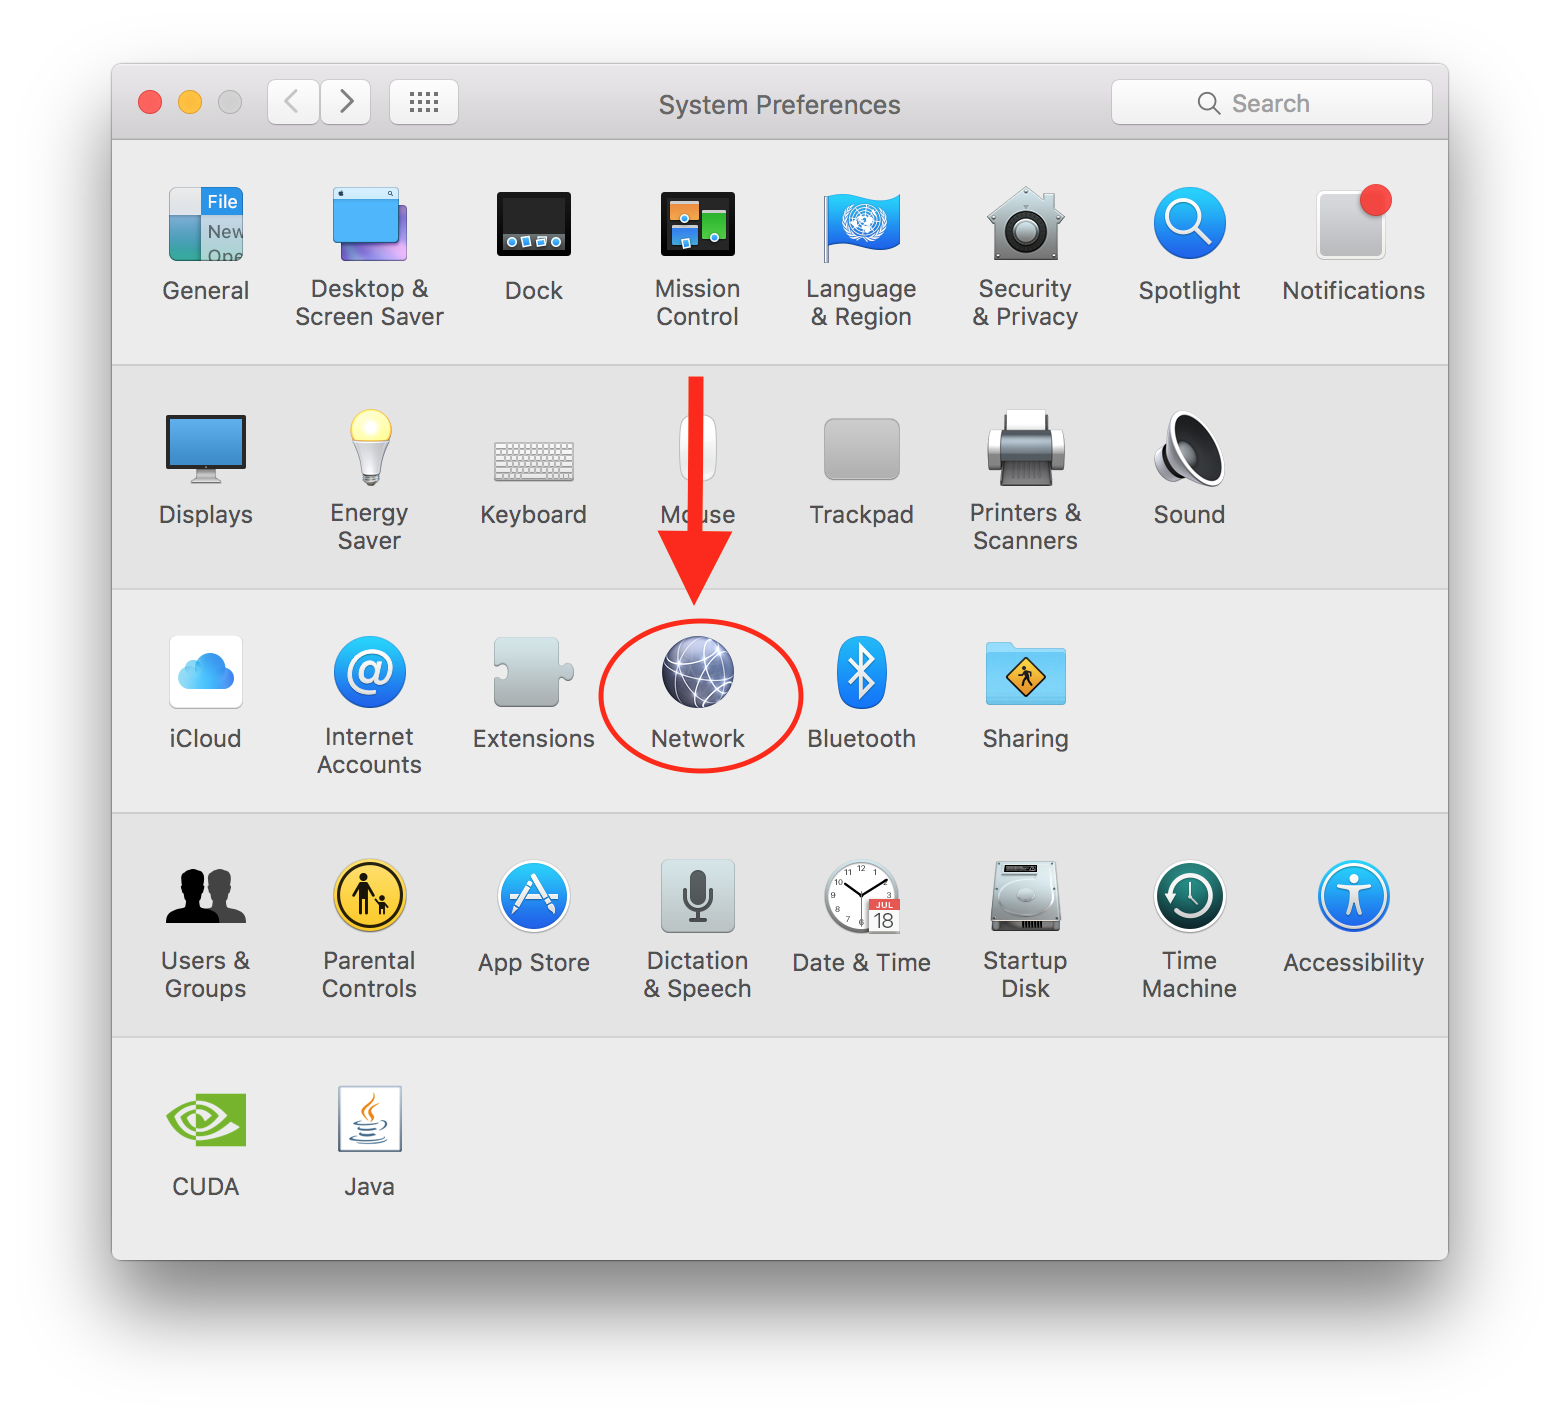
Then, after clicking on Network (as shown above), click on Thunderbolt Ethernet on the far left list, and select Manually under Configure IPv4 and fill out the configuration as follows:
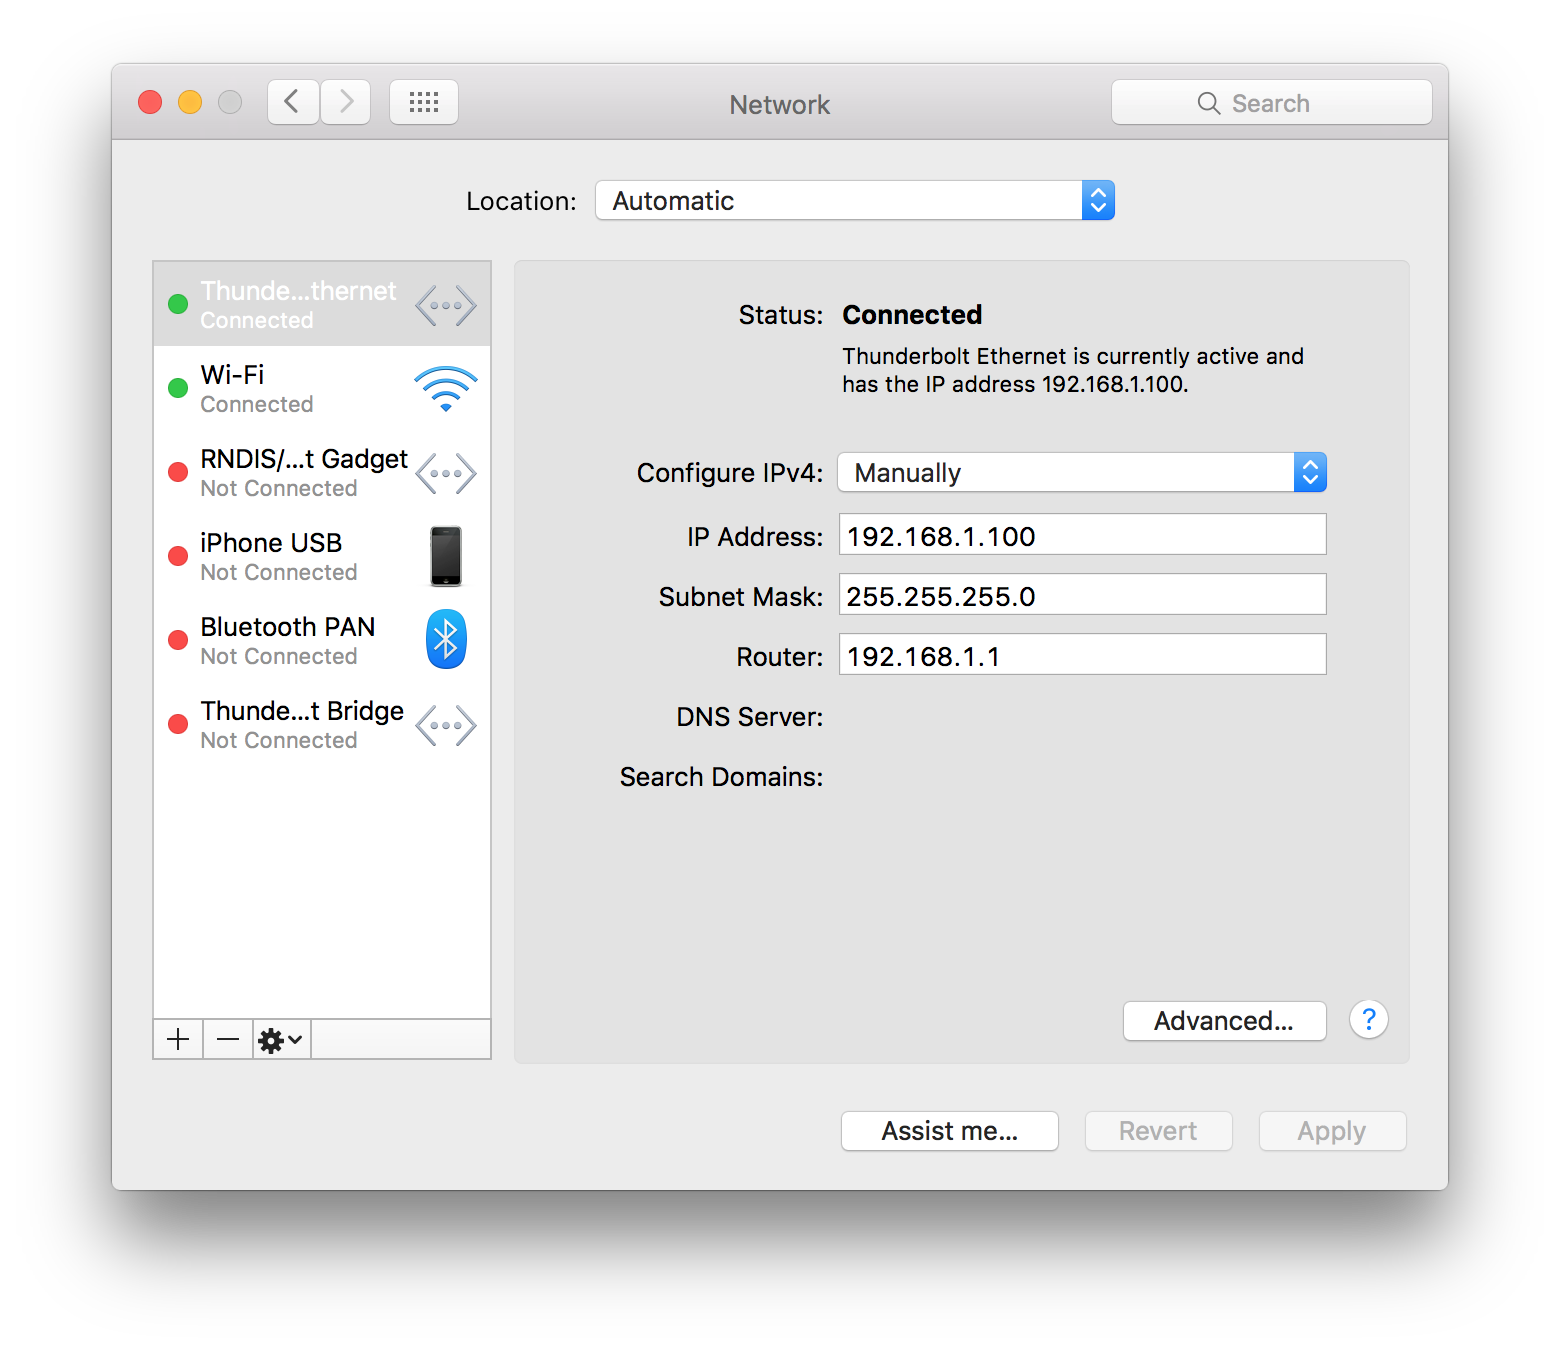
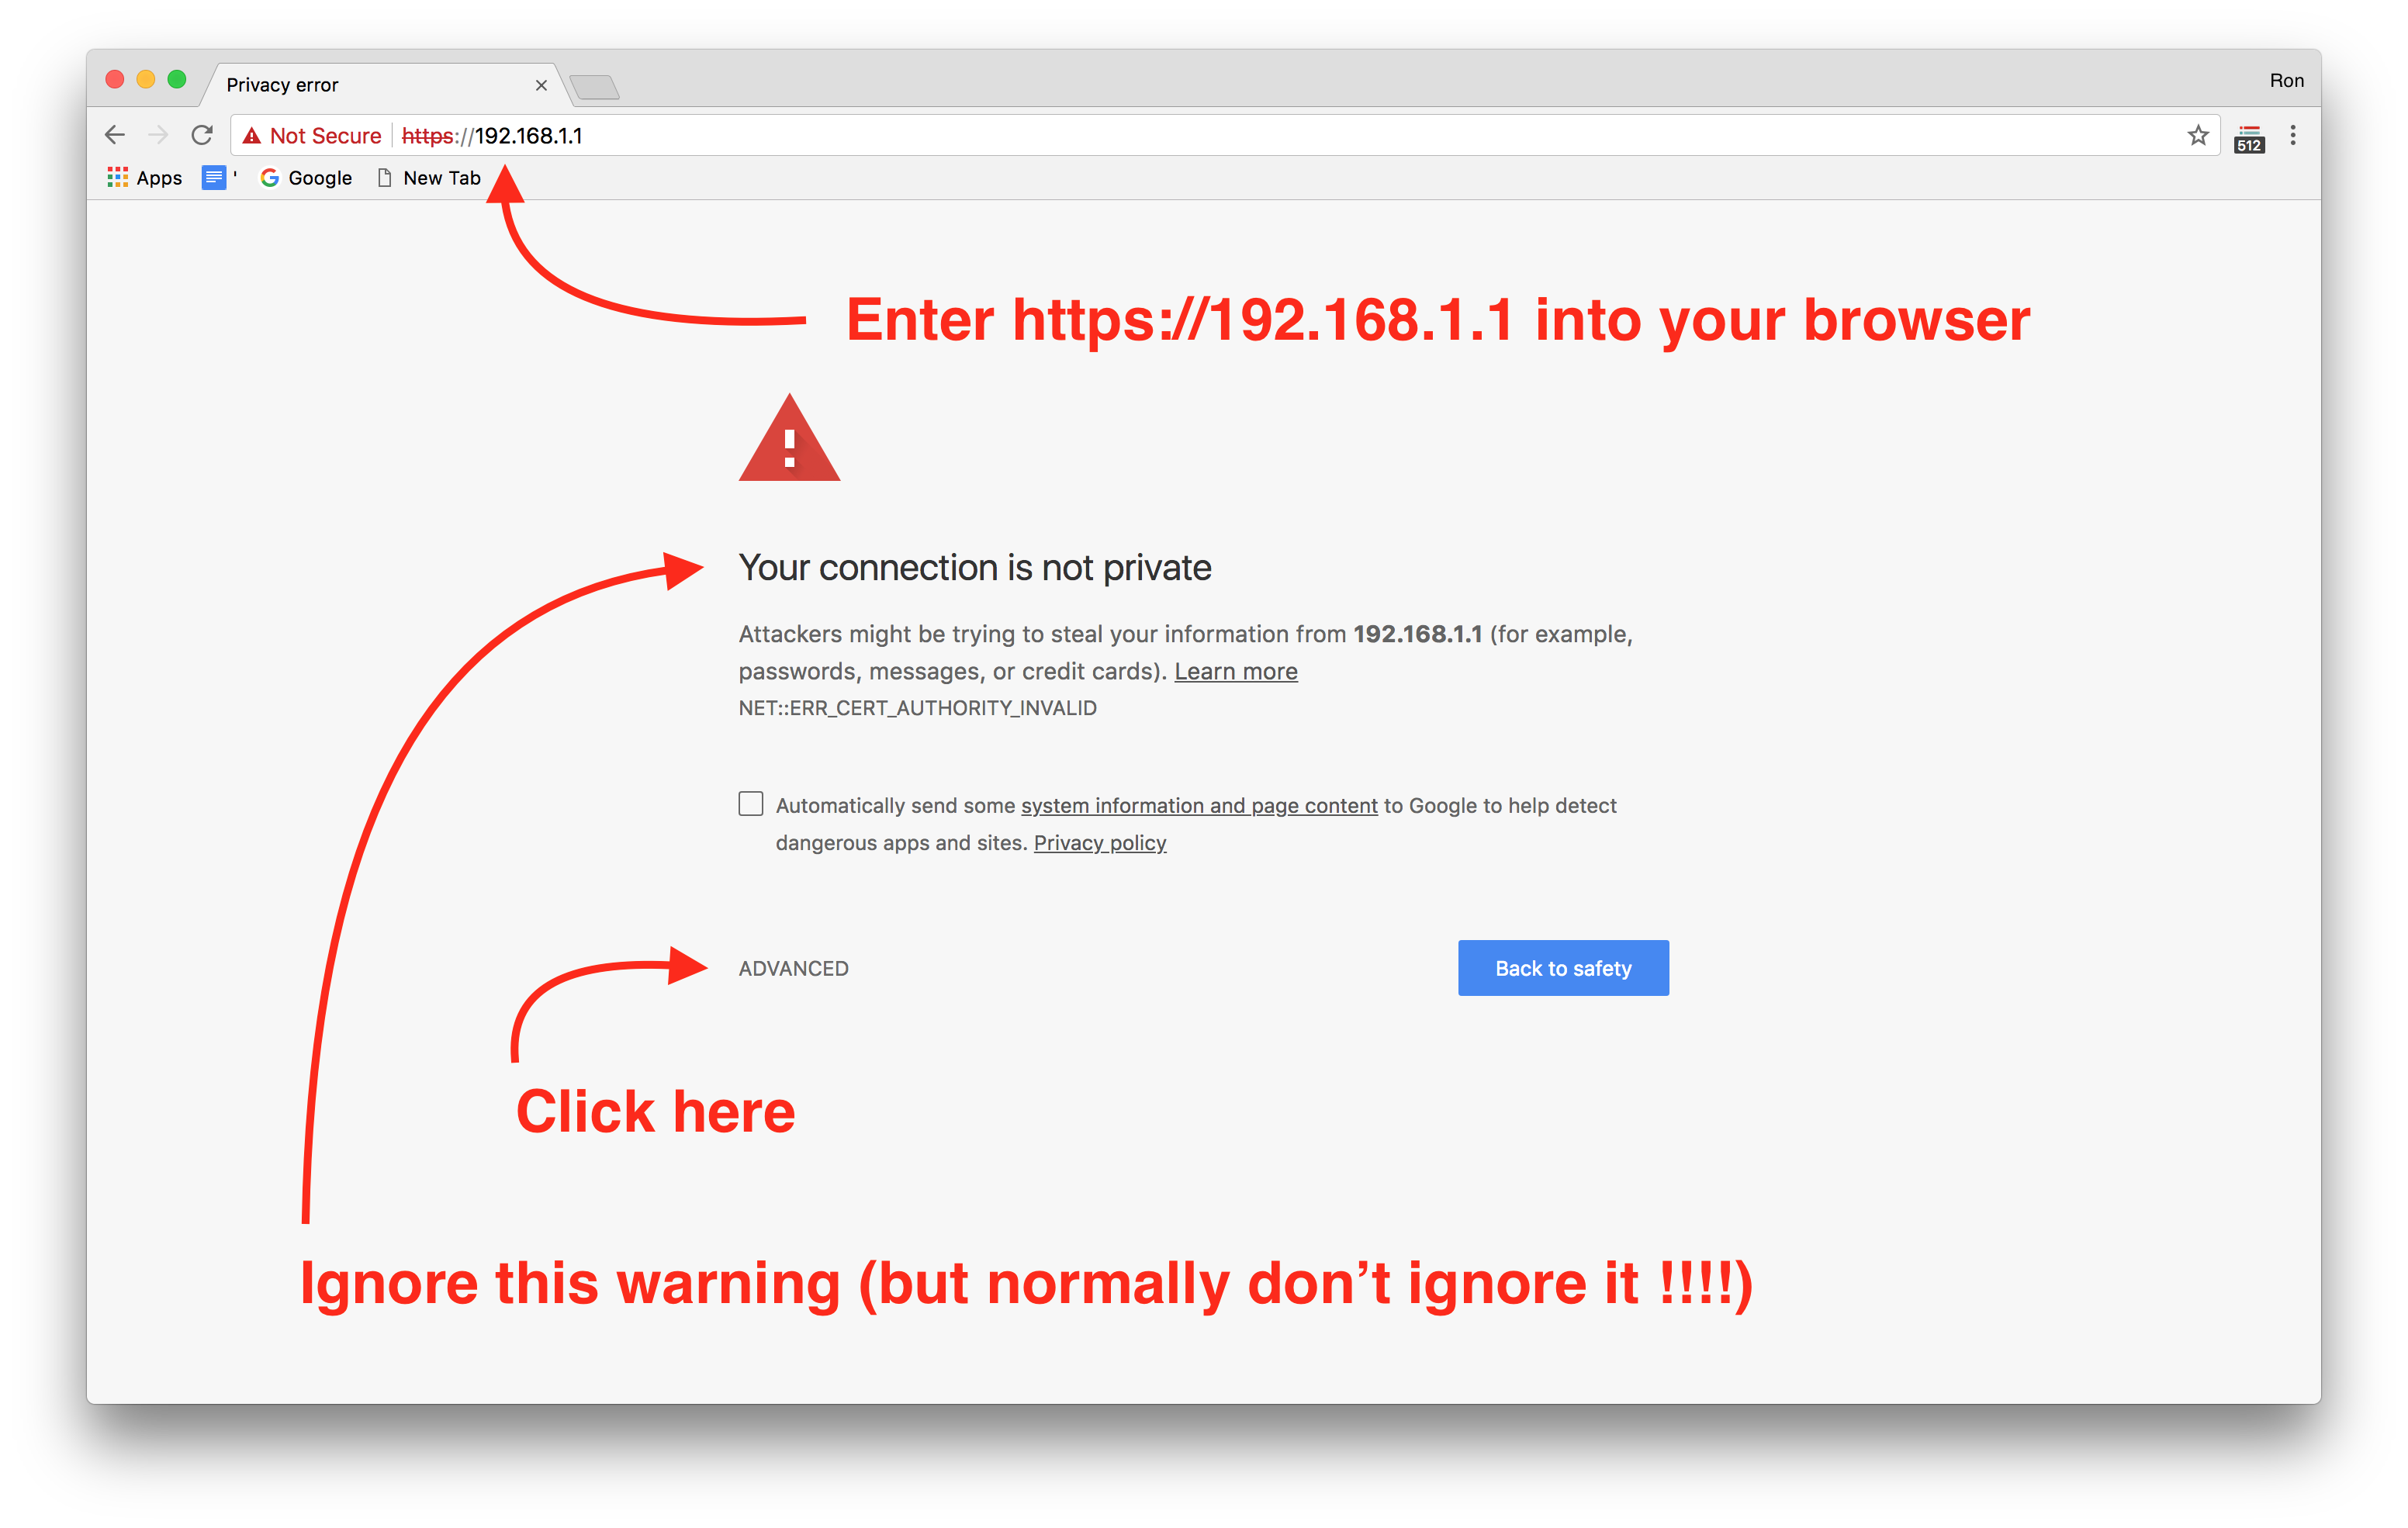
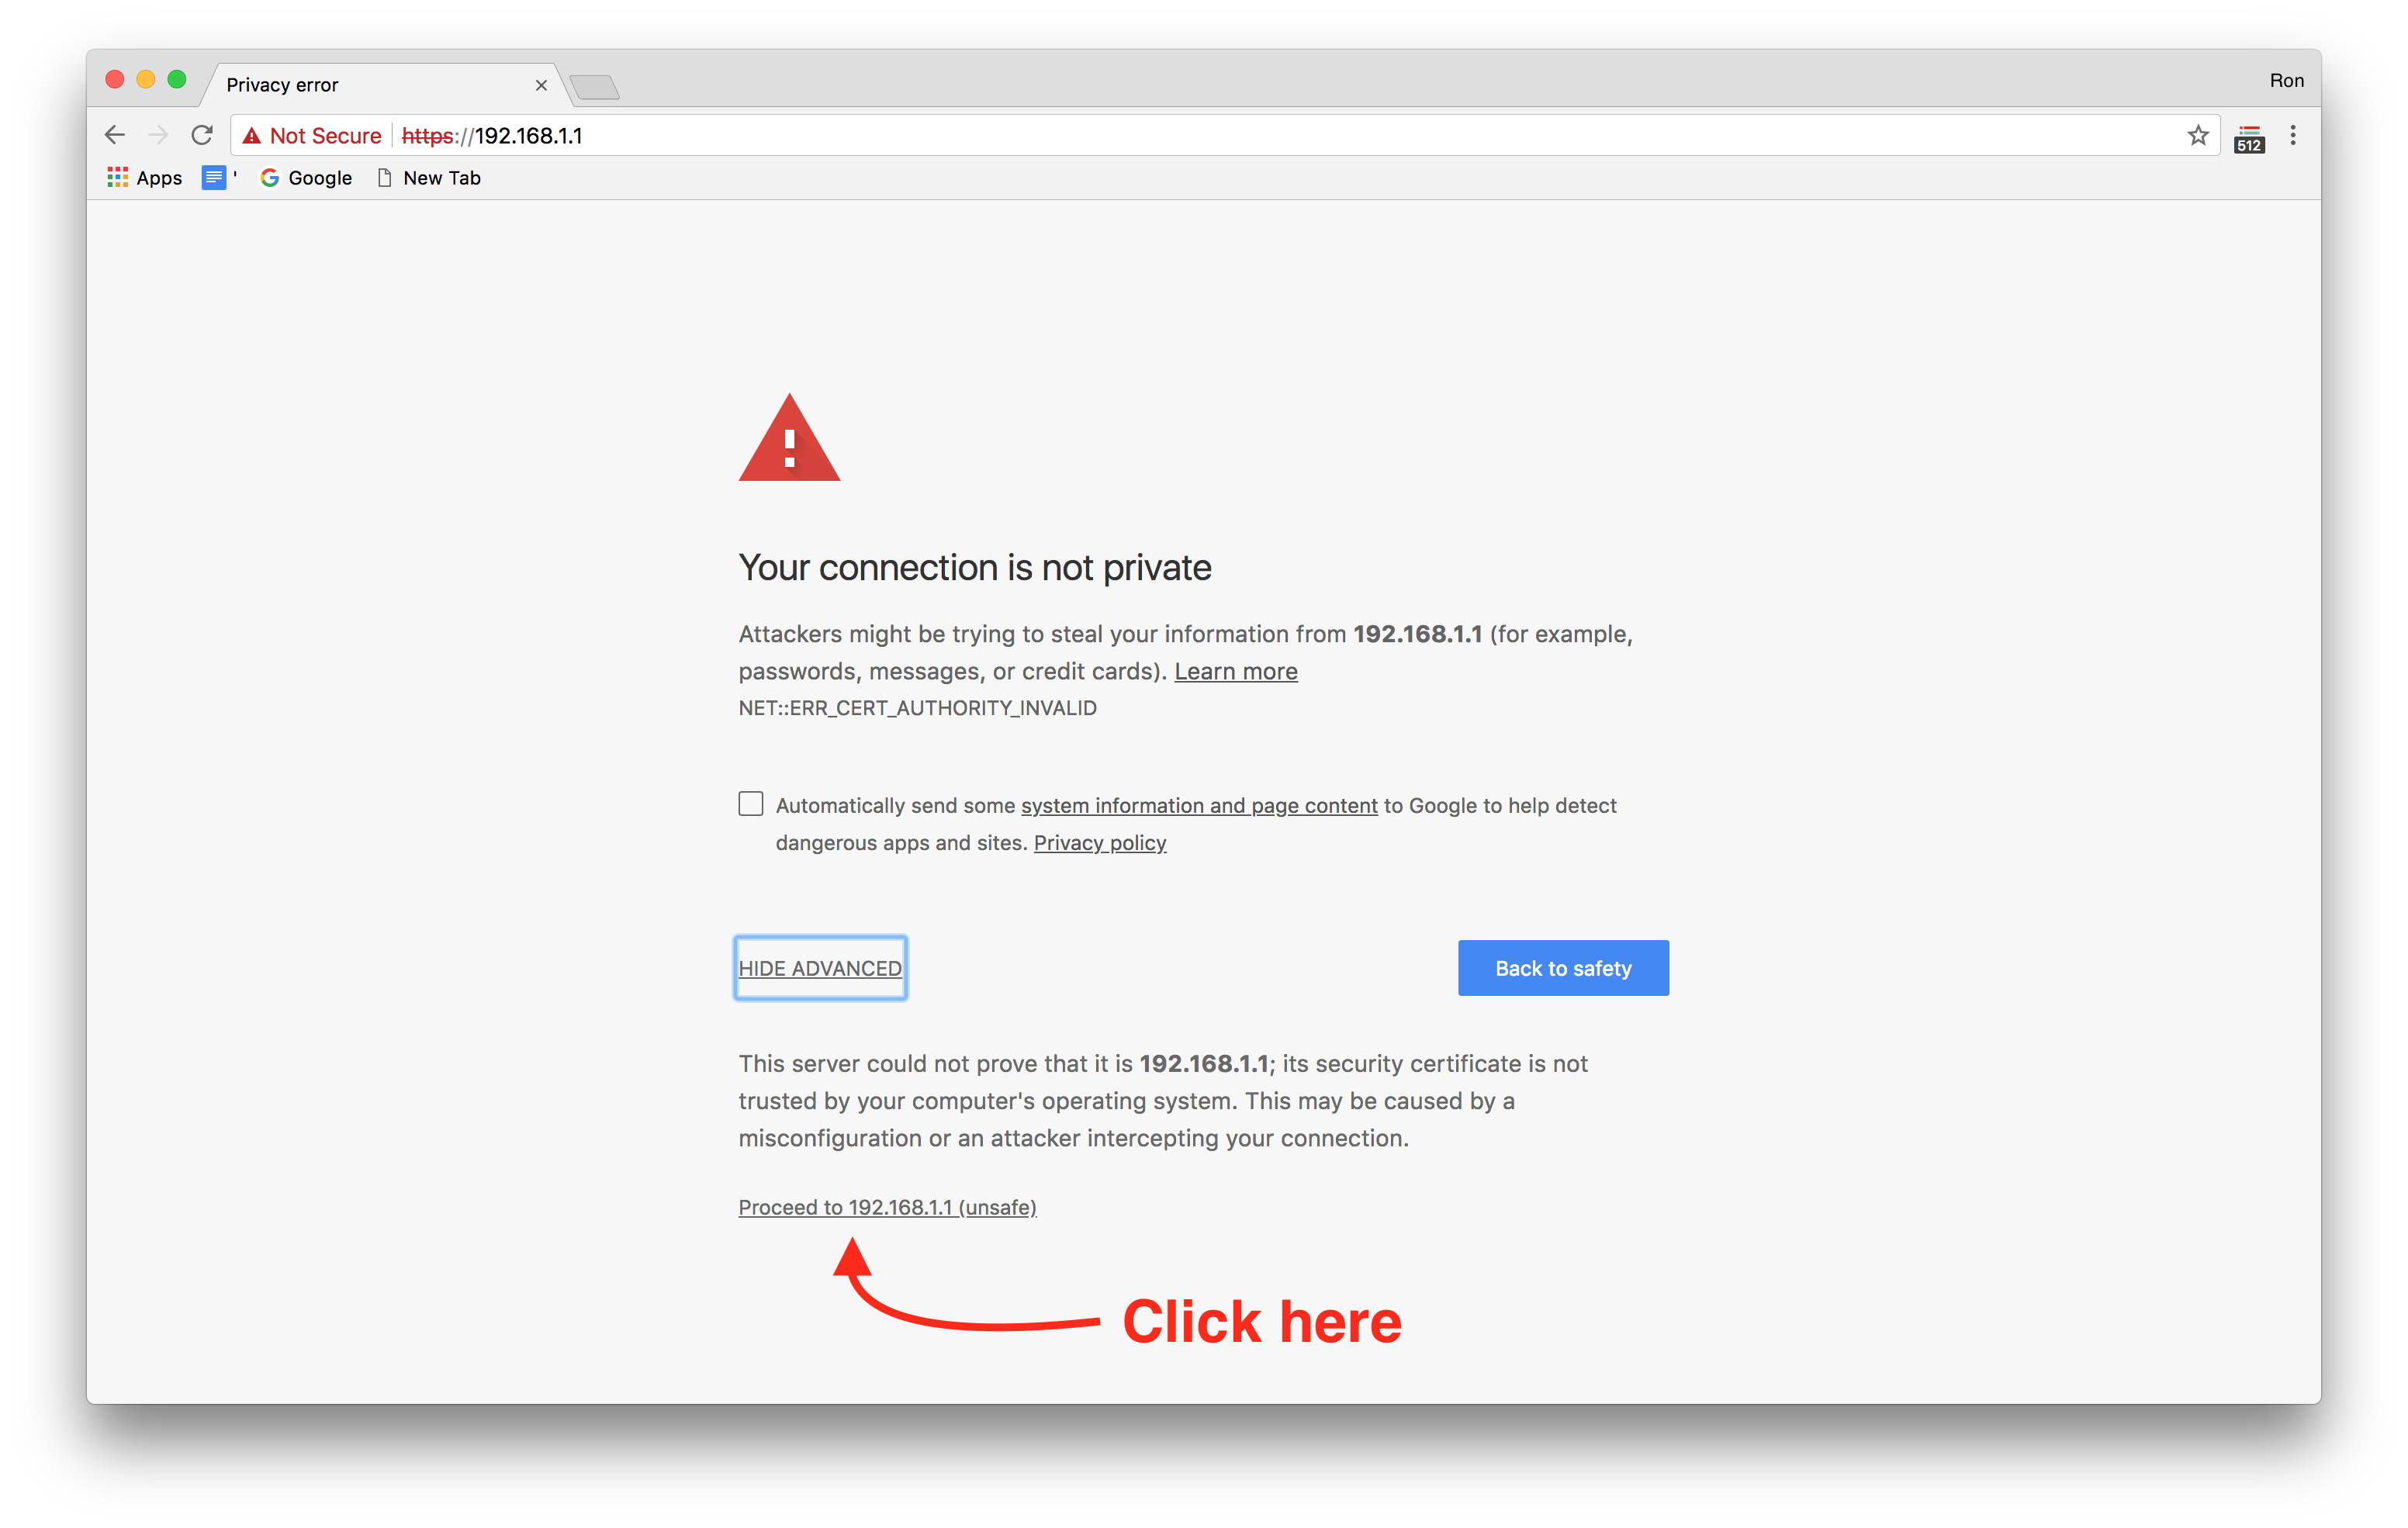
Now turn off the wifi and navigate in a browser to https://192.168.1.1. You may have some issues with this connection is not secure, ignore them and proceed to the website (see below for an example on chrome):
Once you have correctly navigated to the website, you should see a login page like the following:

Enter the login credentials as follows:
Username: ubnt
Password: ubnt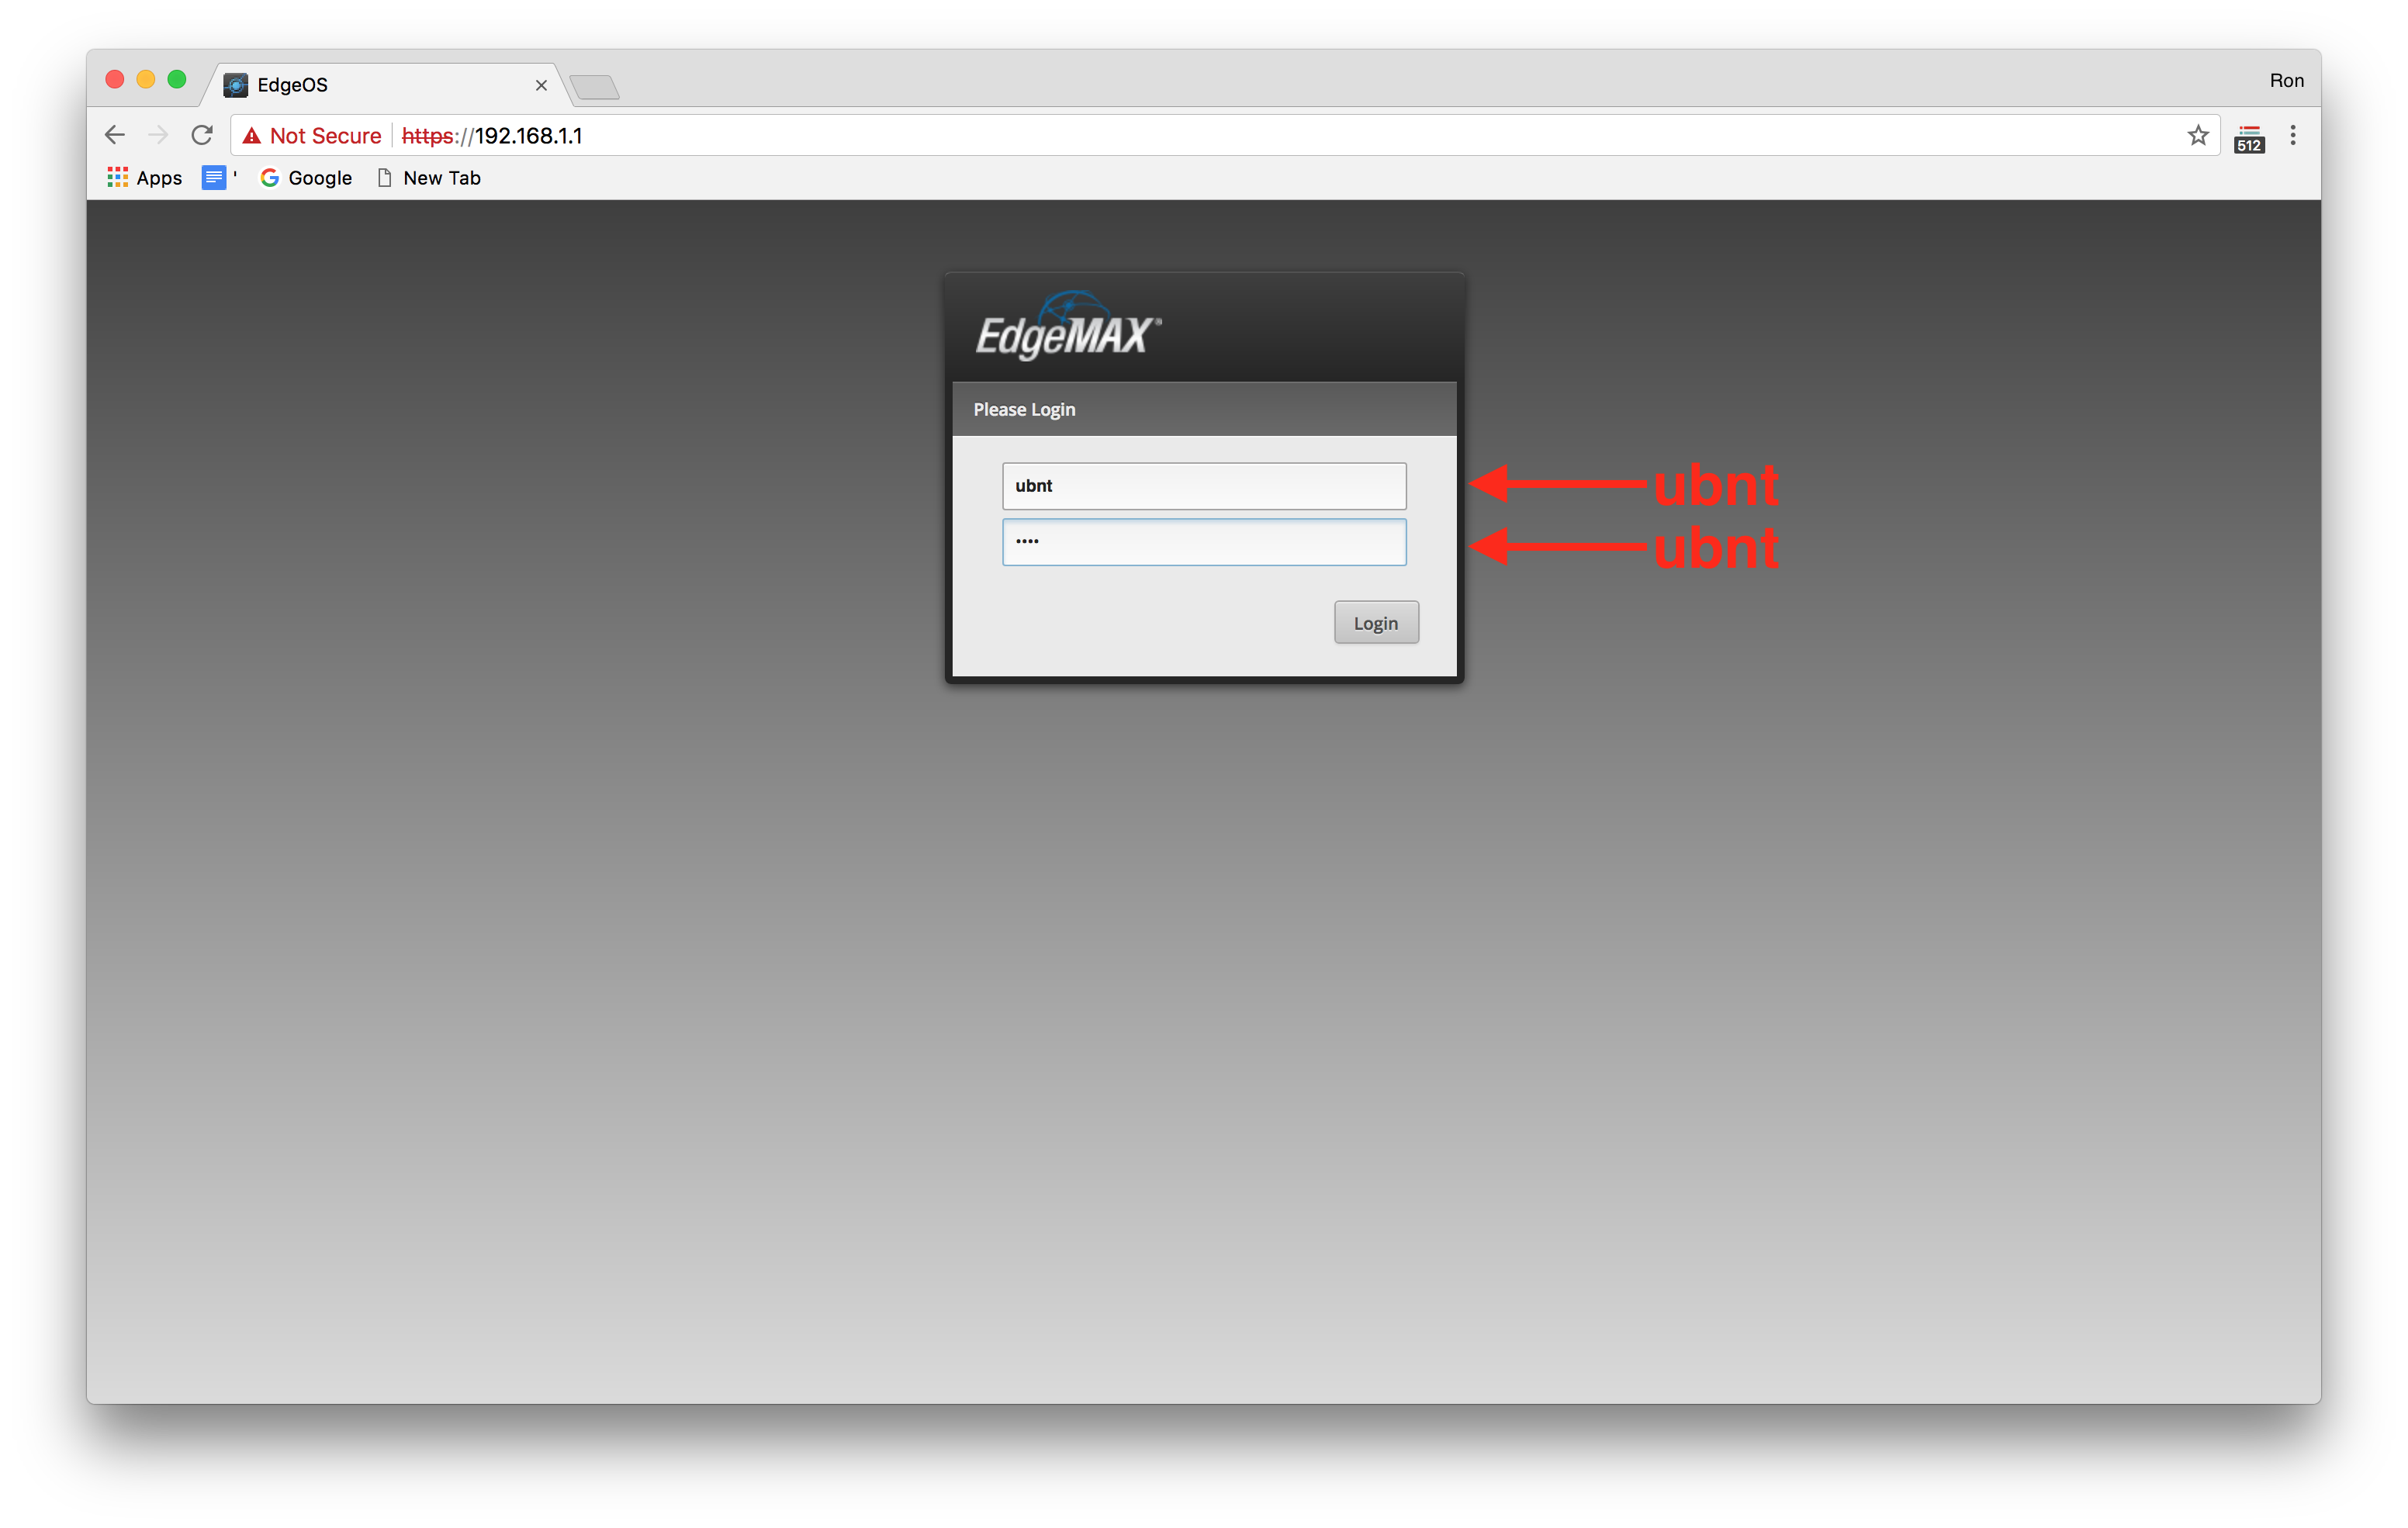
These are the default credentials and you will want to change them (this will be covered later). If successful, you should see a dashboard for the EdgeOS:
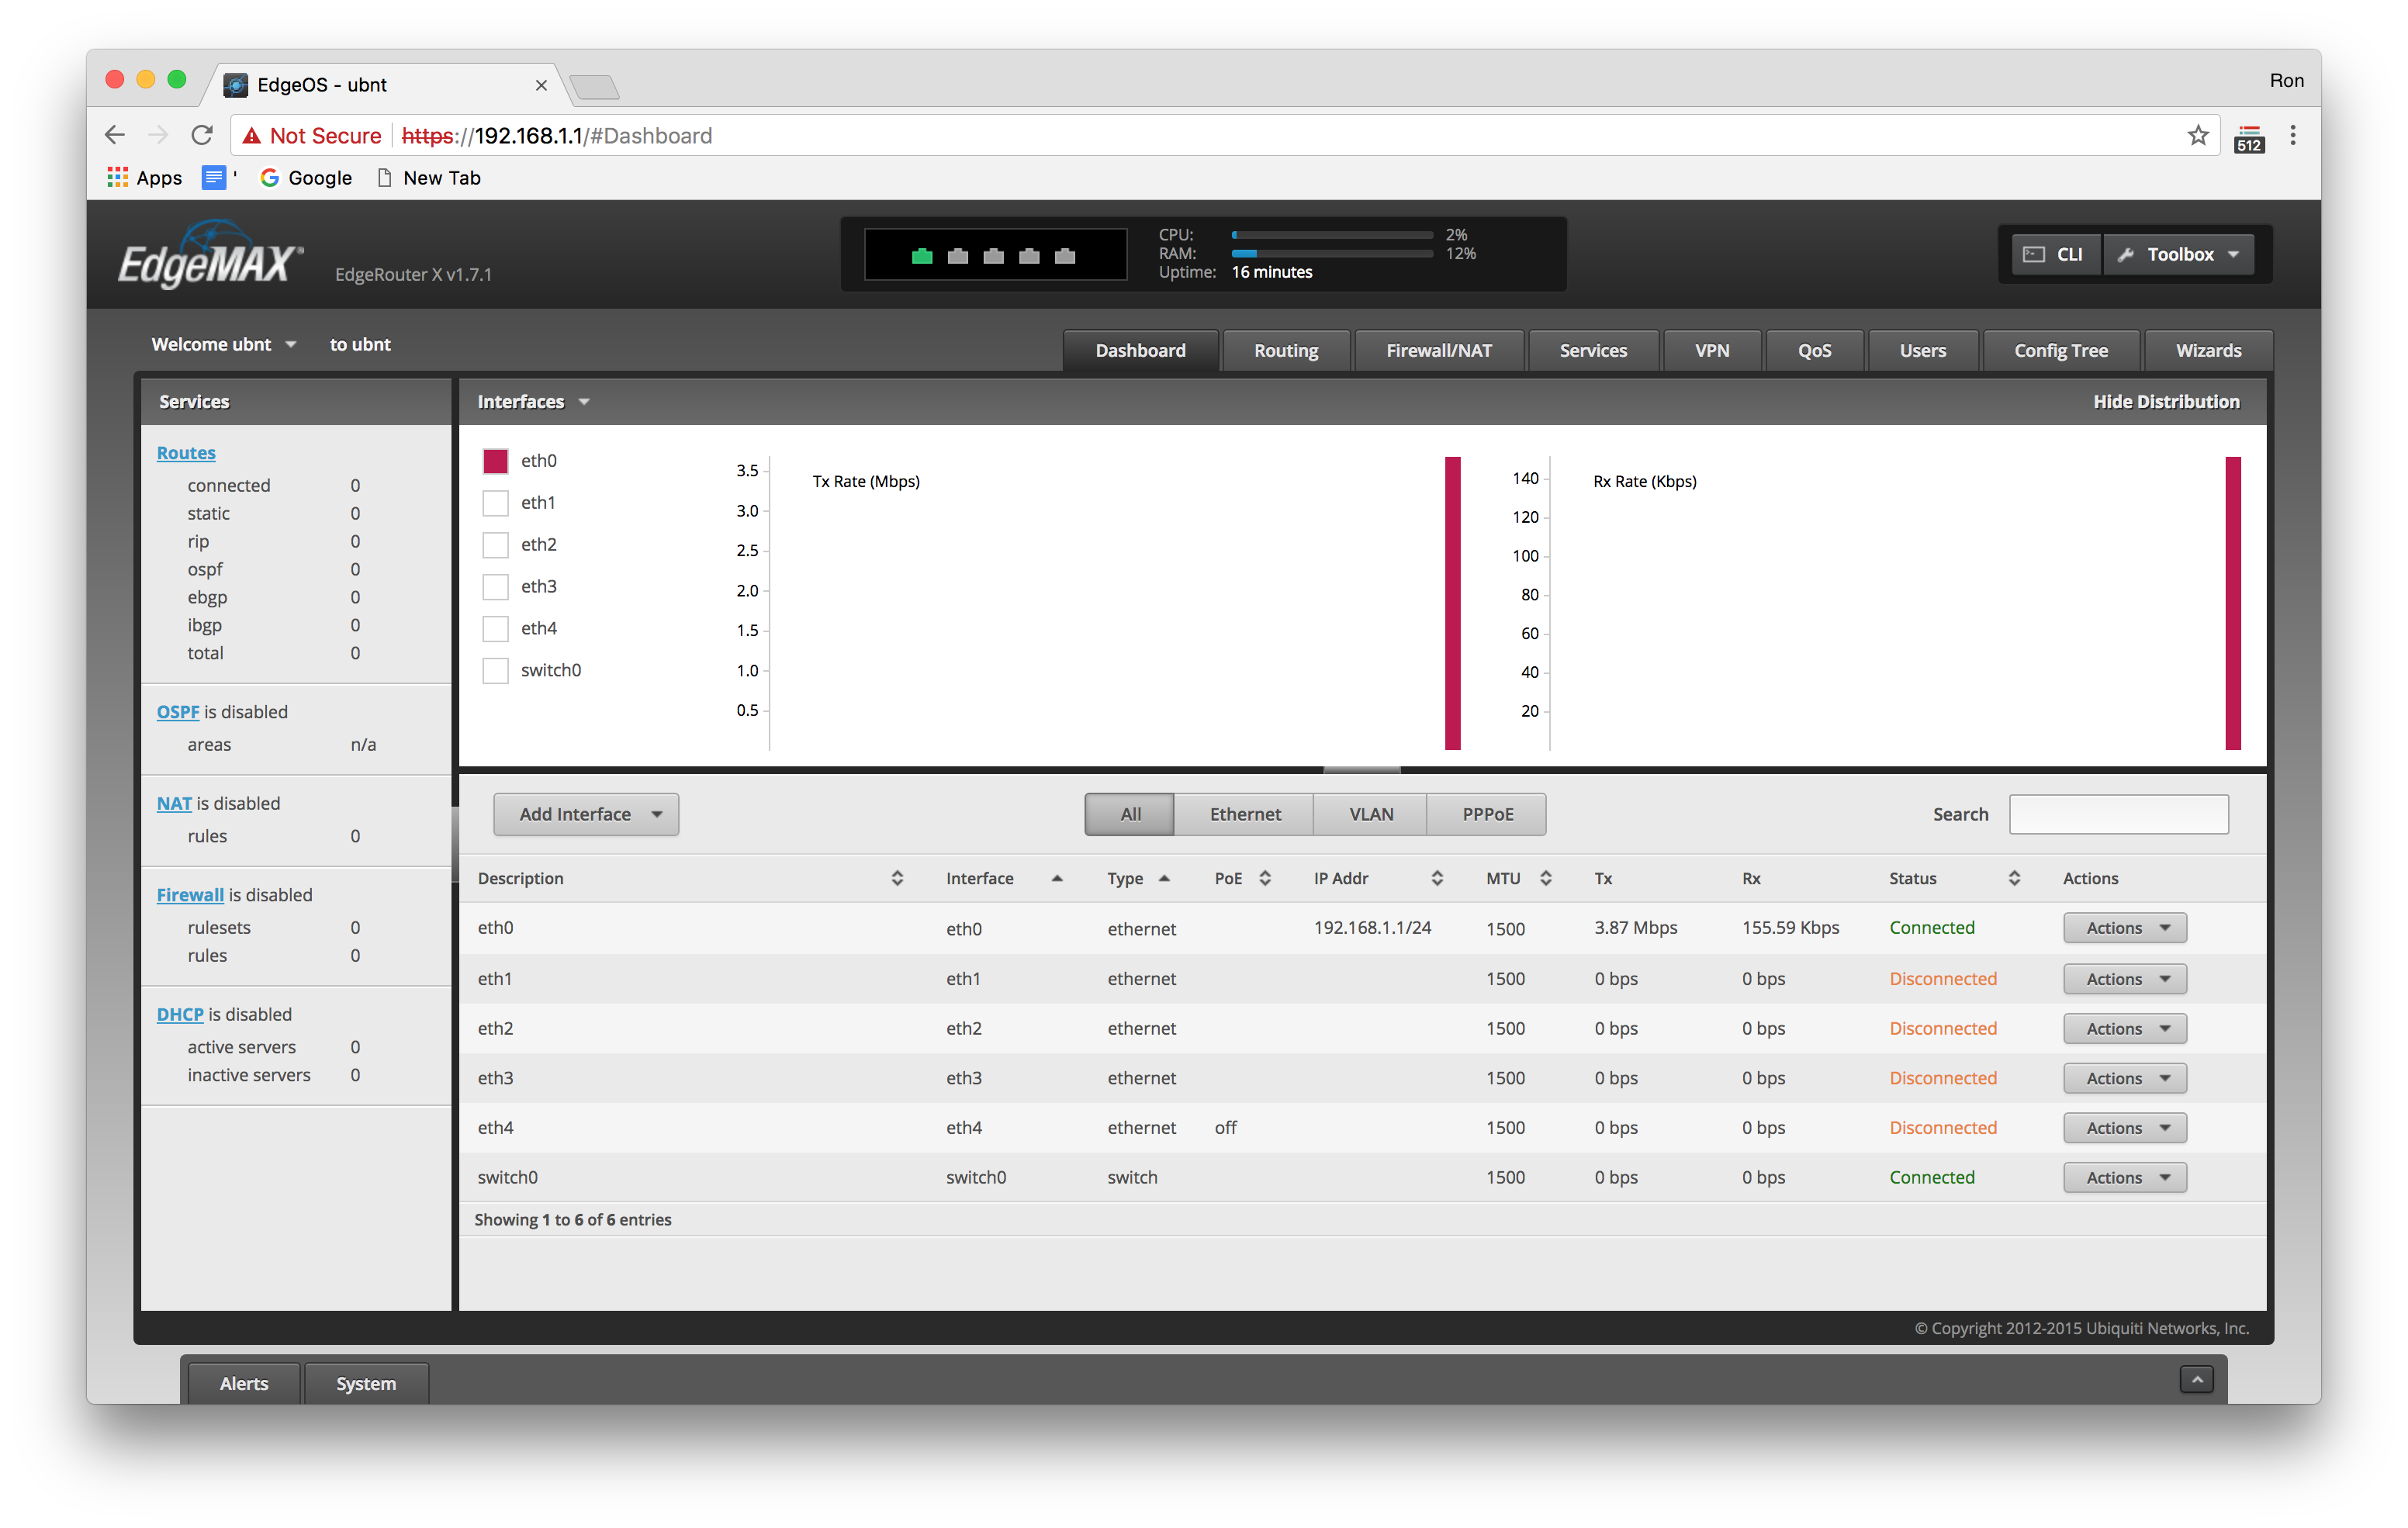
You have completed the initial login to the router! Now in the next section we will look at how to update the firmware.
Update Firmware
Before we move any further, it would be wise to take this oppurtunity to update the firmware. At the time of writing, my EdgeRouter X shipped with the default firmware version v1.7.1. After updating to the most recent version (at the time of writing v1.10.1), many more features became available (e.g. hardware offloading).
To get started, navigate to the Ubiquiti Edge Router firmware page and download version v1.10.1 for model no: ER-X to your local machine (we will upload from your main laptop/desktop computer to the Edge Router). This is assuming that you are downloading the firmware v1.10.1 for the Edge Router X (model no: ER-X). If not, then look for the firmware for your specific model.
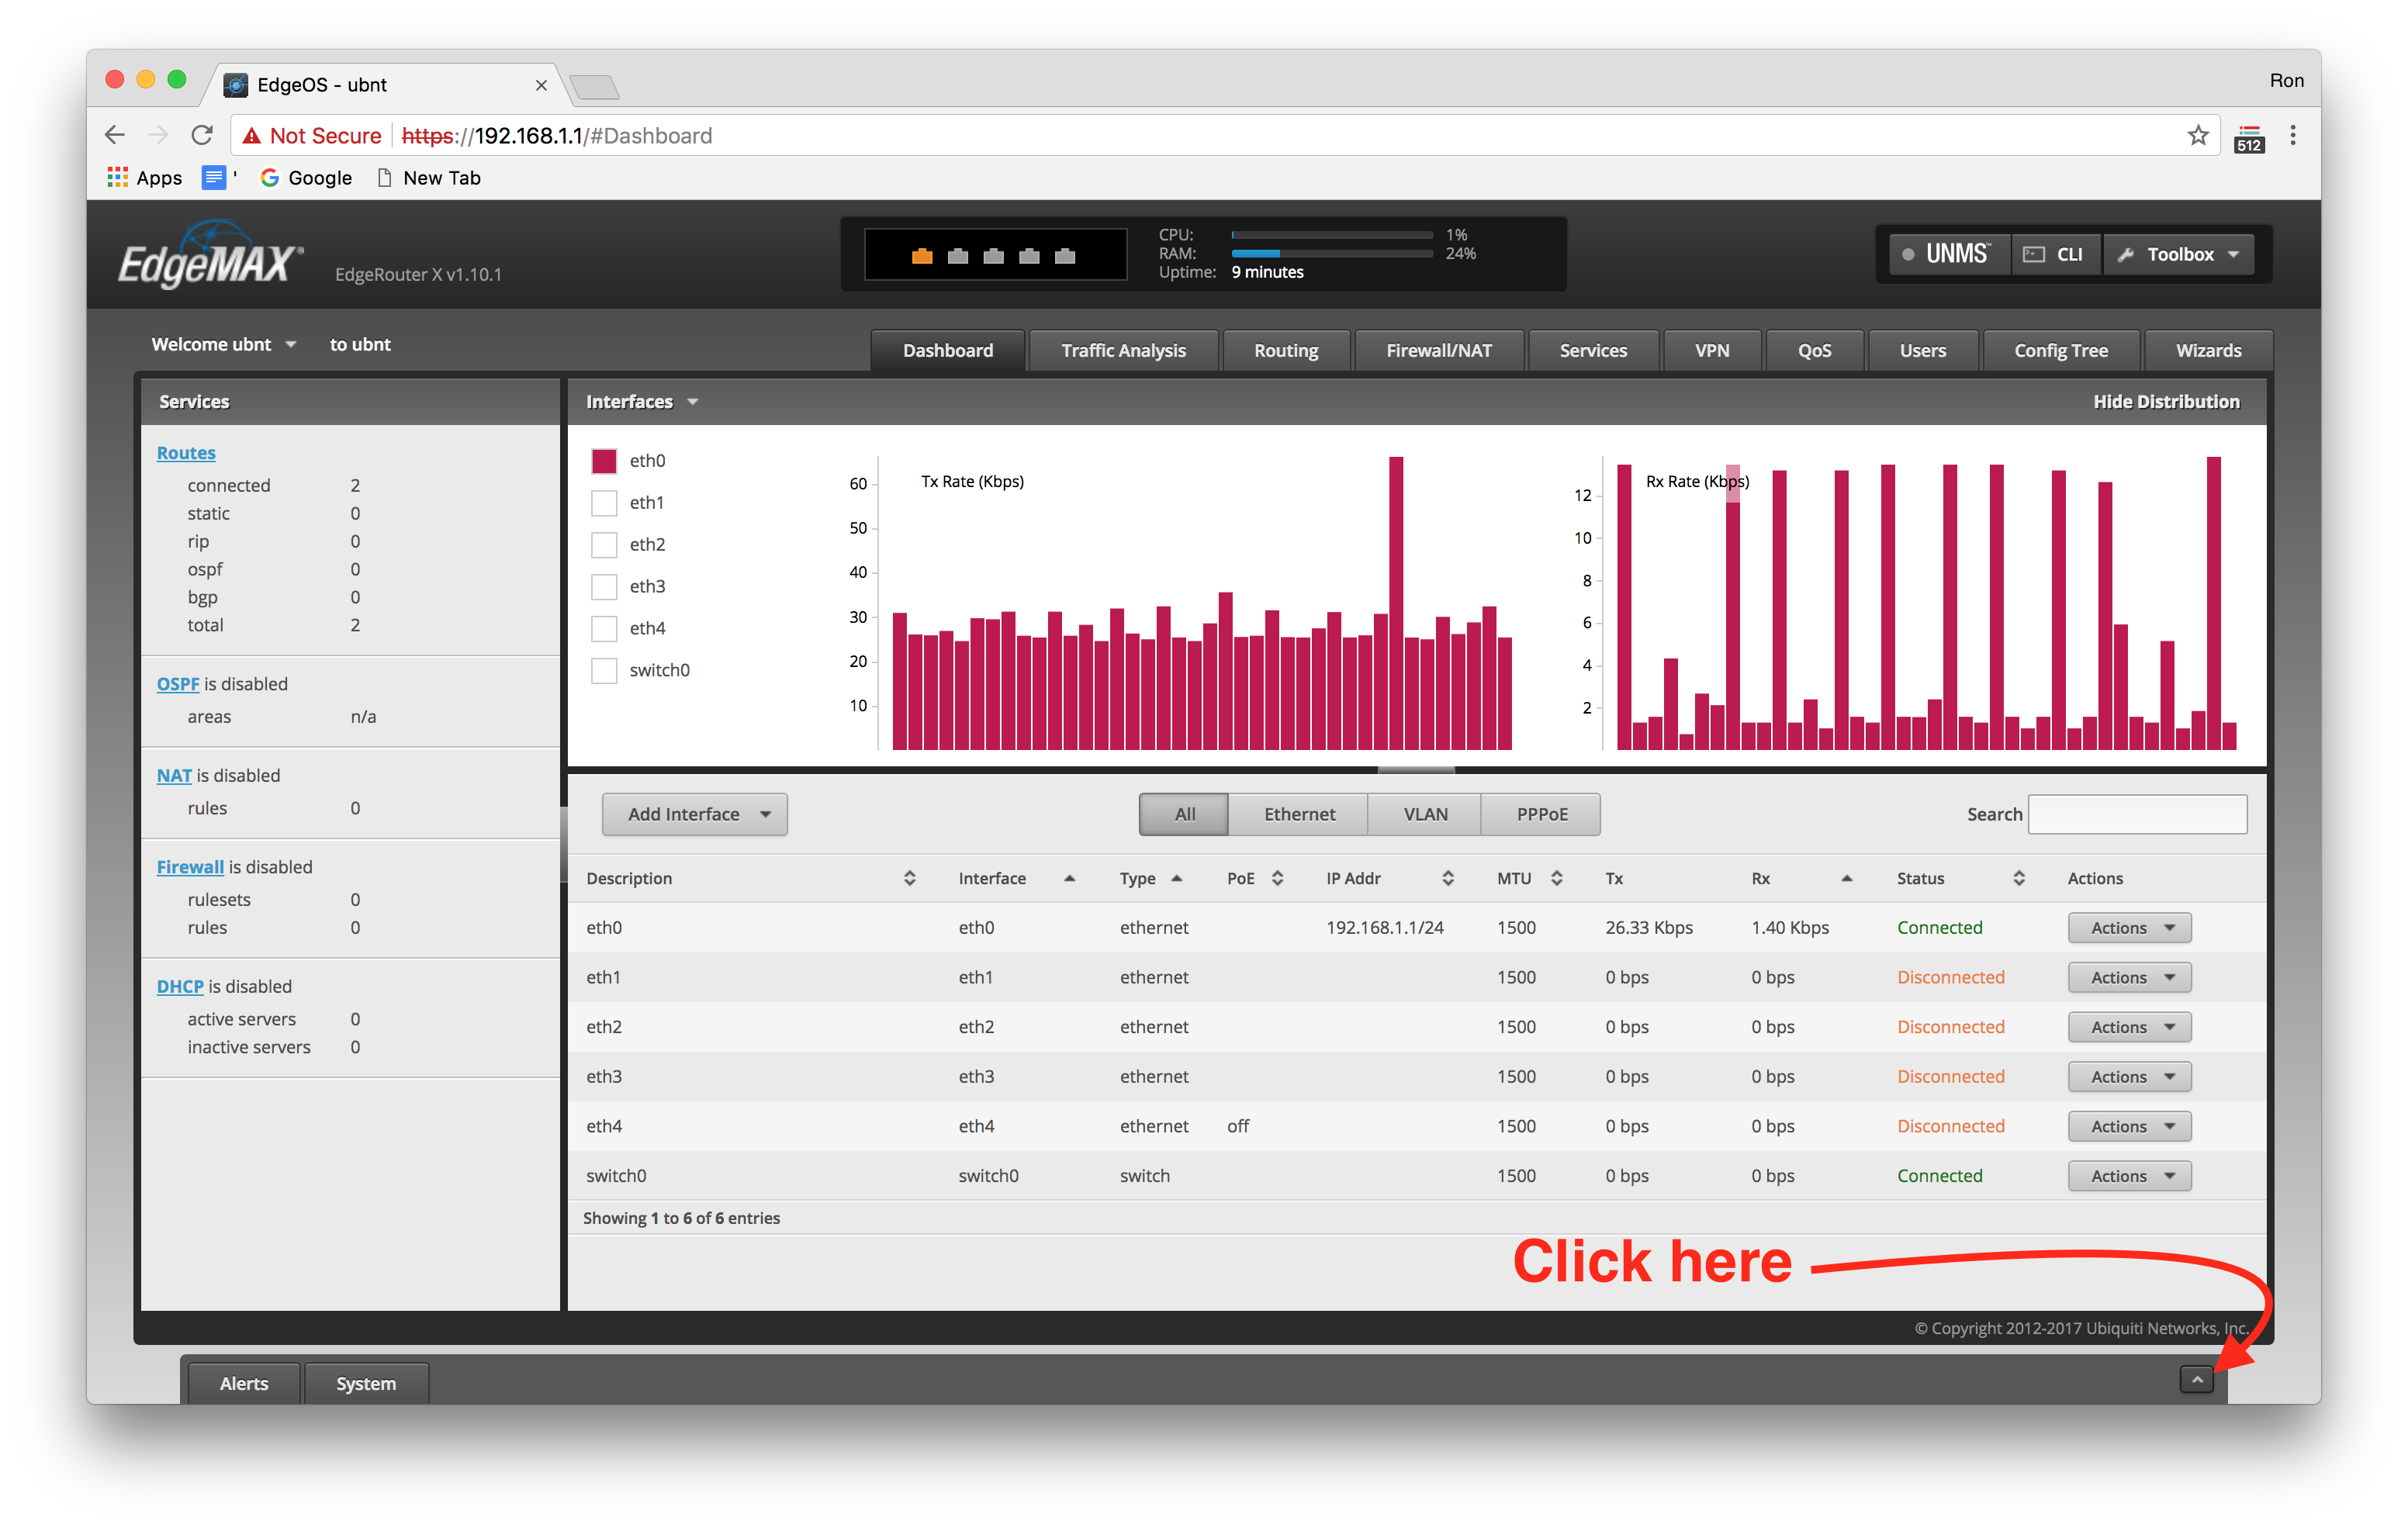
Once the file is downloaded, open a browser to 192.168.1.1 and login to your Edge Router with the default username/password ubnt/ubnt. Once logged in, click on the alert/system tab on the bottom right hand corner as follows:
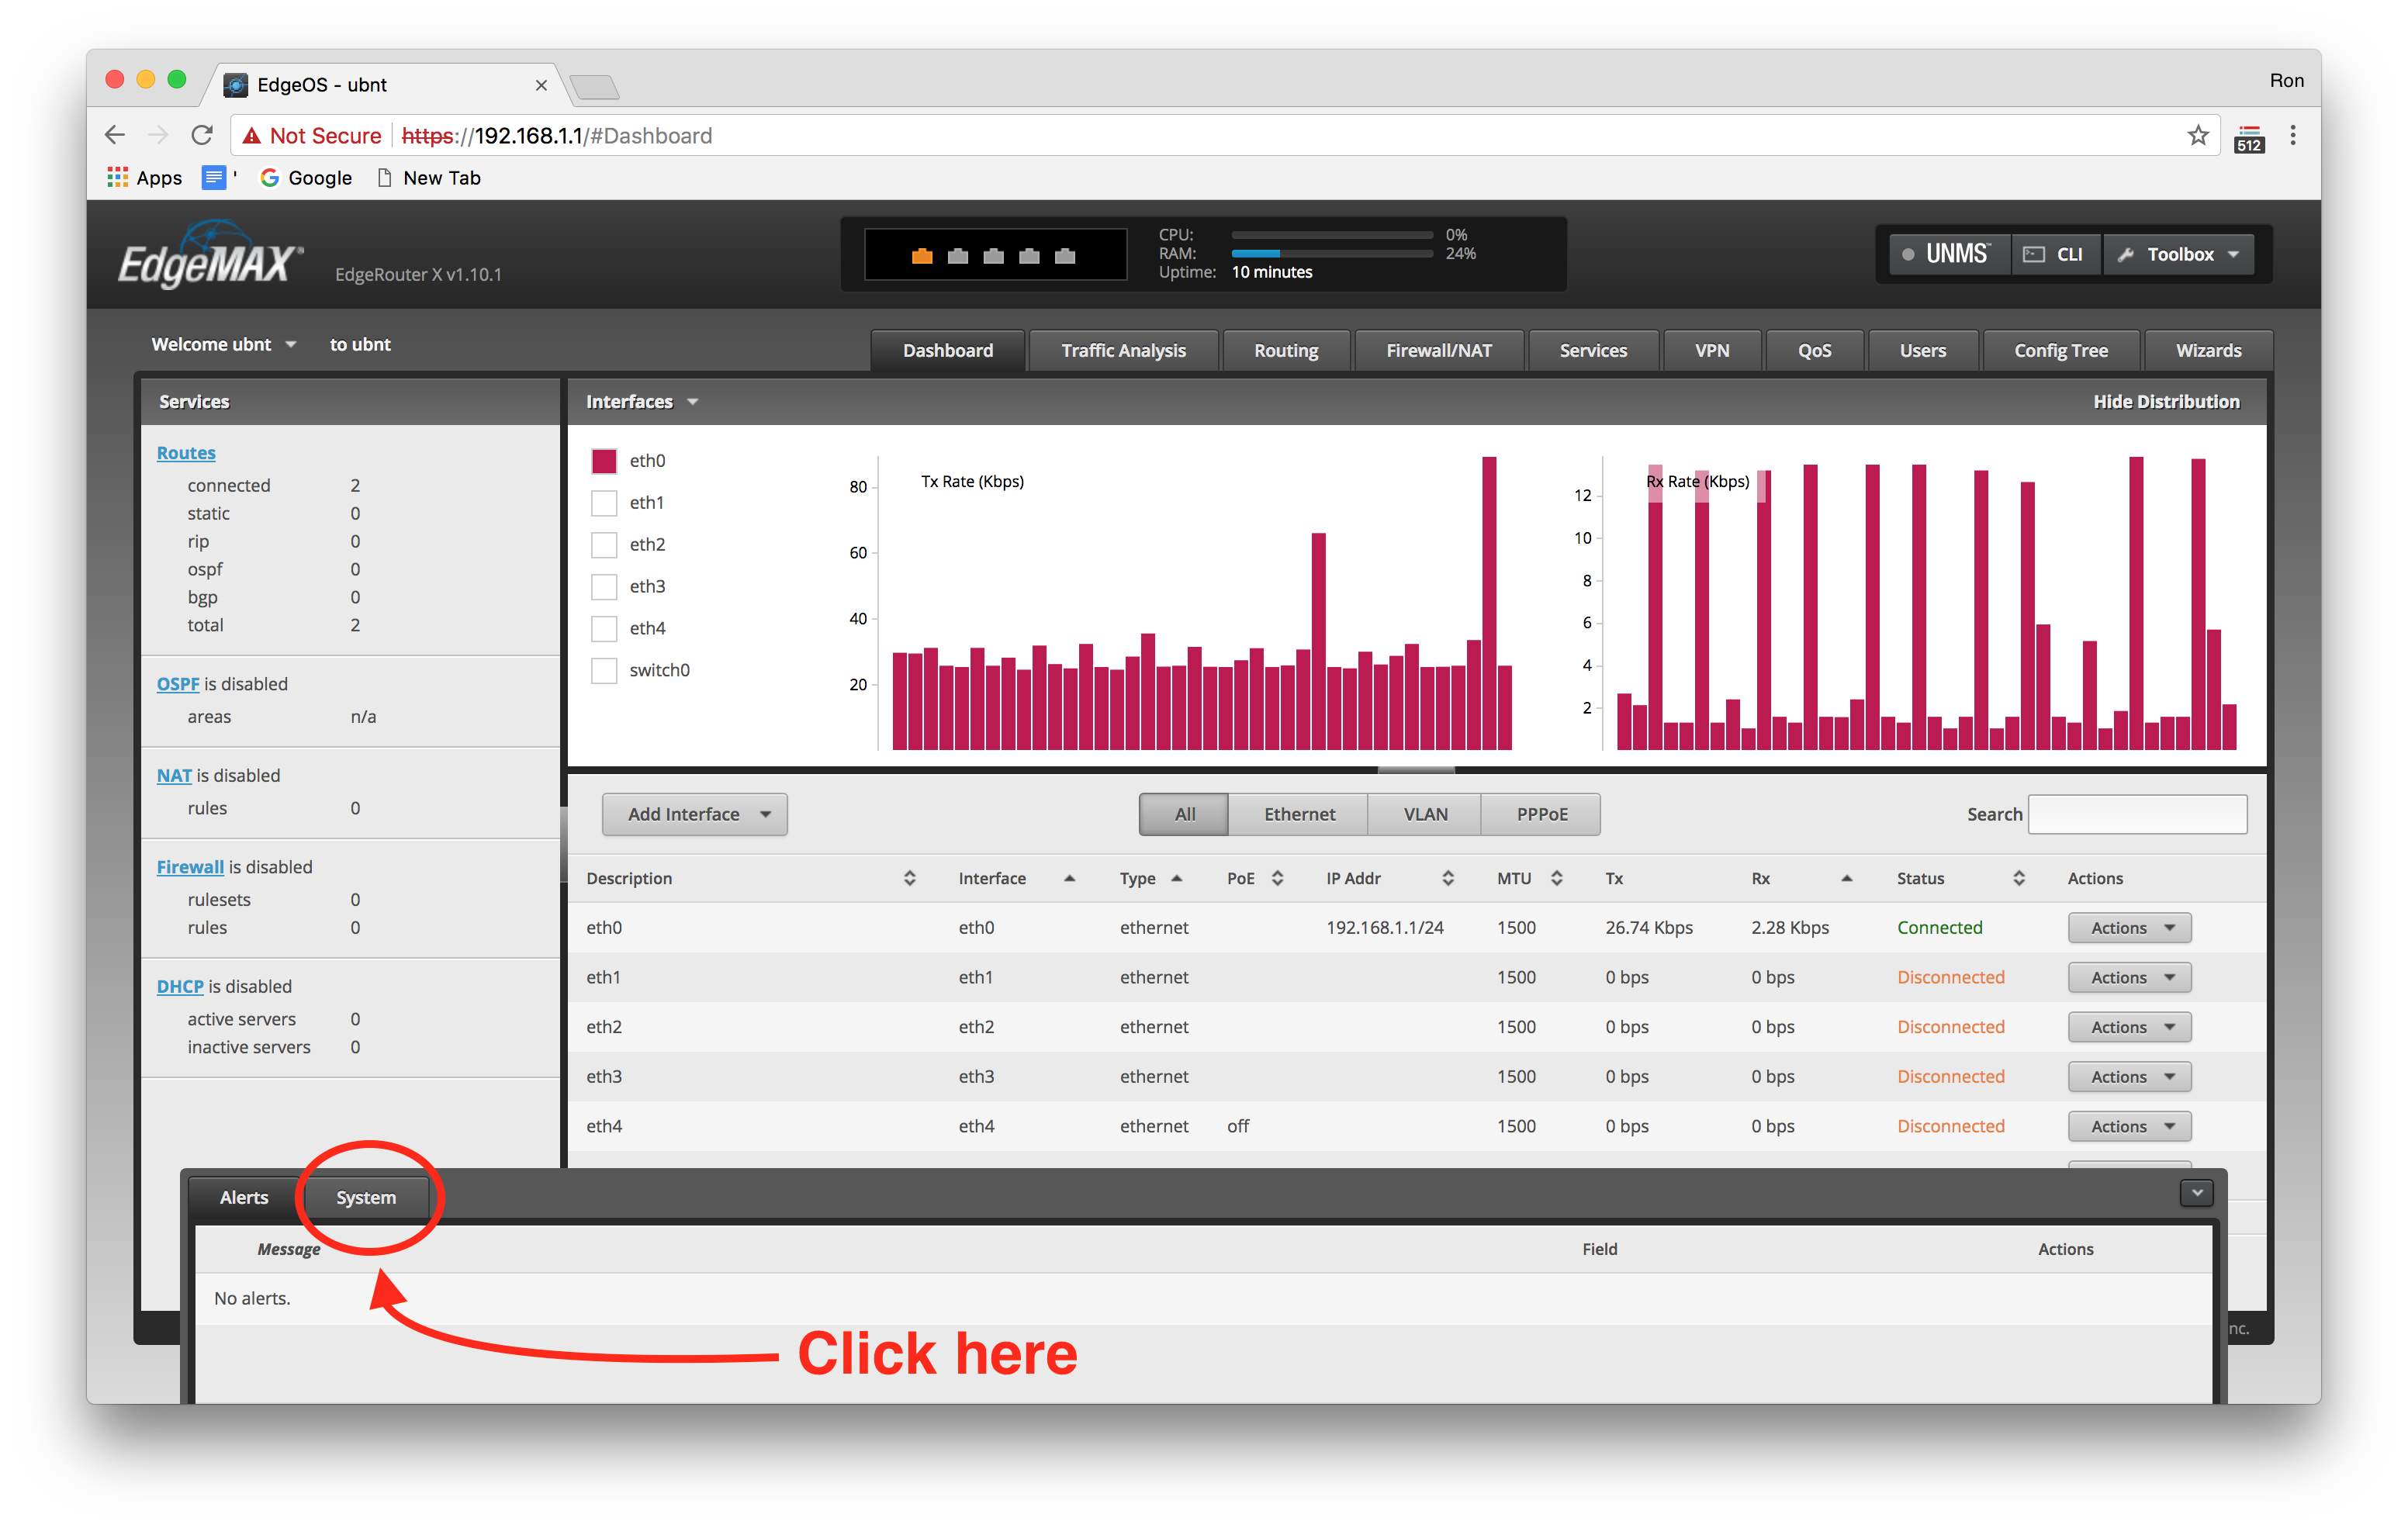
Next click on the system tab next to the alert tab as follows:
Finally, scroll down to the bottom of the page that opens, and click upload a file:
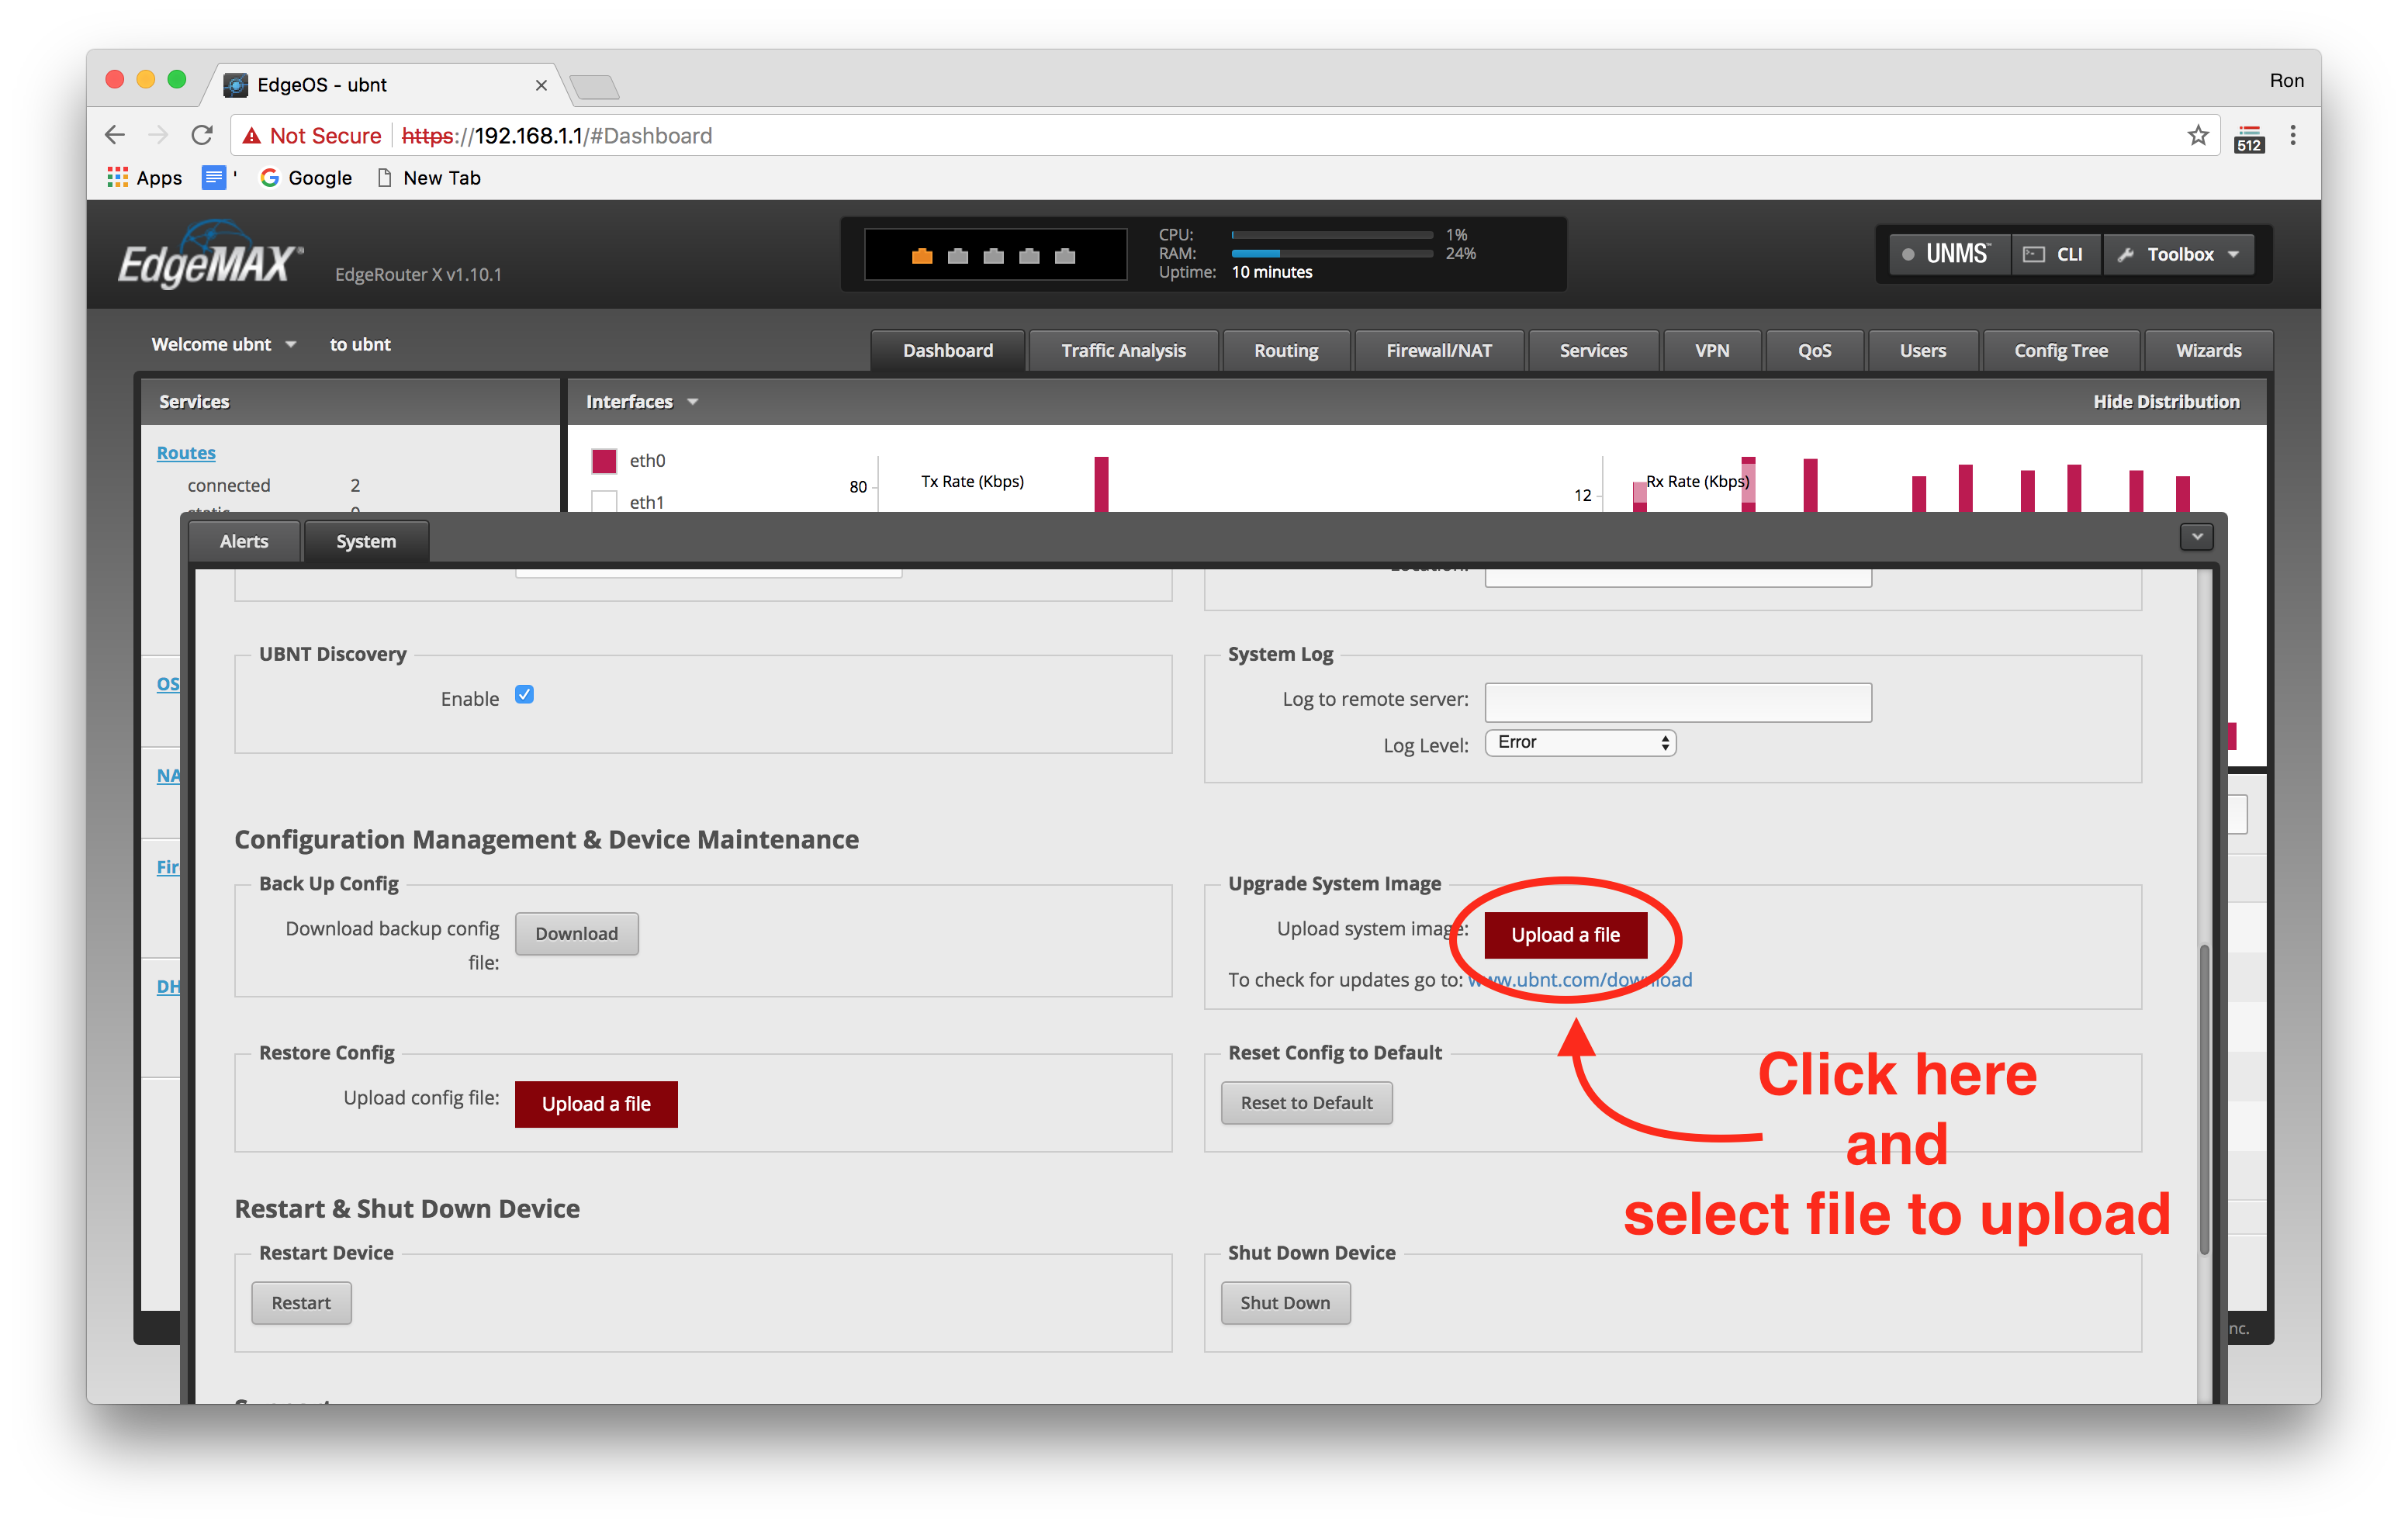
This will start off the updating process, and the router will then install, and restart. Once it reboots, you will be able to continue with configuring the router.
Router Configuration
The following section will cover how to complete the setup and configuration of your router. It is highly recommended to use the pre-made config file.
Upload Pre-made Configuration File (optional)
While you are more than welcome to skip this section and follow the “basic configuration” that is outlined in the next section, it is highly recommended you complete your setup by uploading this pre-made configuration file.
“Why should I … “ you may ask, and here is why:
- Because all the performance configurations have been turned on
- Because all the security issues have been secured
- Because it’s really easy.
That should have convinced you (if you’re not a masochist). To get started go ahead and click the config file download link below:
A word of caution before continuing: This config file was created on an Edge Router ER-X model with firmware version v1.10. Please make sure you have followed the steps in the last section to upgrade the firmware before proceeding further.
Now that you have the file downloaded, and you are sure you have updated the firmware to version v1.10, you simply need to transfer the file you just downloaded to your local machine to the router using a command call
scp(short for secure copy).7 It should look something like this:$ scp path/to/your/download/config.boot.zerocool ubnt@192.168.1.1:/configIf like me you are using an Apple computer, then the file will be in your downloads folder and you can write the path as follows:
$ scp ~/Downloads/config.boot.zerocool ubnt@192.168.1.1:/configWhere
~is shorthand for/Users/your_username/which is your home directory.Now the new config file will be in the
/configdirectory on the router. We just need to login to the router,cd /configto the config directory, make a back up of the current config file, and then rename our new file as the old config file. Sound easy? It is don’t worry. First let’s login:$ ssh ubnt@192.168.1.1 Welcome to EdgeOS By logging in, accessing, or using the Ubiquiti product, you acknowledge that you have read and understood the Ubiquiti License Agreement (available in the Web UI at, by default, http://192.168.1.1) and agree to be bound by its terms. ubnt@192.168.1.1's password:Again, for the password just type
ubntand you’re good to goubnt@192.168.1.1's password: ubnt Linux ubnt 3.10.107-UBNT #1 SMP Mon Mar 5 18:53:35 UTC 2018 mips Welcome to EdgeOS ubnt@ubnt:~$ cd /config ubnt@ubnt:/config$The above command simply got us logged in with the password, followed by a change of directory (i.e.
cd) to the/configdirectory. Now let’s finish by backing up the originalconfig.bootfile, and renaming theconfig.boot.zerocoolfile:ubnt@ubnt:/config$ mv config.boot config.boot.original ubnt@ubnt:/config$ mv config.boot.zerocool config.bootNow everything is in place and we simply need to reboot the system (using the
shutdowncommand):ubnt@ubnt:/config$ sudo shutdown -r 1 Broadcast message from ubnt@ubnt (pts/0) (Tue Jun 12 17:26:30 2018): The system is going DOWN for reboot in 1 minute!After 1 minute you will be logged out and the router will begin to reboot.
During this one minute, proceed to the Configuration Complete section, and follow the instructions about configuring the DHCP on your network settings. Once you have read that section you may want to return here and test your login to the router using the new username and password:
$ ssh zerocool@192.168.1.1
Welcome to EdgeOS

By logging in, accessing, or using the Ubiquiti product, you
acknowledge that you have read and understood the Ubiquiti
License Agreement (available in the Web UI at, by default,
http://192.168.1.1) and agree to be bound by its terms.

zerocool@192.168.1.1's password: hack the planet
Linux erx001 3.10.107-UBNT #1 SMP Mon Mar 5 18:53:35 UTC 2018 mips
Welcome to EdgeOS
Last login: Tue Jun 12 17:17:40 2018 from 192.168.1.42
zerocool@erx001:~$
If everything was successful (you used the new username
zerocoolwith passwordhack the planet) you should see the above login screen. Notice the user iszerocooland the hostname iserx001. While this is more secure than the default username/password that comes with the router, you may still want to change this to an even more obscure username/password. Please refer to the Advanced Configurations: Adding/Removing Users to find out how to add/remove users to the router login system.Finally your router is now configured and ready to be connected to the internet. You can proceed to the Internet Access section and complete the setup
Basic Configuration Wizard
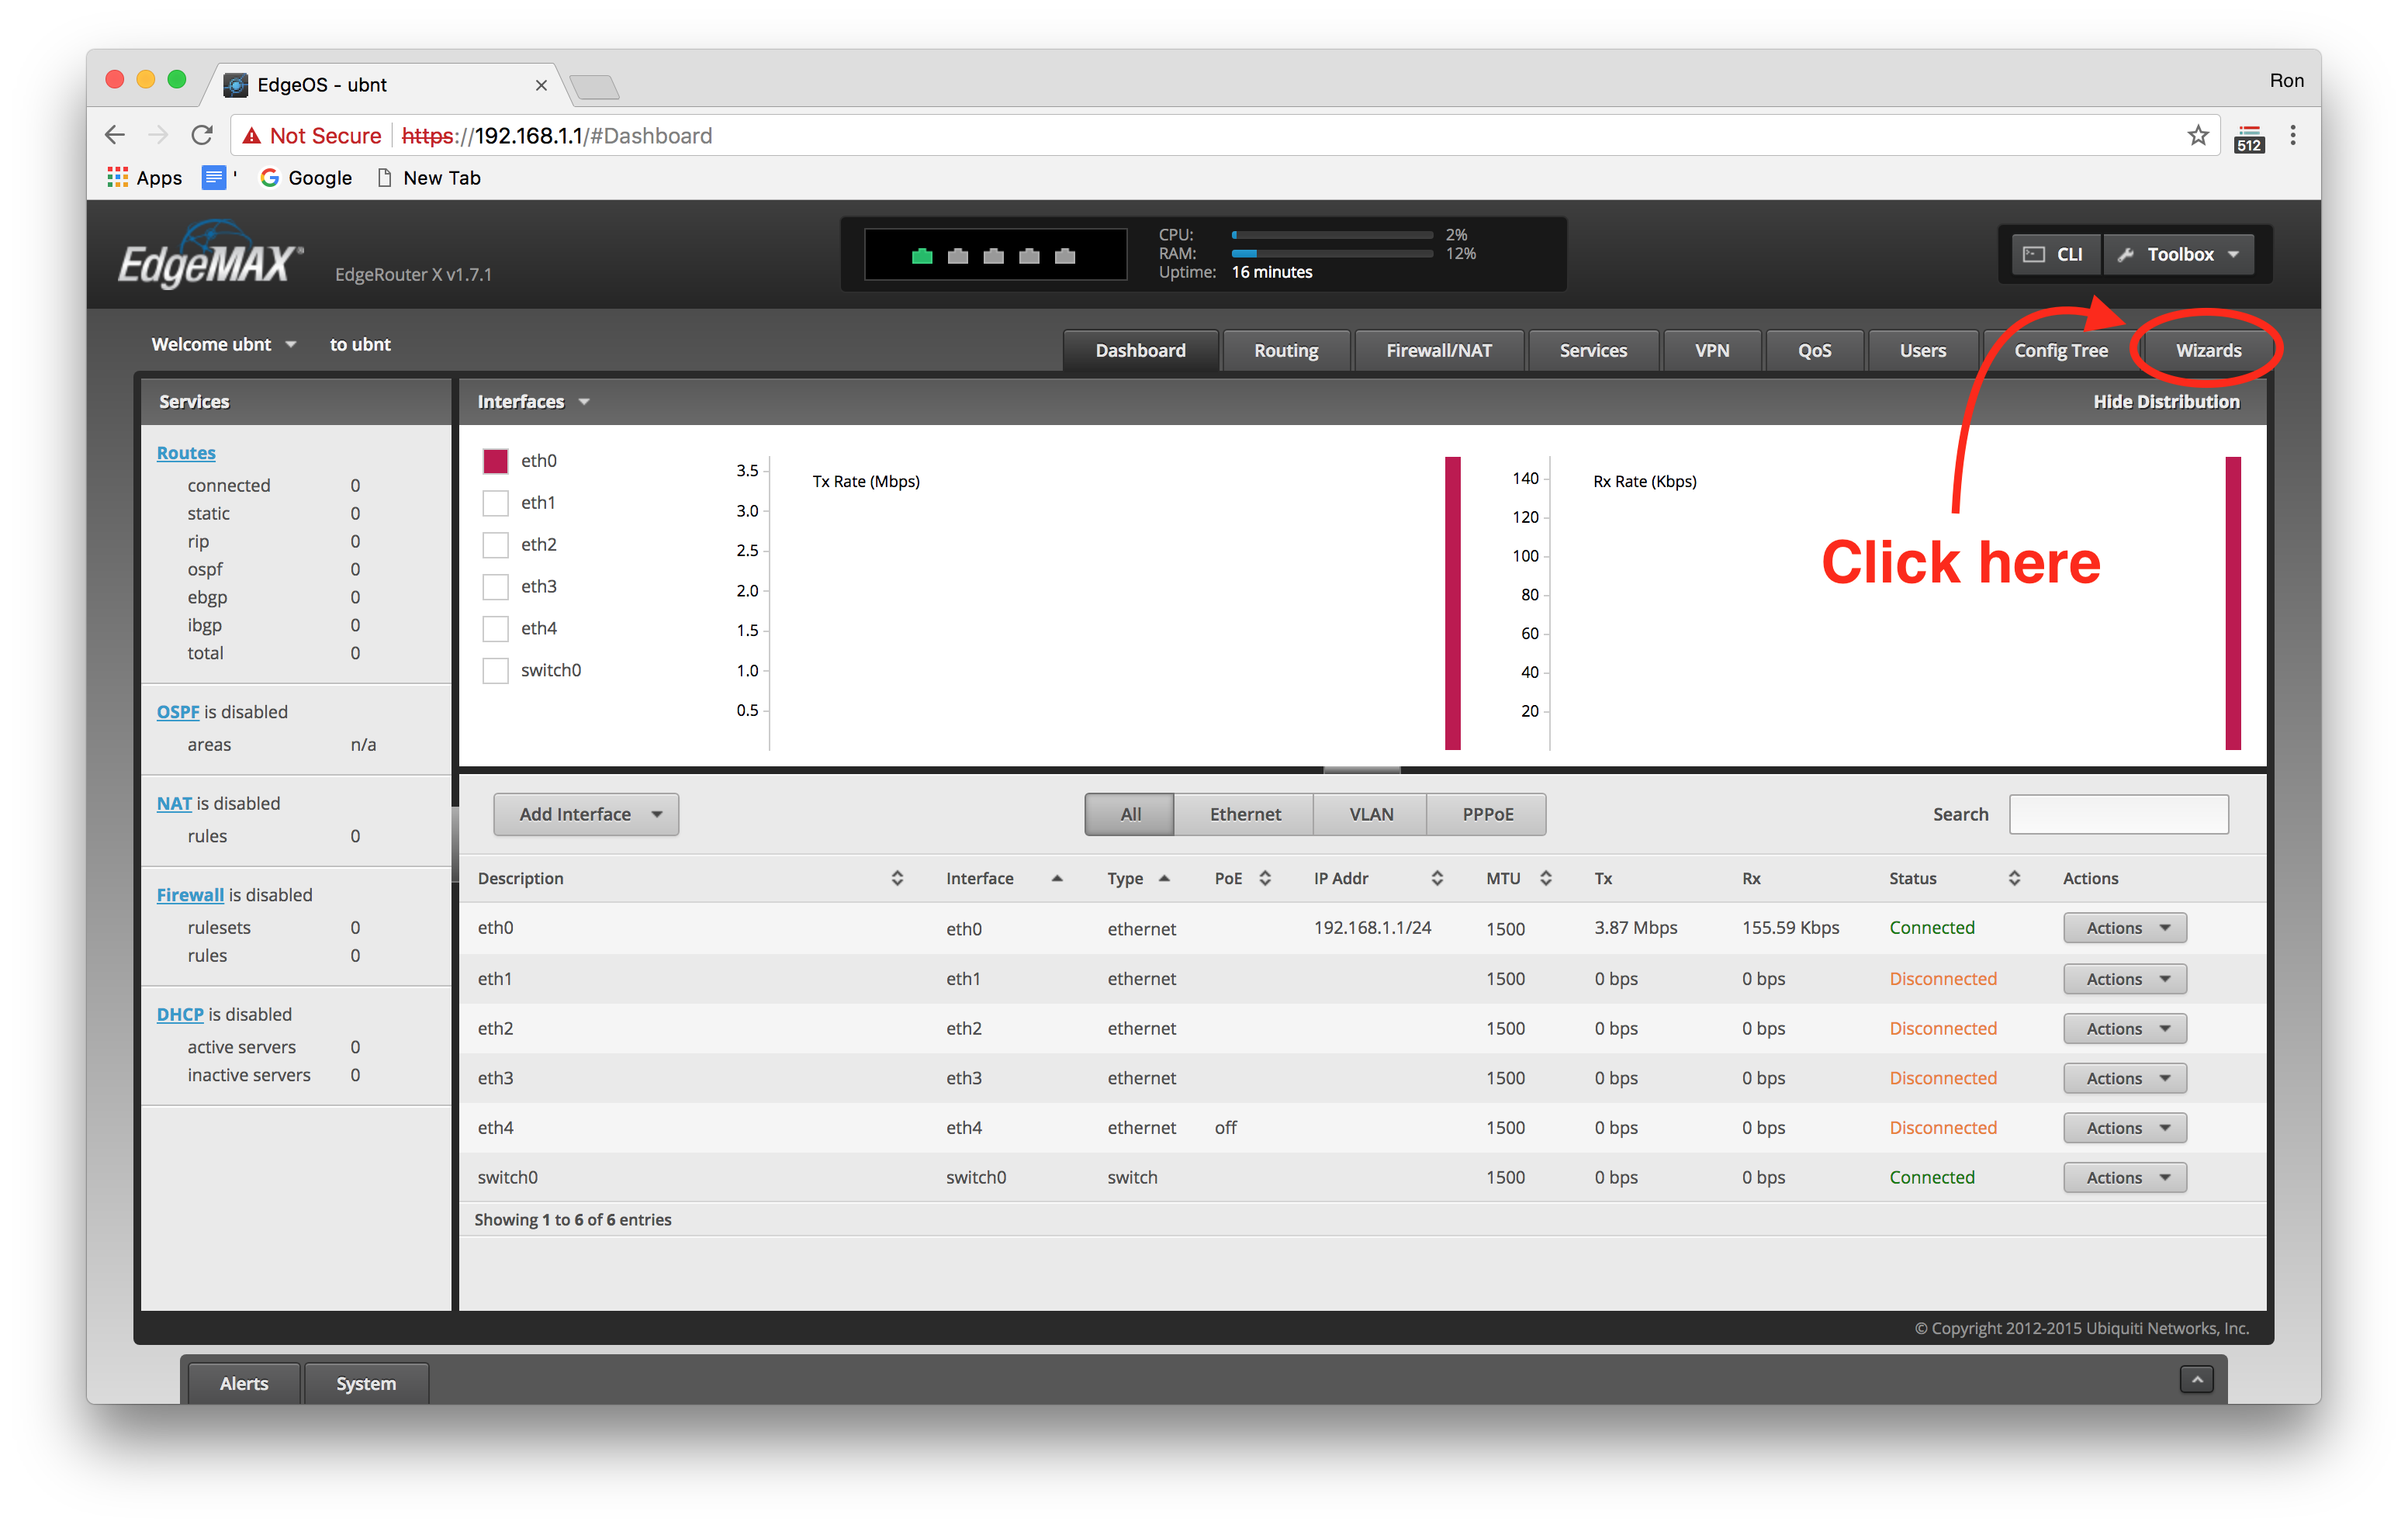
Please make sure you have read the previous section, as it is the best way to configure your router. If for some reason you have decided against this way, which is highly ill advised, then you will need to proceed with the basic configuration wizard. To begin the basic configuration, we need to click on the Wizards tab in the upper right portion of the dashboard (just below the Toolbox button):
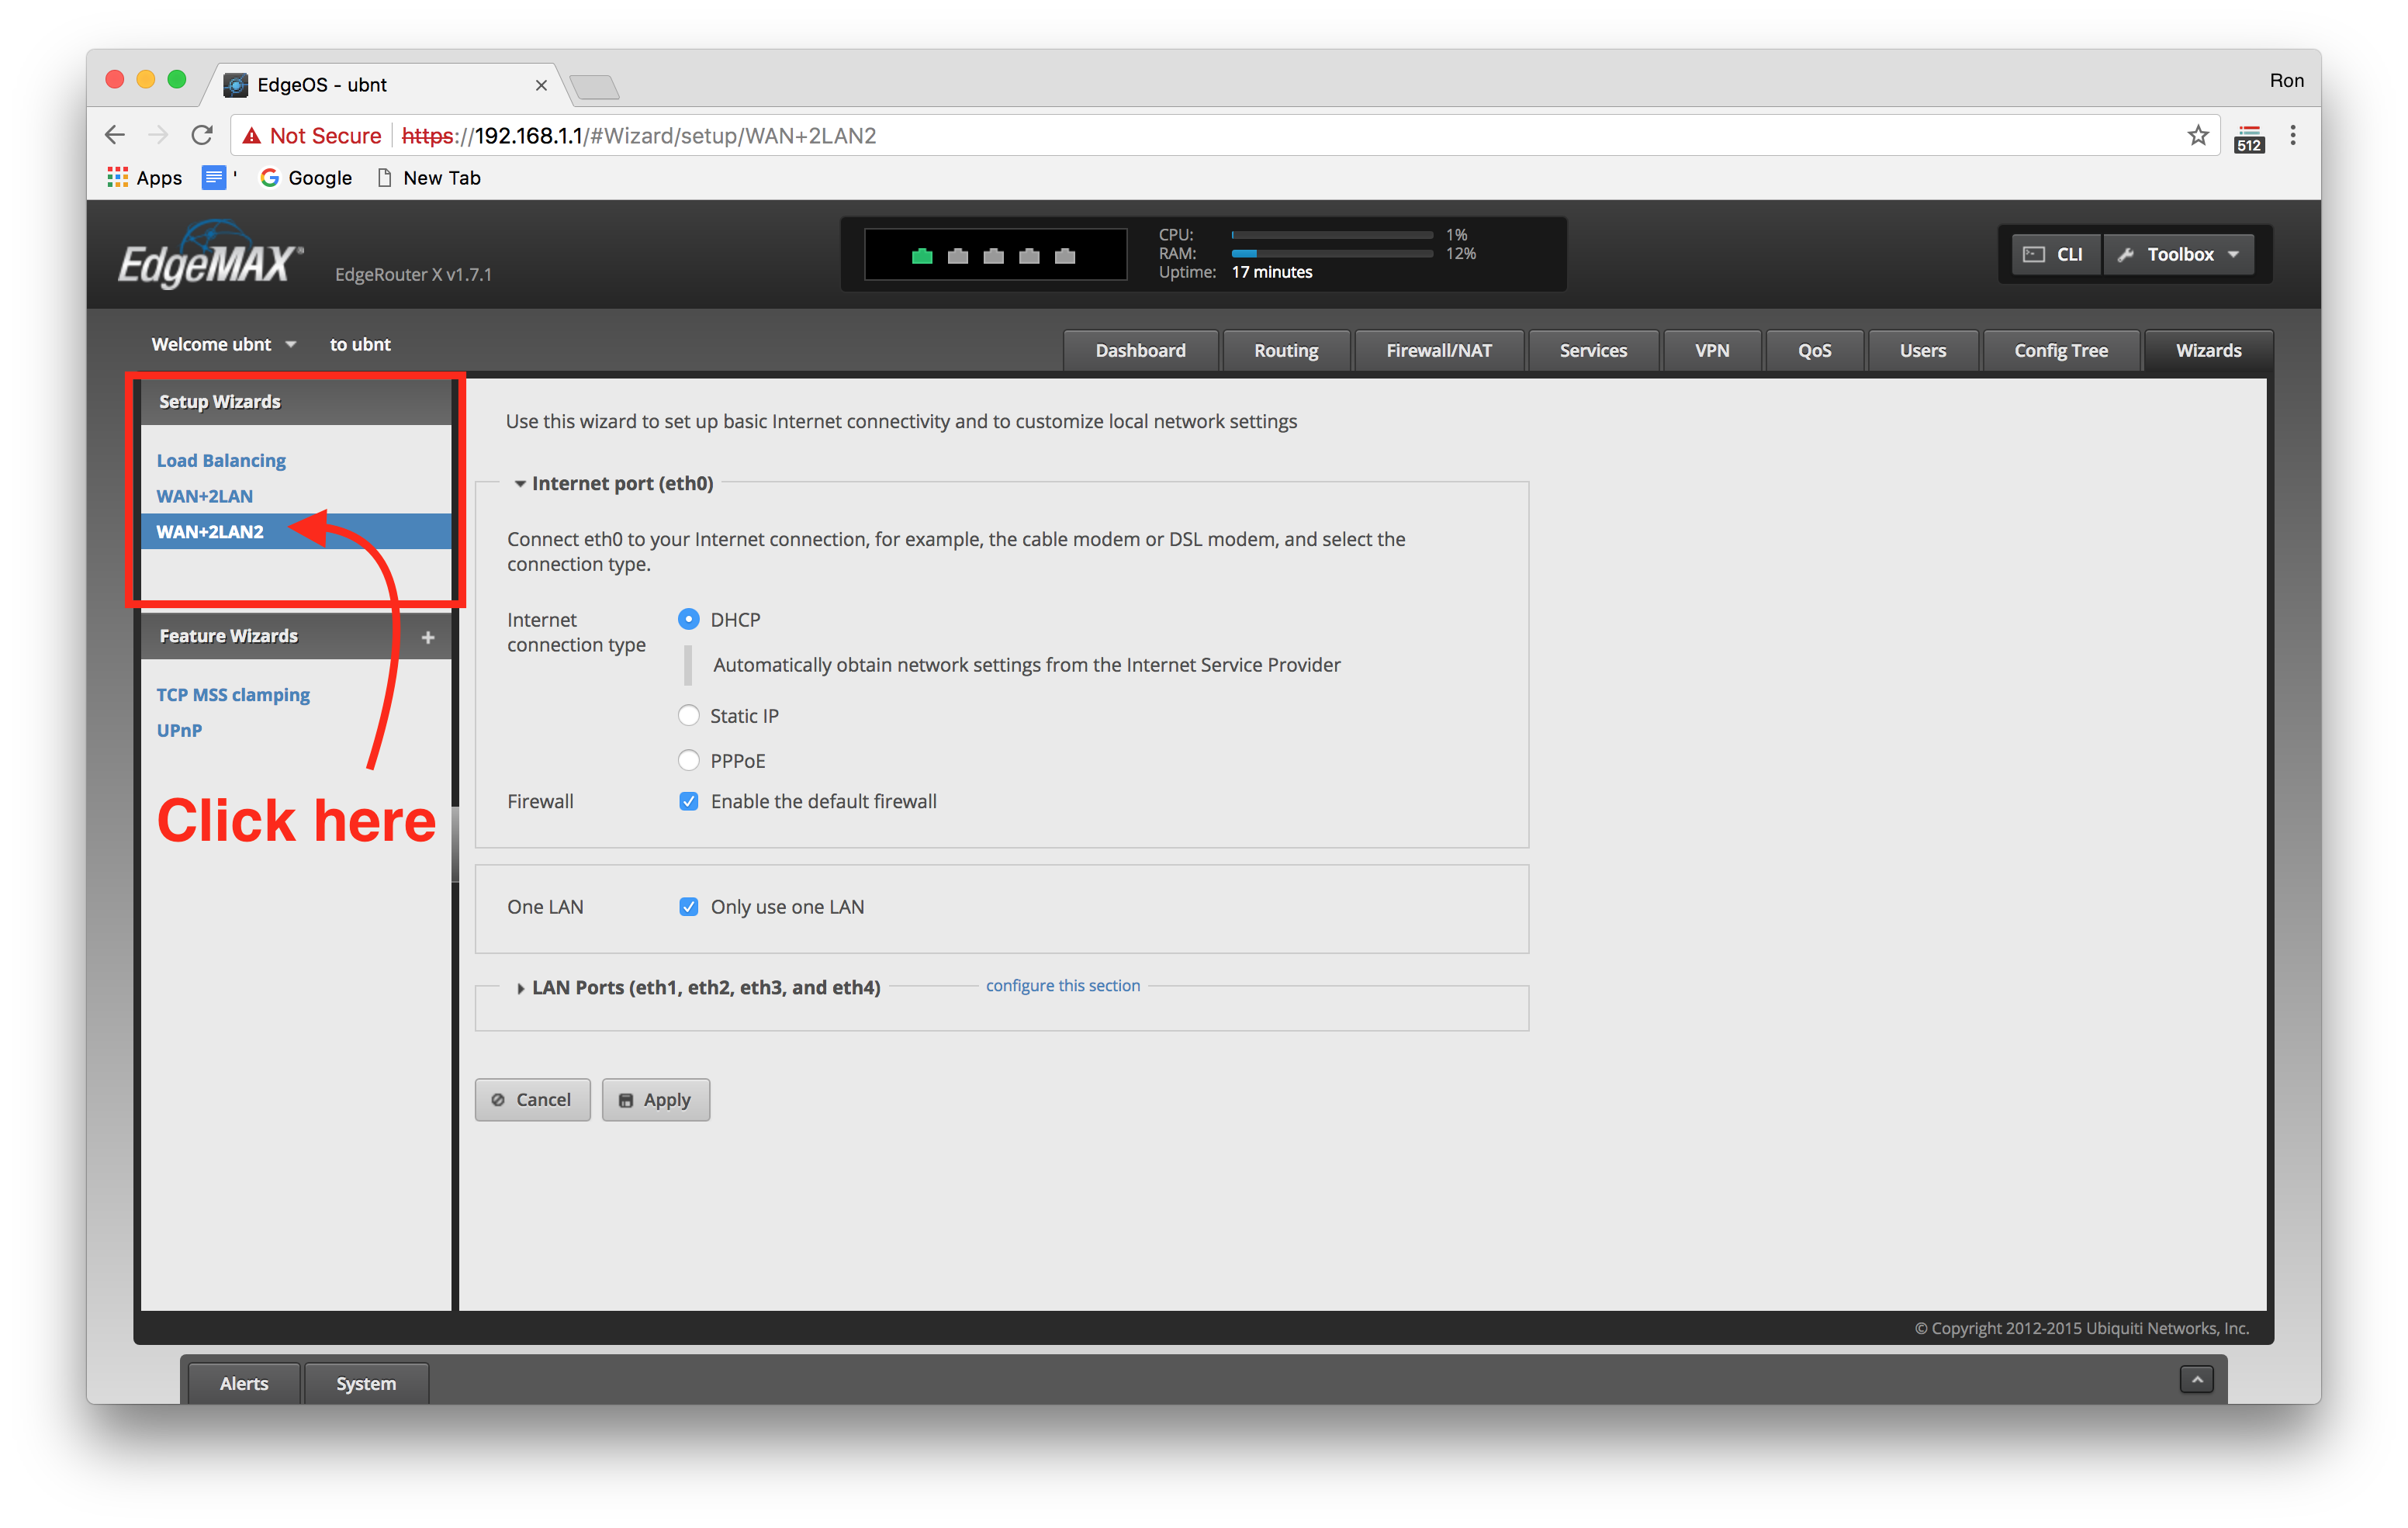
Once you are on the Wizards page, find the list of wizards on the left side, and click on WAN + 2LAN2:
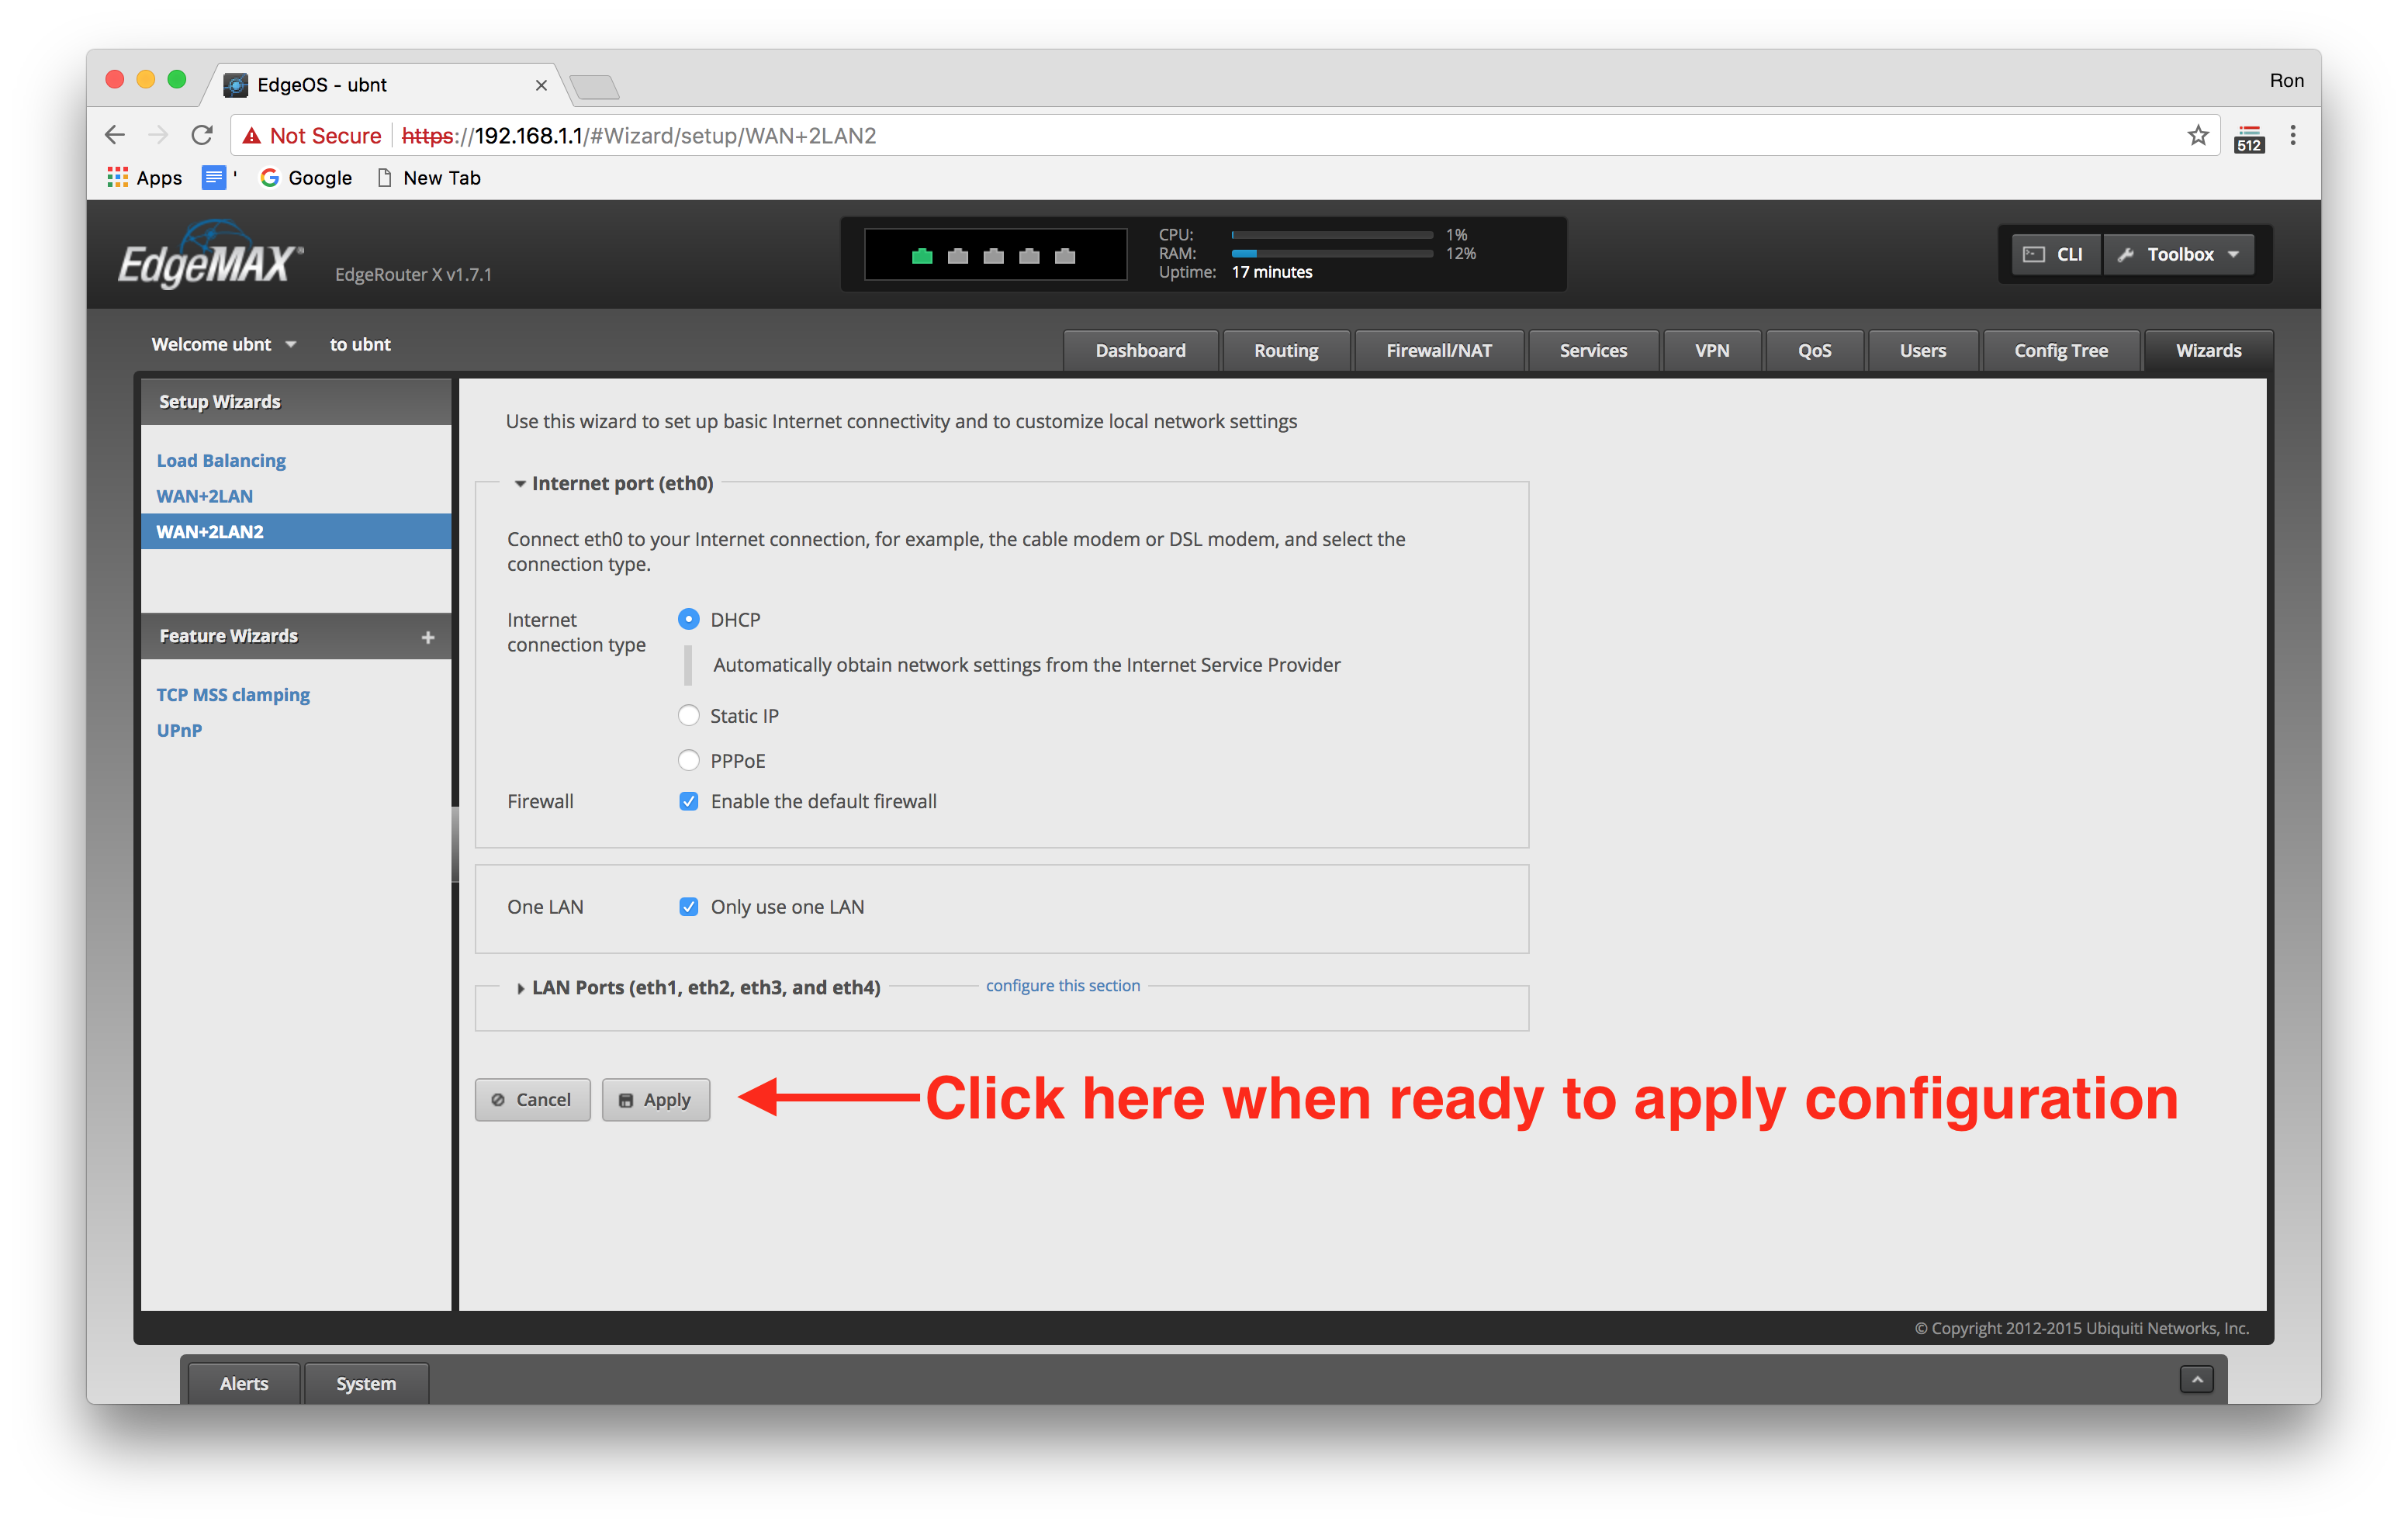
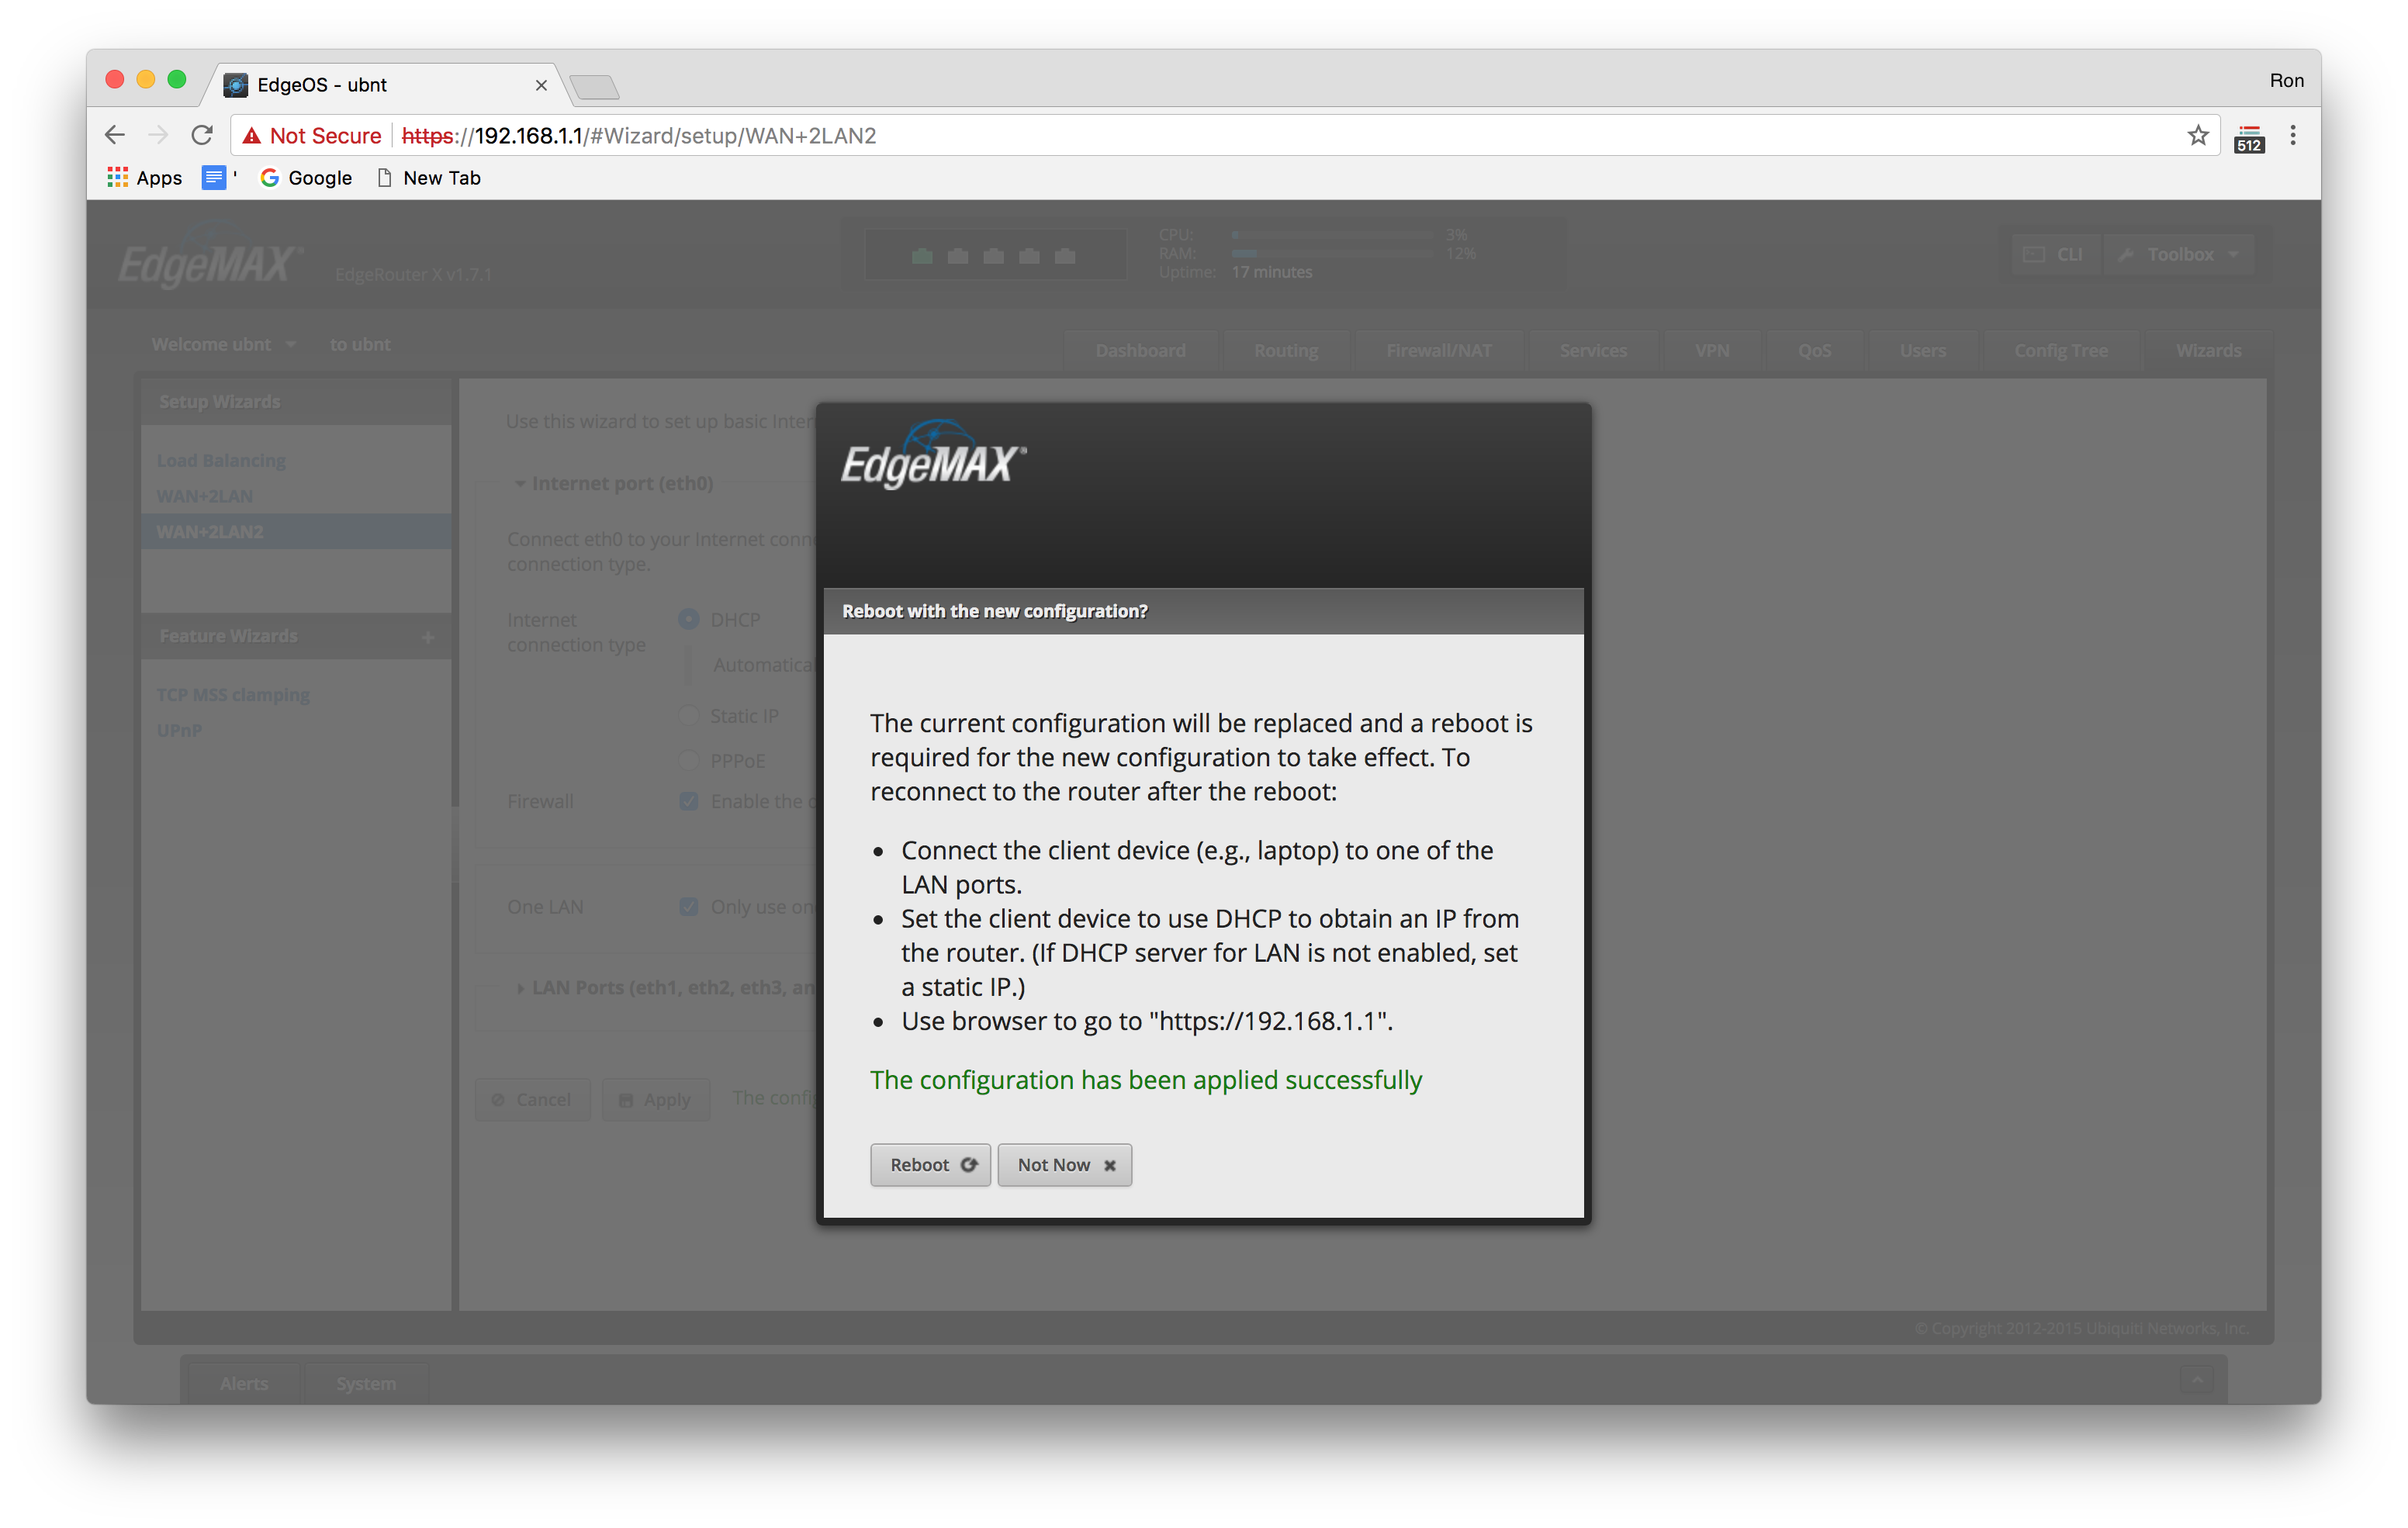
Just leave the configuration setup as is, do not change anything, and click apply to implement the configuration:
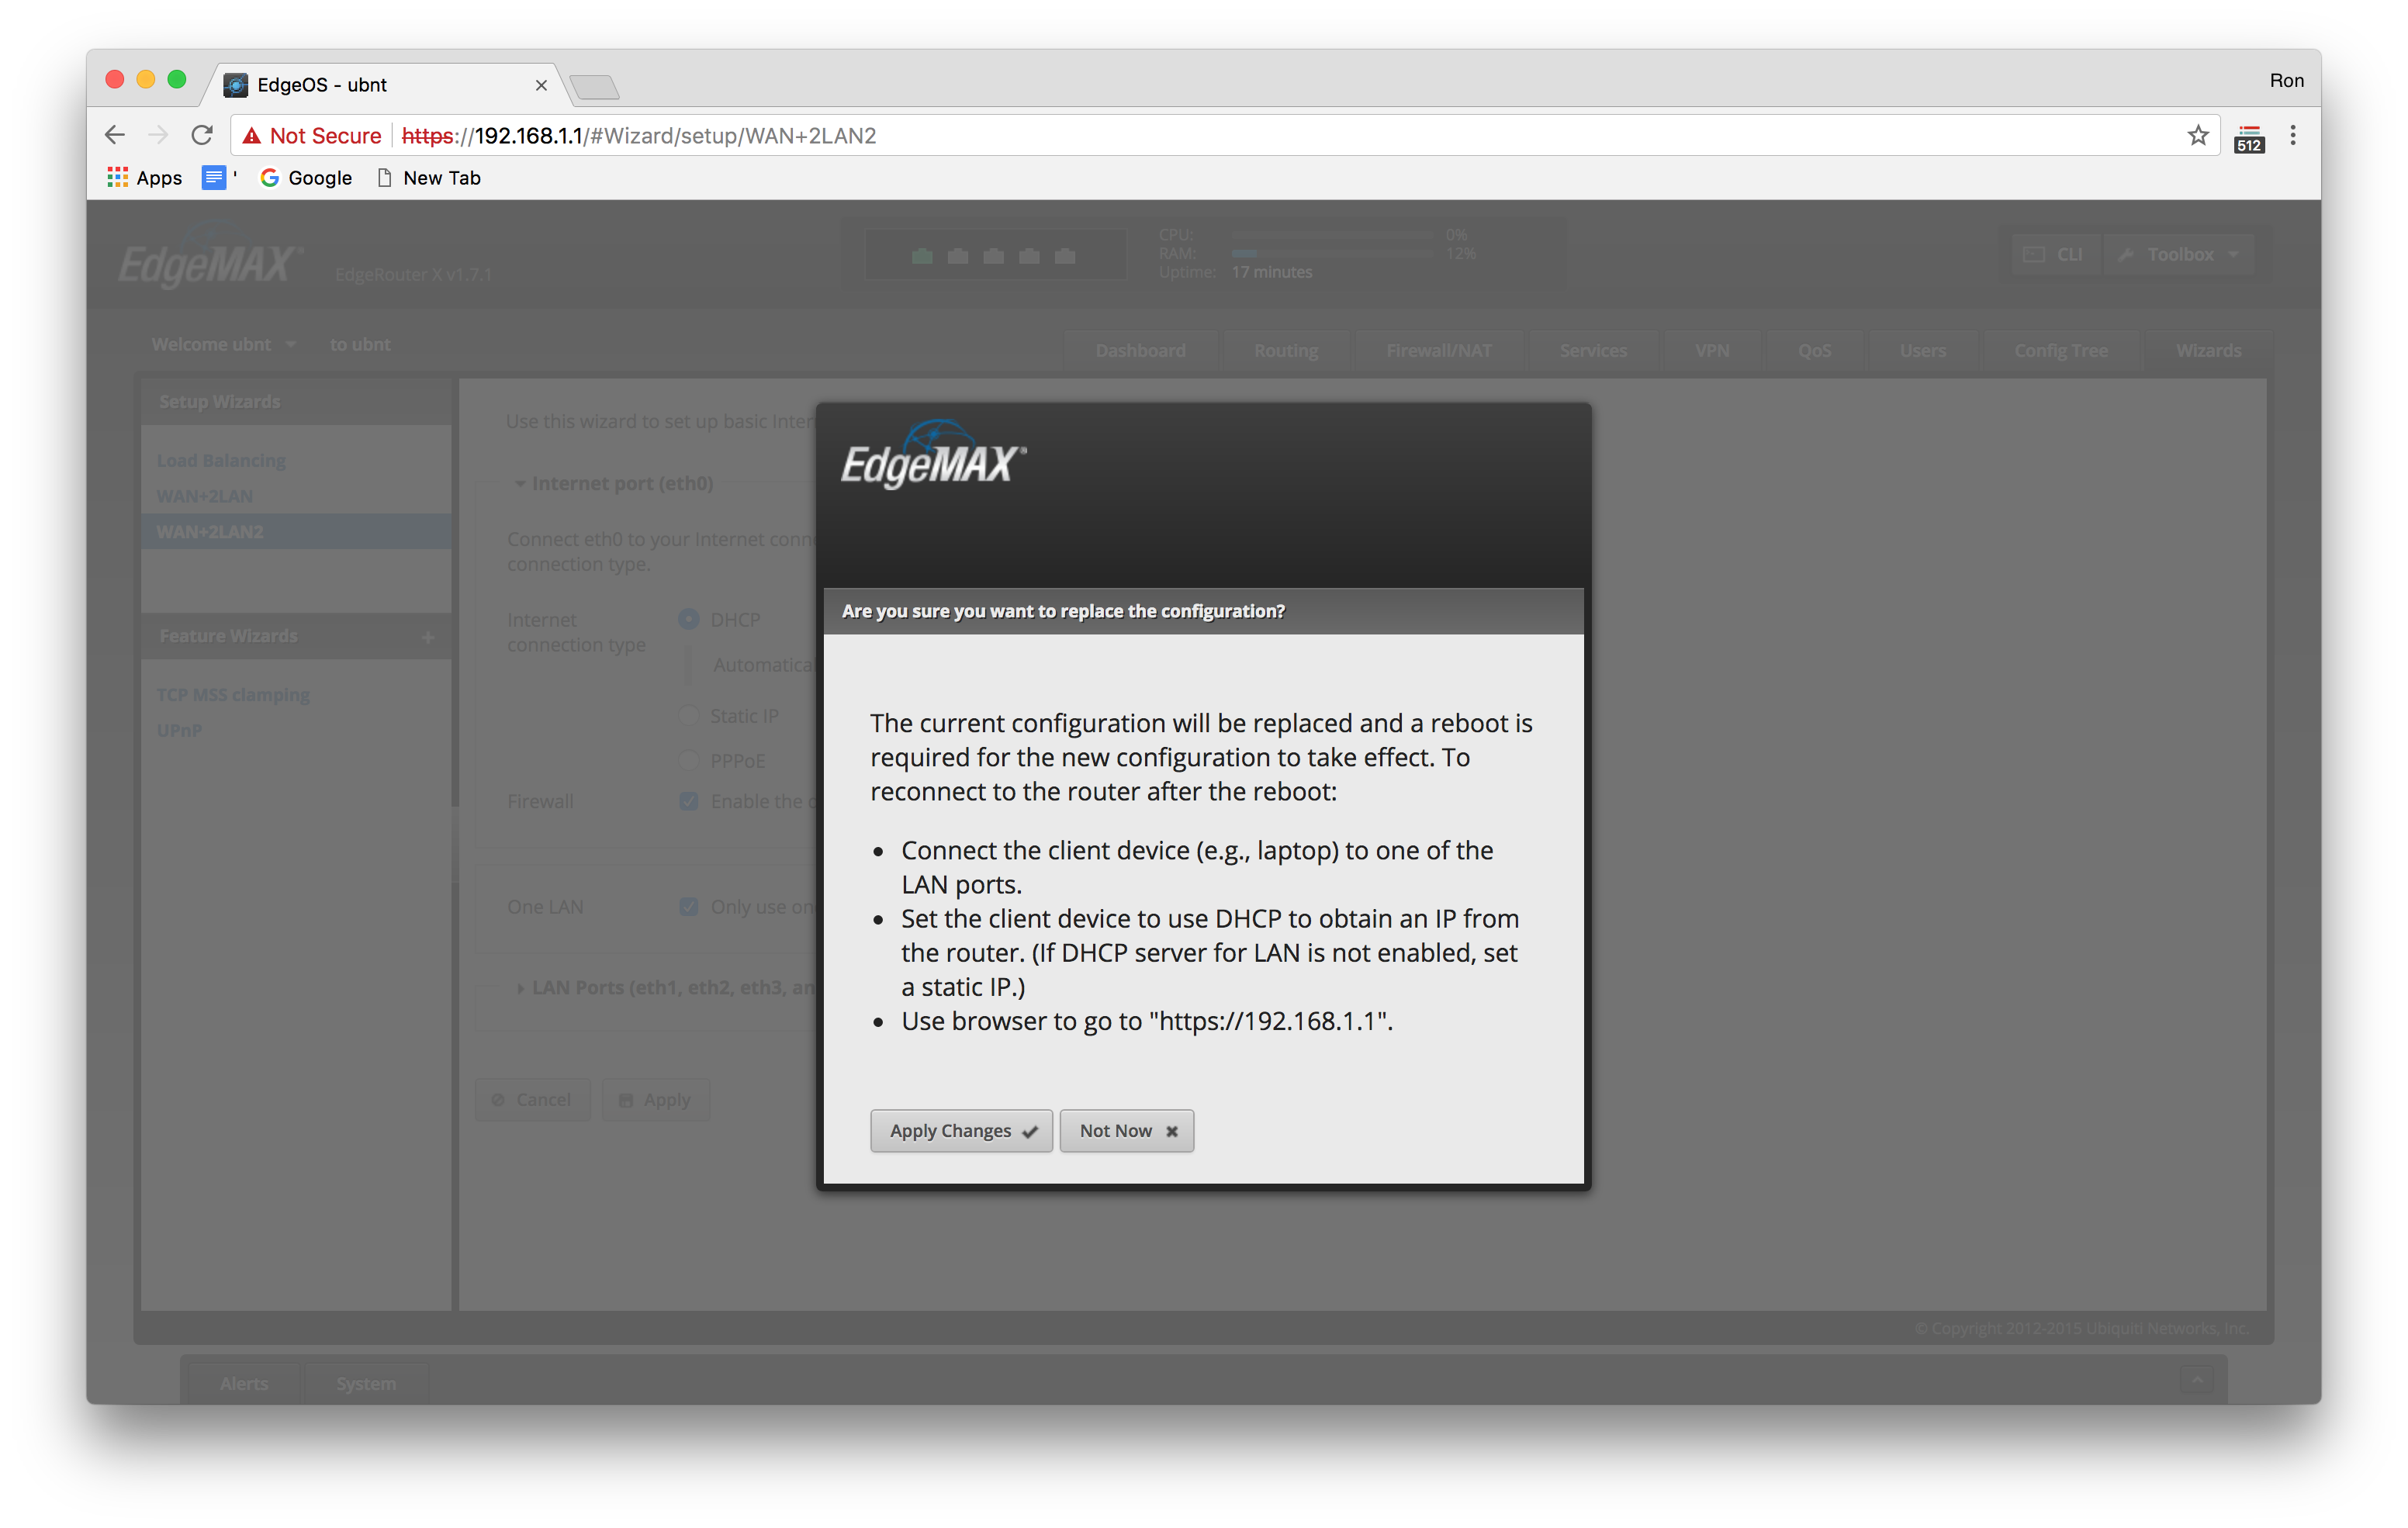
After you click apply you will see a series of prompts asking you about applying changes, and then rebooting, and then are you sure. Just click yes:

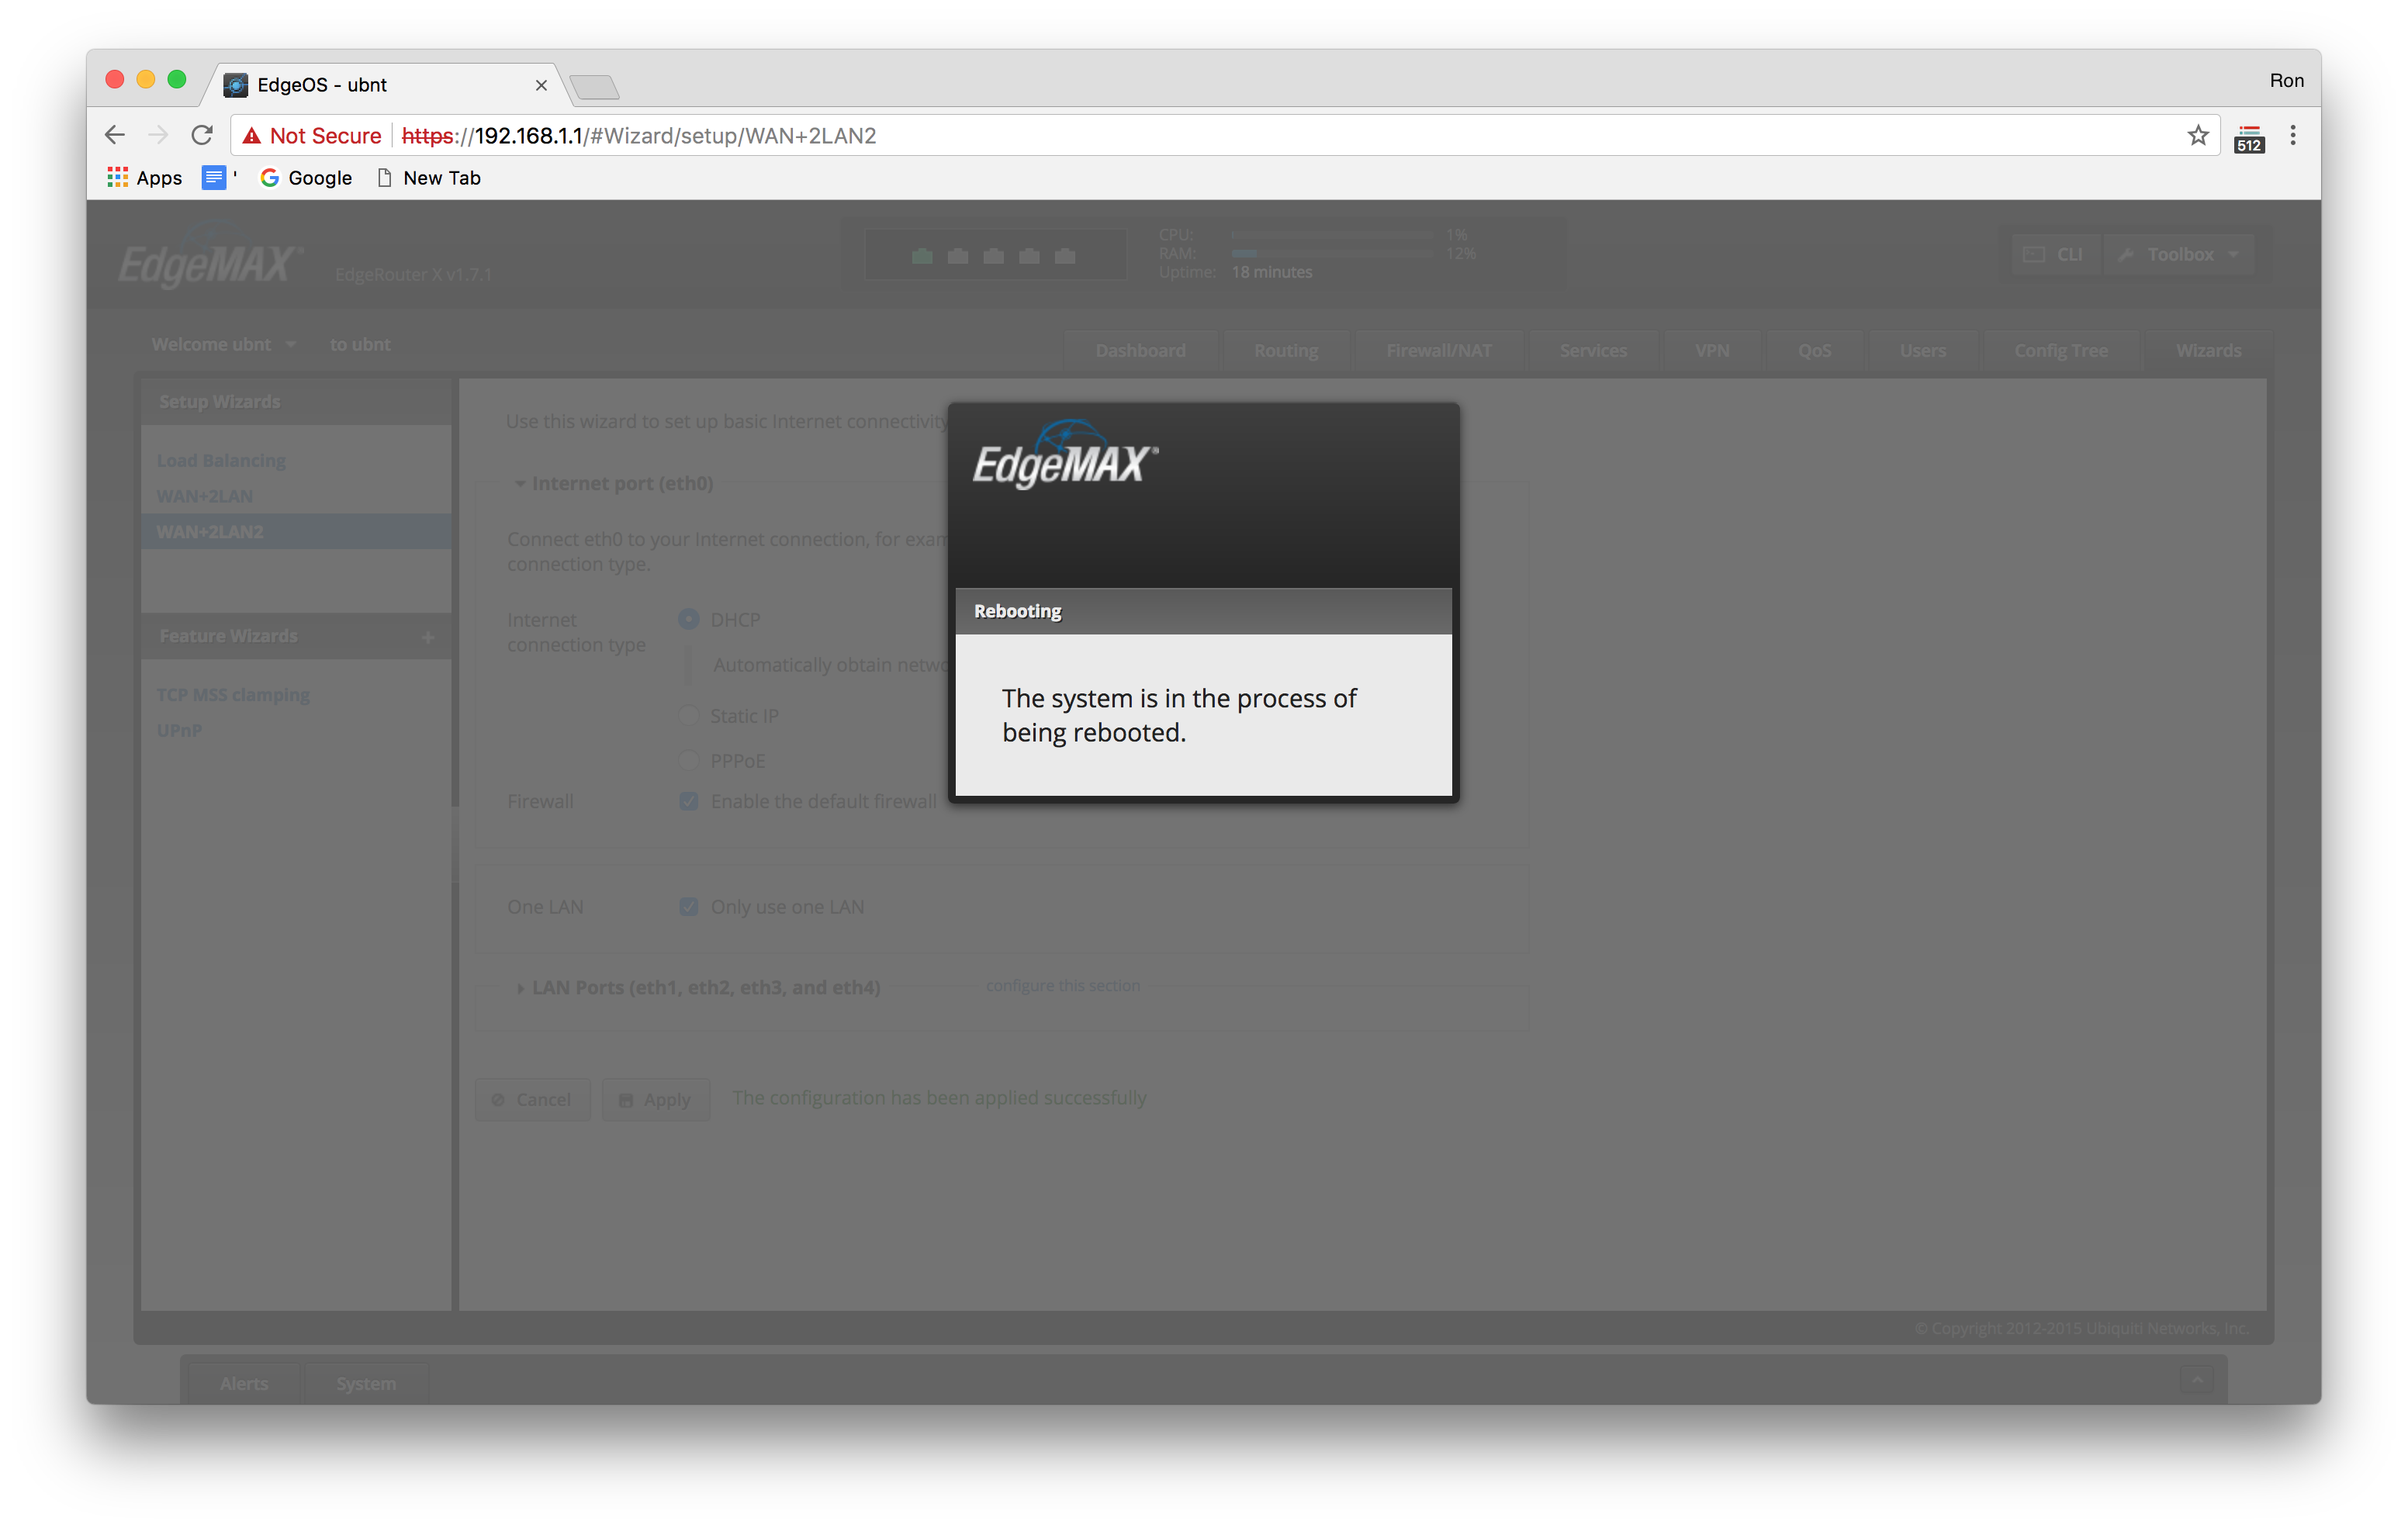
Configuration Complete
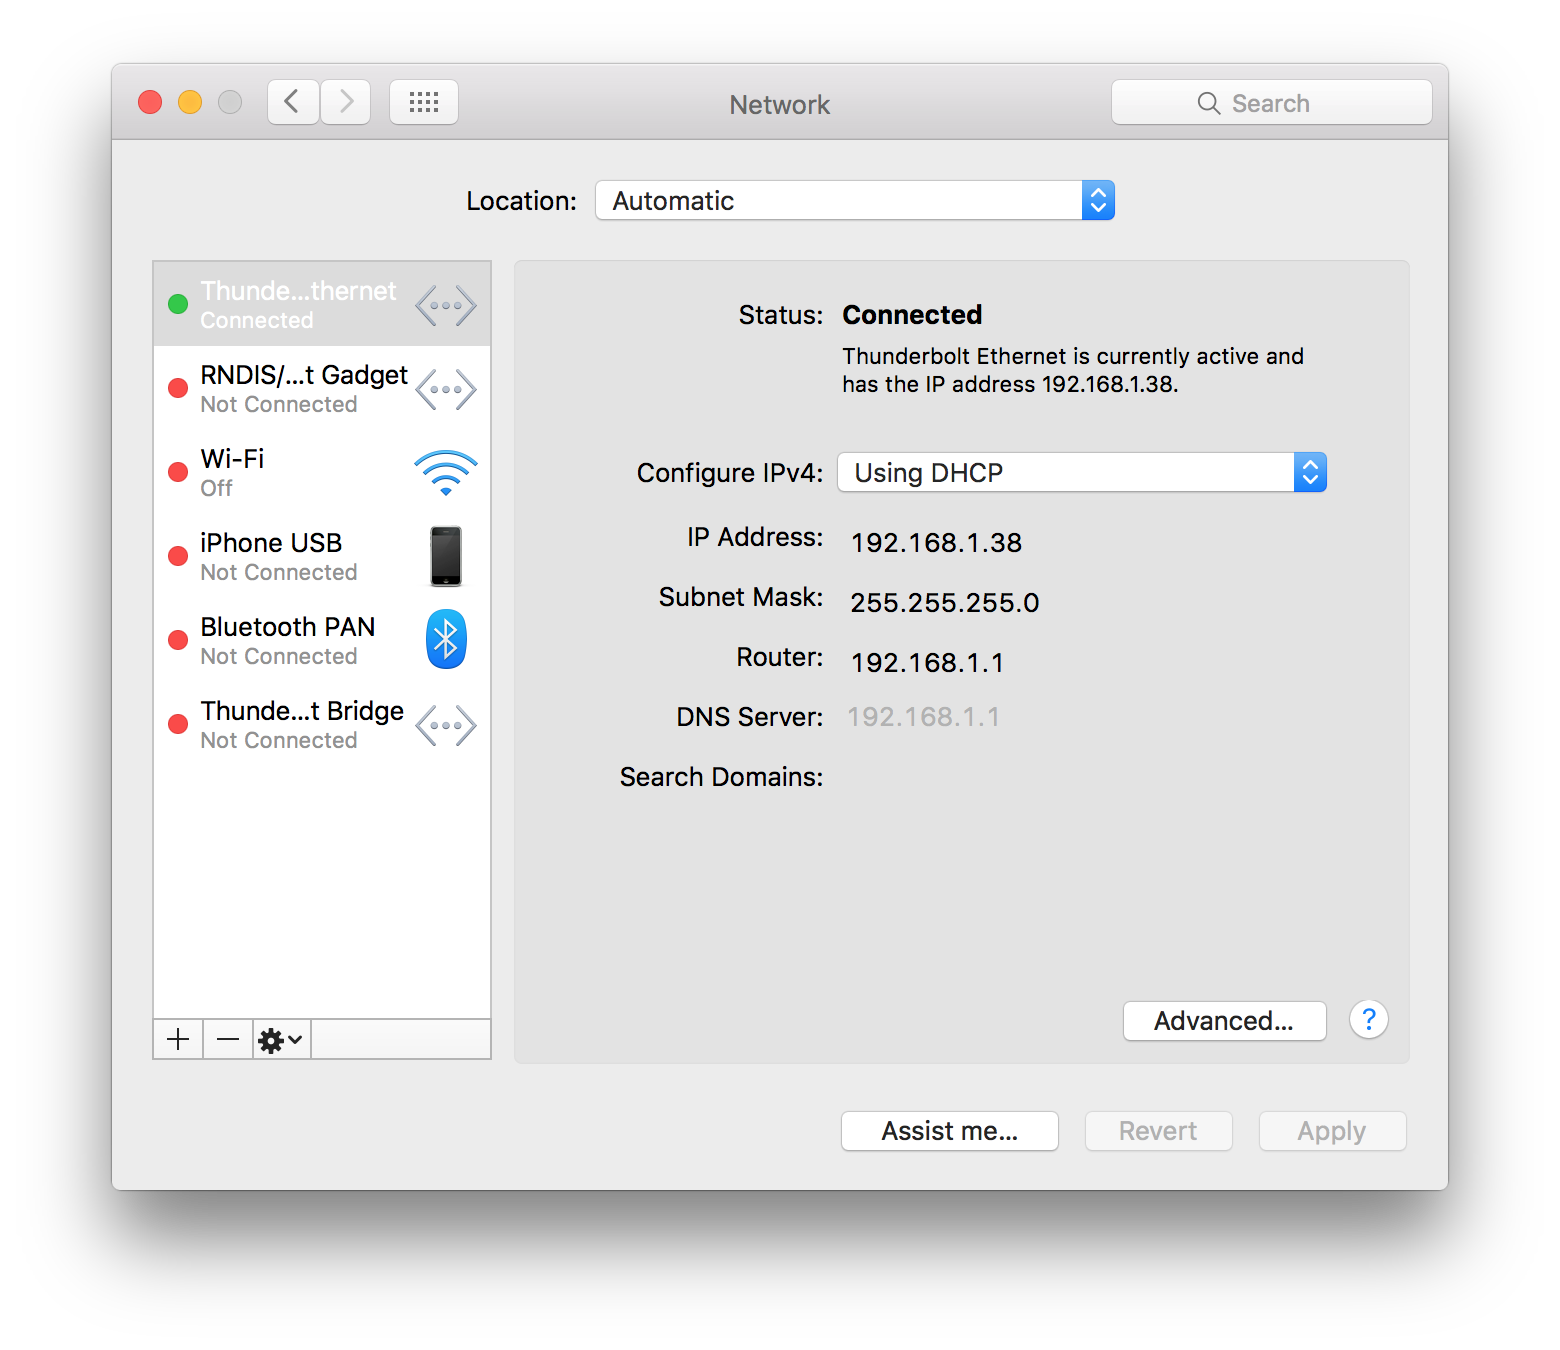
Now, the router will be rebooting, and loading the newly setup basic configuration. While it is rebooting, disconnect the ethernet cable from the router port eth0 and connect it to eth1. Open up the network preferences, find Thunderbolt Ethernet in the list on the left of the page, click on Configure IPv4, and switch it to Using DHCP like the following:
You may find that it will take a minute or two for the router to assign you an IP address. Before it looks like the above image, it may look like the following image:
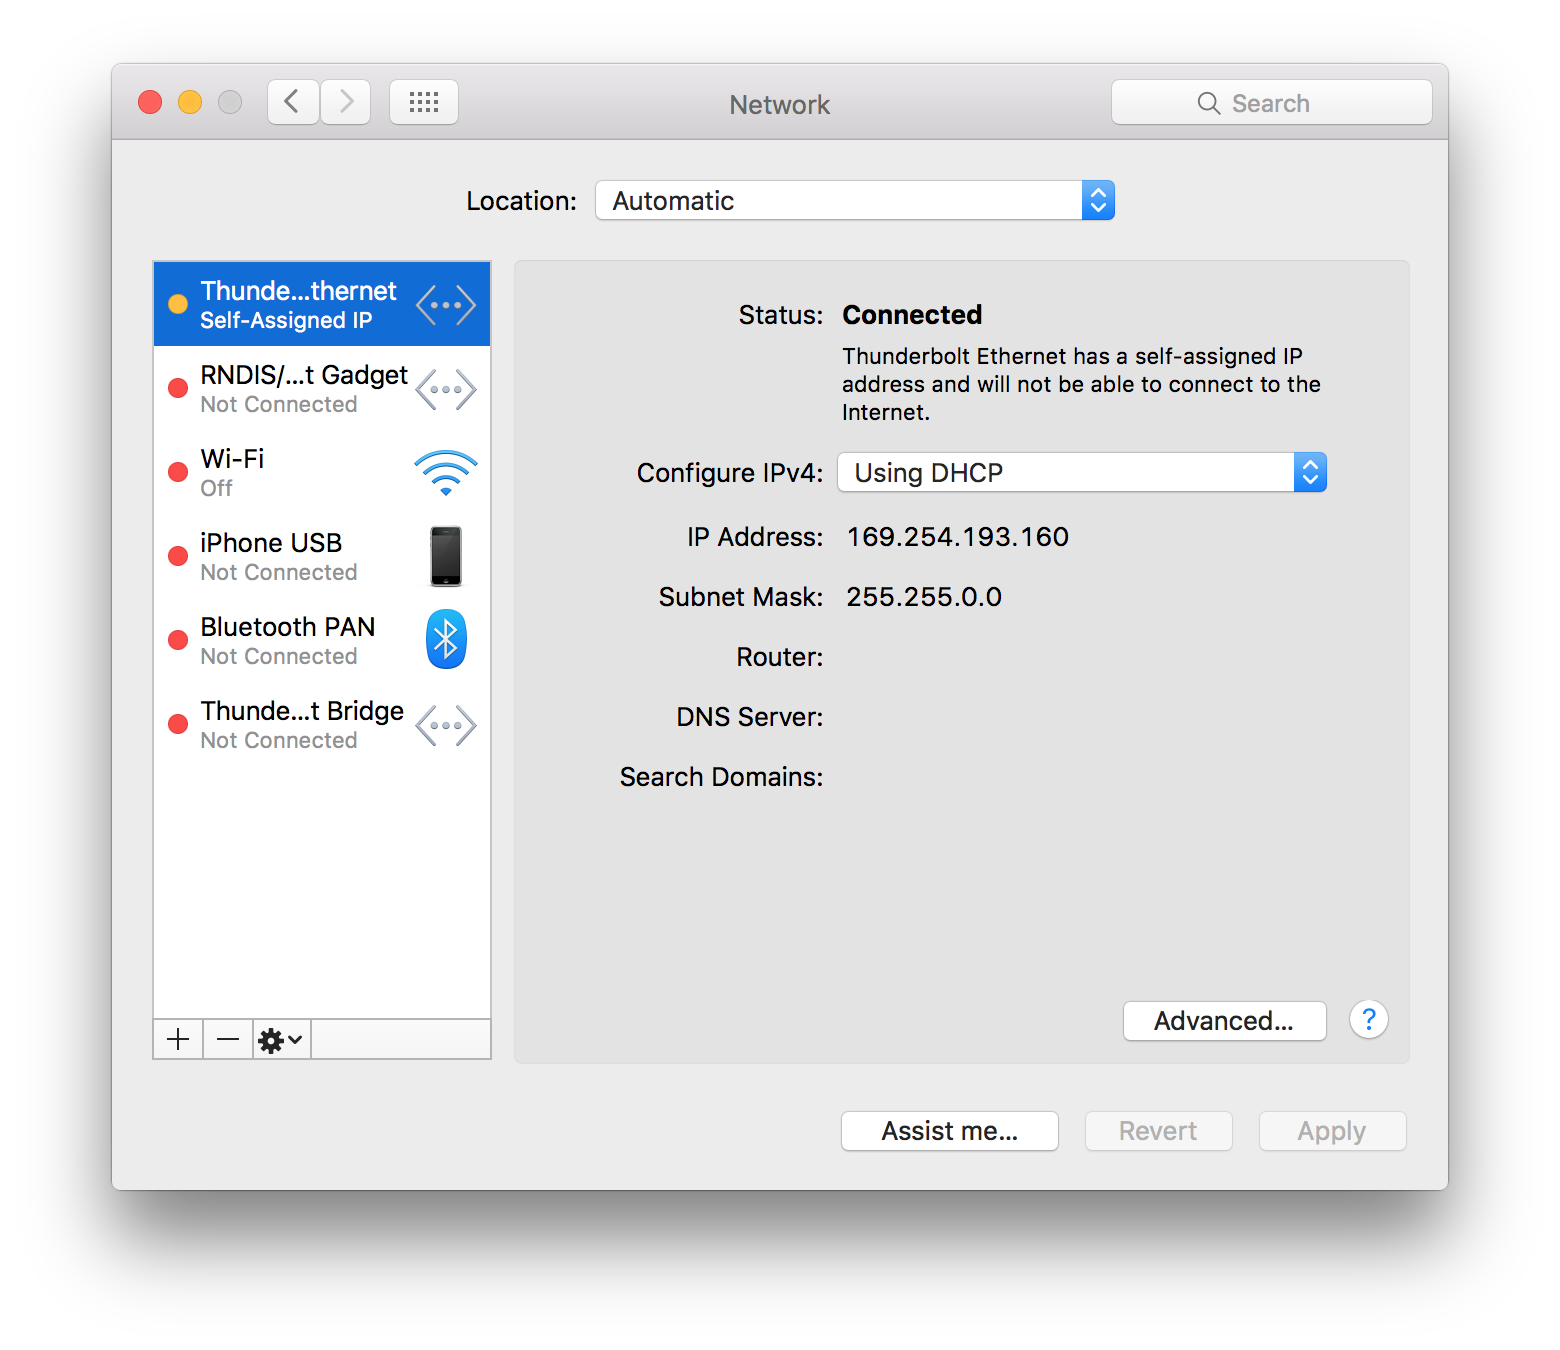
This is normal, and it may sit on this for a minute or more. Just let it work its magic. Once it looks like the following you are good to move on to the next section on Internet Access:
Internet Access
Once the router finishes booting up, it will assign you an address (here it was 192.168.1.38), and you will be on the network. From here there are two options to be aware of:
-
if you have a pre-existing network, disconnect your modem from your old router and power cycle the modem (i.e. unplug the modem, wait 30s, plug it back in)
-
if no pre-existing network, simply power up the modem
- NOTE: you must disconnect the modem completely, power cycle it, and after it boots up reconnect it to eth0 on the router. So, make sure you disconnect the modem before you power cycle or power it up. Then after it is up you can connect it to eth0 on the router.
This completes the basic configuration. (woooooooooh!!) Your network should now be working, and all the hosts connected to ports eth1-4 will be able to see and access each other. To confirm that you are connected to the internet, go ahead and test the connection from your terminal commandline as follows (ignore the “$” sign and only copy the
ping google.cominto your terminal ):$ ping google.com PING google.com (172.217.0.78): 56 data bytes 64 bytes from 172.217.0.78: icmp_seq=0 ttl=53 time=34.728 ms 64 bytes from 172.217.0.78: icmp_seq=1 ttl=53 time=34.097 ms 64 bytes from 172.217.0.78: icmp_seq=2 ttl=53 time=32.616 ms 64 bytes from 172.217.0.78: icmp_seq=3 ttl=53 time=33.569 ms 64 bytes from 172.217.0.78: icmp_seq=4 ttl=53 time=34.591 ms --- google.com ping statistics --- 5 packets transmitted, 5 packets received, 0.0% packet loss round-trip min/avg/max/stddev = 32.616/33.920/34.728/0.769 msWhat this does is send a
PINGpacket to Google’s servers at google.com. First your router needs to resolve the domain name “google.com” which it does as you can see in parentheses above (172.217.0.78). Then it sends packets to the server to test if it can route. If you get something similar to the above, you are good to go, your router is connected to the internet and resolving domain names successfully.Pull up the EdgeOS dashboard at
192.168.1.1and you should see something like this: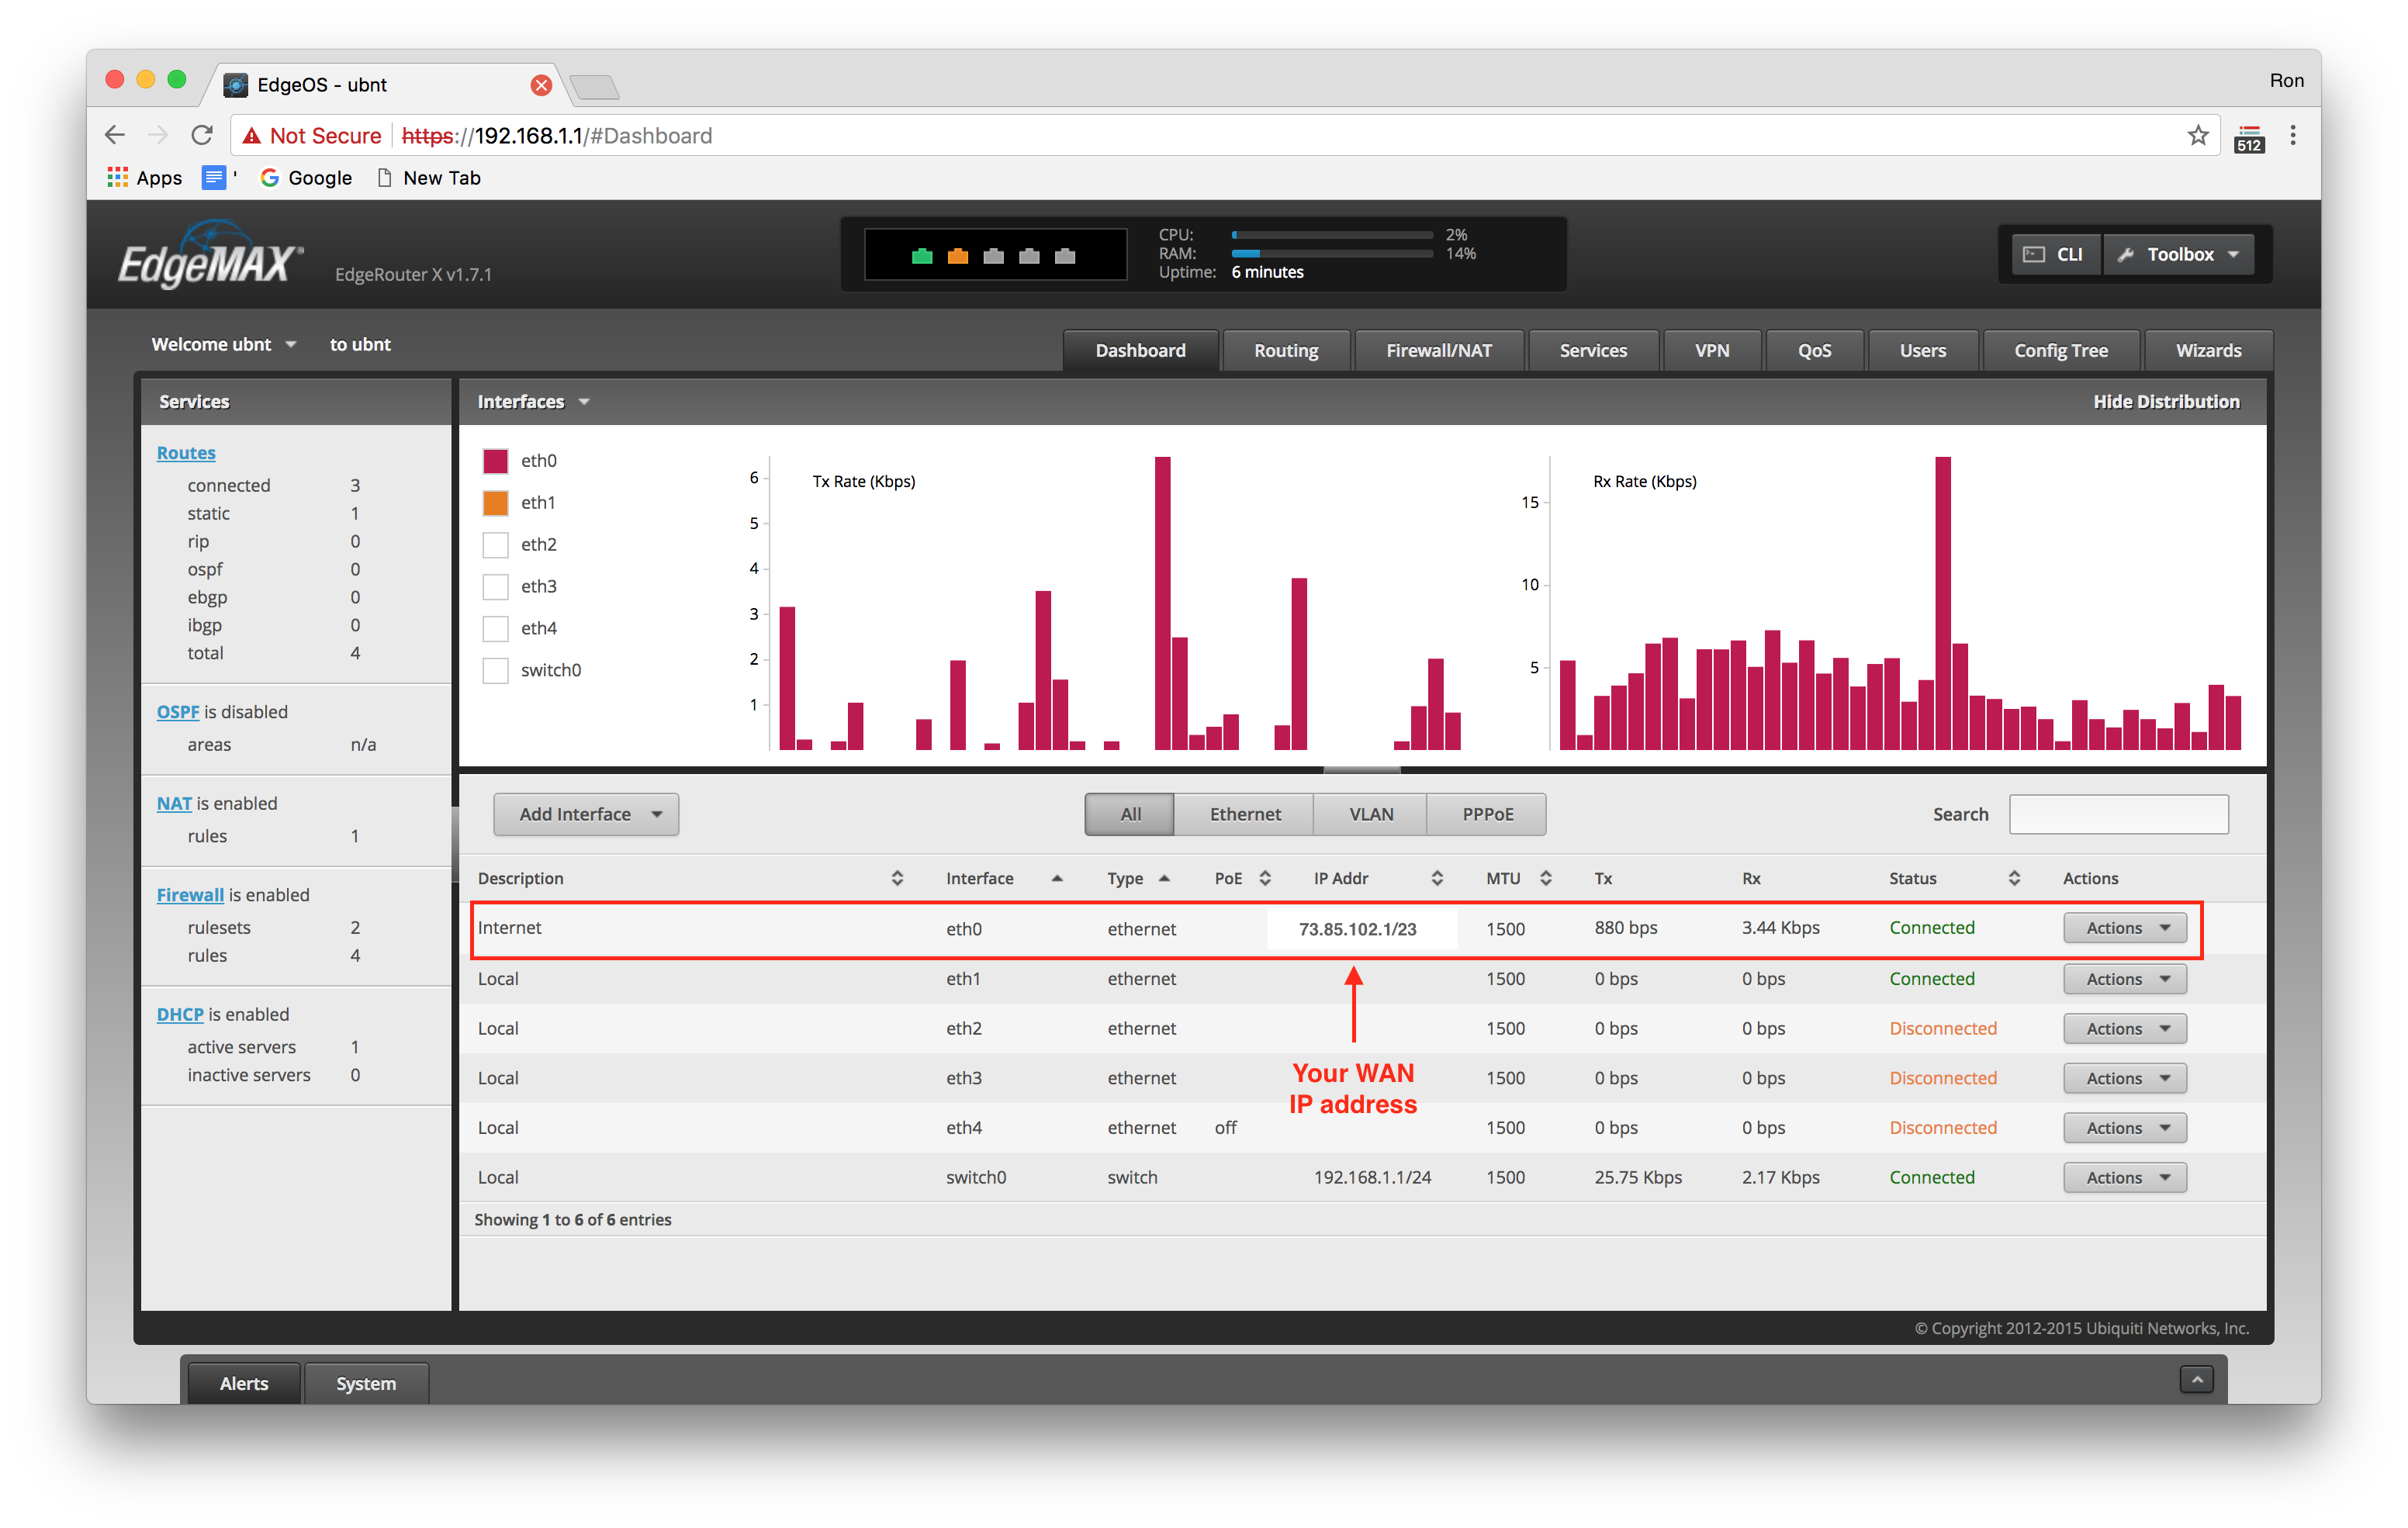
Notice how there is an IP address for eth0. This is your router’s address on the WAN (i.e. internet). Again, this confirms the router and modem have successfully established a connection, and your internet access is open.
To be clear, this is only the most basic configuration that allows you to use eth0 as the internet source, and eth1-4 as your LAN switch. But you may want to continue to configure your network (most likely to add an access point for wireless internet). From here there are some options:
-
continue with the network setup by configuring a wireless access point (see our guide6)
-
begin configuring a more advanced setup. The latter will be covered in the next section
Advanced Configurations
Here we will cover some of the basic advanced configuration features and options. Some will be related to security, others to port forwarding, performance, etc …
Port Forwarding
Port forwarding is a very common feature to setup on a router. This whole topic has been written at length about in another post on this website that can be found here:
Ubiquiti EdgeRouter Configuration: DHCP Reservation and Port Forwarding
Adding/Removing Users
It’s almost trivial to add or delete users. The below command line snippets show the process.
Adding: First login, type the configure command, and then type a series of commands with arguments as follows (NOTE: this example assumes that zerocool is still your default username):
$ ssh zerocool@192.168.1.1
Welcome to EdgeOS

By logging in, accessing, or using the Ubiquiti product, you
acknowledge that you have read and understood the Ubiquiti
License Agreement (available in the Web UI at, by default,
http://192.168.1.1) and agree to be bound by its terms.

zerocool@192.168.1.1's password: hack the planet
Linux erx001 3.10.107-UBNT #1 SMP Mon Mar 5 18:53:35 UTC 2018 mips
Welcome to EdgeOS
Last login: Tue Jun 12 17:17:40 2018 from 192.168.1.42
zerocool@erx001:~$ configure
zerocool@erx001# set system login user crashoverride authentication plaintext-password
'mess with the best die like the rest'
zerocool@erx001# commit
zerocool@erx001# save
zerocool@erx001# exit
zerocool@erx001:~$ exit
To recap what we did: we logged into the router using the username
zerocooland passwordhack the planet, followed by theconfigurecommand, followed by theset system login usercommand where we created a new user namedcrashoverridewith passwordmess with the best die like the rest(notice the single quotes around the password), followed by thecommitcommand, thesavecommand, and finallyexittwice to logout of the router completely.Just switch out
crashoverridefor whatever username you want and change the passwordmess with the best die like the restto whatever password you want (remember to surround it with single quotes!!!). Then commit, save, and exit. You will now have a new user.Deleting: Just like adding a user, we must first login (NOTE: this example assumes that zerocool is still your default username):
$ ssh zerocool@192.168.1.1
Welcome to EdgeOS

By logging in, accessing, or using the Ubiquiti product, you
acknowledge that you have read and understood the Ubiquiti
License Agreement (available in the Web UI at, by default,
http://192.168.1.1) and agree to be bound by its terms.

zerocool@192.168.1.1's password: hack the planet
Linux erx001 3.10.107-UBNT #1 SMP Mon Mar 5 18:53:35 UTC 2018 mips
Welcome to EdgeOS
Last login: Tue Jun 12 17:17:40 2018 from 192.168.1.42
zerocool@erx001:~$ configure
zerocool@erx001# delete system user crashoverride
zerocool@erx001# commit
zerocool@erx001# save
zerocool@erx001# exit
zerocool@erx001:~$ exit
This is trivial in comparison to adding a user. In this case you only need to replace
crashoverridewith whatever username on your router you want to delete!References